User Manual
Console 1 Channel Mk III
Foreword
First Time with Console 1
Installation
The Three Parts of Console 1
The Console 1 Workflow
Your First Session
Menus
What's New in Mk III?
Nine Sections with Dual Center Sections
More Control
The New Knobs... Oh my
The Sound
Features and Improvements
Hardware User Interface
General Workflow
Fast Workflow
Scroll/OK/Cancel
More Is More
Dual Section's "On" Buttons
Using Menus
Quick Select
Global Functionality
Display
Favorites
Mark Plug-ins as Favorites
Track Selectors
Undo/Redo and A/B/C/D
Group/All
Copy
Presets
Default Preset
Settings
Function Mode
Bypass
Shift button
The Sections of Console 1
Load Strip/Section
Change Order
Ext. S/C To
Tape/Preamp
Filter
Shape
Equalizer
Compressor
Drive
Output
Solo Safe
Hardware Displays
On-Screen Display Overview
Switching between the Dual Sections
Shift Parameters
Input Section
Input Meter
Filter
Preamp/Tape
Shape,EQ and Compressor Sections
Output Section
The Section Overview
Output Meter
Drive Section
Output Controls
Meter Bridge
Window Footer
Track Overview Mode
Plug-in User Interface
Resizing
Sections
Filters To... and Ext. S/C To
Integrated DAW Control
Metering with DAW Control
Disabling DAW Control
DAW Control for Logic Pro
Introduction for Visually Impaired
Front Panel
Rear Panel
Screen Reader Functions
Special Screen Reader Functionality
Training Mode
Apollo Central Mode
How to switch to Apollo Central Mode
Features at a Glance
Insert a Plug-in
Load a Preset
Tweak
Send to Auxes
The On-Screen Display
Header
Selecting Tracks and Inserts
Basic Mixing ("Channel View")
Sends
Preamp Settings
Unison Preamps
Controlling Track Parameters
Controlling Plug-ins ("Insert View")
Quick Access to Channel Settings
Loading Plug-ins
Loading Presets
Specifications
Related manuals
Console 1 Fader
Core Mixing Suite
American Class A
British Class A
Chandler Limited® Zener-Bender
Empirical Labs Trak Pak
Solid State Logic SL 4000 E
Solid State Logic XL 9000 K
Summit Audio Grand Channel
Weiss Gambit Series
Foreword
Console 1 is our dream console. It’s our way to create the best in-the-box mixing experience possible, something that feels like working on a large format console, but without the problems that arise when you don’t have access to all the digital features that a modern producer/mixer needs.
Hardware is a crucial part of this. Moving a mouse on screen is not the same as turning a knob and hearing the result, simply because the latter doesn’t require your eyes to be involved. And as soon as the eyes want your attention, listening will lose focus. (Have you ever closed your eyes when you wanted to focus on a mix?)
Sound quality is essential. Can you achieve the results you need? If you don’t trust your tools, you lose the flow. We included a brand-new channel strip, the Core Mixing Suite, which we’ve been working on for ages. It’s made for you. It’s made for fast mixing, broad strokes as well as minute details. Mojo and precision.
Lastly, working on a large format console is fun. It’s fast and inspiring because you know your console and you know its limitations. It’s the opposite of scrolling through 200 plug-ins to find the “right” EQ for the kick. Limitations make it easier for you to enter a flow state and become creative. Console 1 is built for flow.
We hope that you will enjoy it, so that we get to enjoy the music you’re making with it!
First Time with Console 1
Installation
Please go to https://www.softube.com/get-started-with-console-1 for an up-to-date installation procedure!
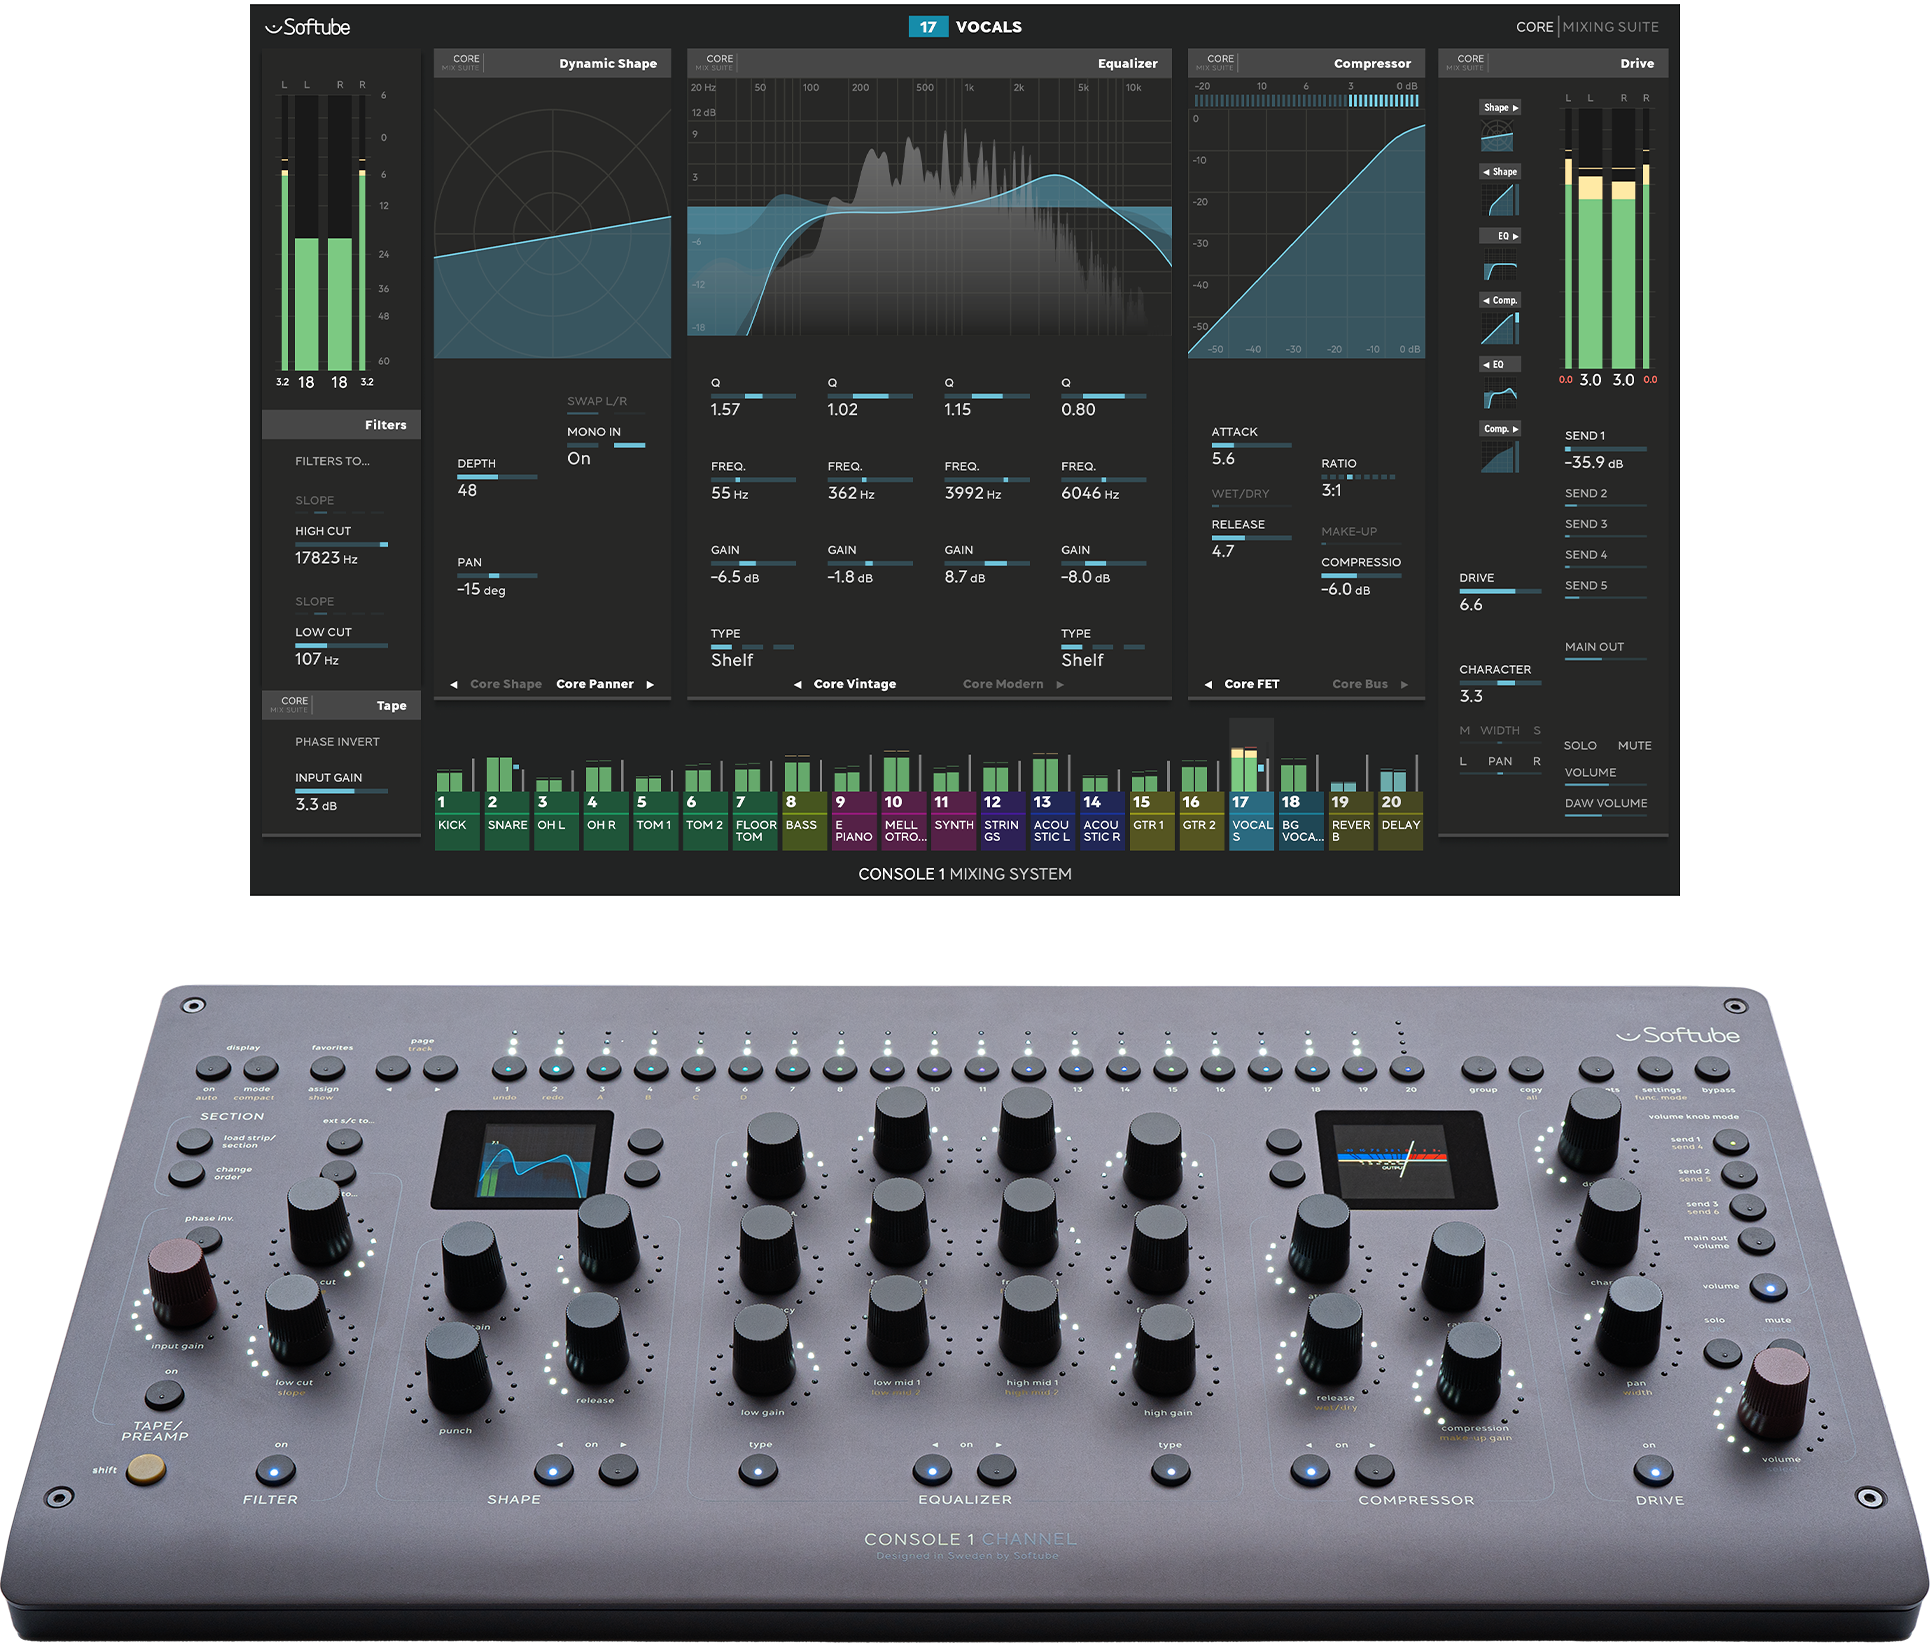
The Three Parts of Console 1
The Console 1 Mixing System consists of three parts:
- The Console 1 Channel Mk III hardware, the main controller for everything related to Console 1.
- The Console 1 plug-in, the unit that actually process the audio.
- The Console 1 On-Screen Display, the big window that shows settings and information regarding your tracks, as well as being the main application that makes sure that the communication between the plug-ins and hardware units run smoothly.
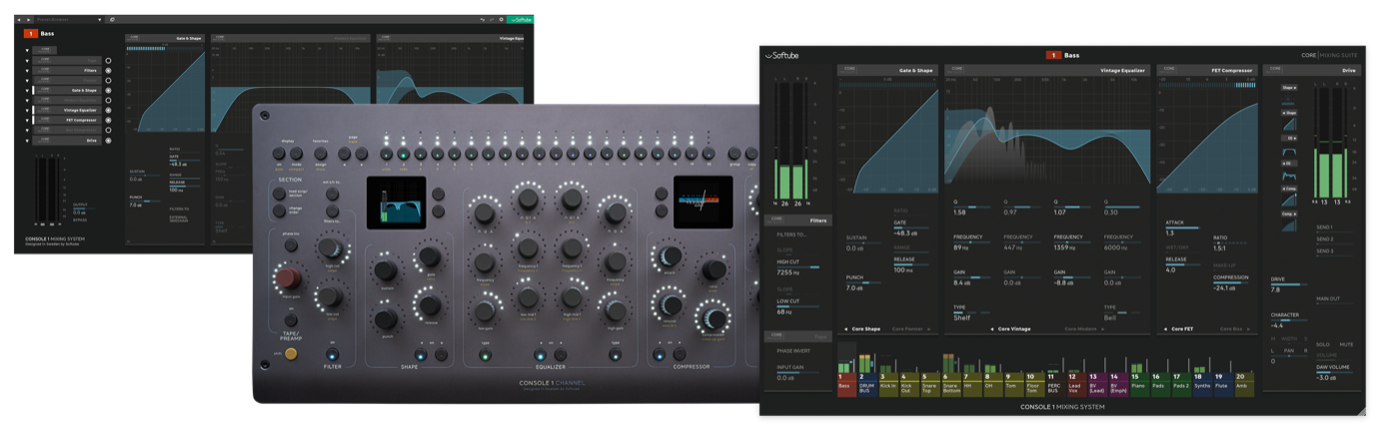
The three parts of Console 1, from left to right: the plug-in window, the hardware, and the On-Screen Display application.
All three parts are necessary for the Console 1 workflow: you control your audio from the hardware, you can see the changes on the On-Screen Display and the audio gets processed in your DAW by the plug-in. It is possible to only use the Console 1 plug-in without the hardware, although the whole experience is designed around the hardware, and that’s where you will notice the biggest improvement to your workflow.
Always make sure that the On-Screen Display application is running. That’s the app that handles all communication between the hardware and the plug-in.
The Console 1 Workflow
Console 1 is about flow. We want the mixing experience to be like playing an instrument; where you can act and react intuitively and fast, where you can make and correct mistakes or leave room for happy accidents. You will be able to try out ideas quickly and not have to think of much else than your music.
But Console 1 isn’t only for the mixing process, it should also be a natural part of your production workflow. Console 1 was designed with tracking and production in mind and has a low latency (4 samples in 44 and 48 kHz) and low CPU usage that lets you use Console 1 while tracking vocals or recording MIDI with a software synth. The added benefits of having Console 1 set up while you are recording tracks are huge. For example, when the singer asks for more compression, less highs or more reverb, you can quickly engage those sections and adjust it to their liking.
Your first session
So, you’re new to Console 1? Follow these steps:
- Place the Console 1 plug-in as the last insert on all your tracks and busses. Don’t worry, Console 1 does not take much CPU, and only active sections will process any audio. If it’s on a mono track, insert the plug-in as “Mono to Stereo” or “Stereo”.
- Setup the sends to your liking. If the DAW supports Integrated DAW Control, you will be able to control the send volumes from Console 1.
- Put Console 1 on your returns as well as the main out track.
- You don’t have to open the plug-in window. It’s enough to just place it on the track to control it through the hardware.
That’s what you need to get started! Next step is to hit play and start working:
- Click Display On (top left button) to open the On-Screen Display.
- Select which track to work on using the Track Selectors on the top of the unit.
- To engage the EQ section you just need to start turning an EQ knob, and the section will turn on. Press the EQ On/Off button below the EQ section to disable it again.
- Select another track and keep on going!
You should always use the VST3 version of the plug-in, unless you are using Logic Pro (AU) or Pro Tools (AAX).
Menus
To navigate in menus, such as Load Strip or Settings, you typically use the red Volume/Select knob, along with Solo/OK and Mute/Cancel. That’s the main way to scroll through a list of options, although there are other ways as described in coming chapters.
What’s New in Mk III?
Console 1 was first released in 2014, and ever since, we’ve carefully added functionality and features that our users have asked for. We are now proud to deliver a major overhaul to the hardware that takes our software updates to the next level. While staying true to the main idea behind Console 1: the workflow, we expand on the concept so that Console 1 can cover more of your needs than what was possible before. We listened to our users and added the most requested features.
If you are already familiar with Console 1 you will feel right at home with the new Mk III. Your old projects will still work, and you will be able to quickly navigate using your new hardware. We have included a whole host of new features to help you in your work moving forward.
Many hardware changes are obvious, such as the dual high-resolution displays, and the slim design with aluminum front, so let's go through a couple of non-obvious changes.
Nine Sections with Dual Center Sections
In total Console 1 Channel Mk III has nine different sections, with a new Tape/Preamp section that comes with our famous Tape algorithm, as well as separate on/off buttons for the Filters and Drive sections.
The Shape, EQ and Compressor sections are doubled up: dual sections allow you to use two shape sections, two equalizers and two compressors from within Console 1. Many users have asked for a way to include the corrective EQ work in the Console 1 workflow, but still use the colorful vintage EQs. The dual sections will let you do this, and more! And you can of course change the order of the six center sections in any way you want.
More Control
Many of our customers have asked to be able to control the Q value on the Low and High Bands, so we included four fully parametric bands on the EQ. We added dedicated Q knobs to the outer bands, but also repurposed the Shift button so that it is possible to access even more parameters, such as Compressor Make-Up Gain (yes, it is now possible to turn off the automatic make-up gain for all compressors!).
The new layout allows the user to control up to six send levels, for DAWs that support DAW Control.
The New Knobs ... Oh my...
The new knobs are amazing. Our goal was to make the knobs feel and behave just like on an analog console, with the same precision and a solid feel. We use endless potentiometers with amazing precision. You just have to try it to believe it. The knob caps have a new grippier design, with a slightly smaller radius. And they are touch sensitive too.
The Sound
The Core Mixing Suite opens up a new way to mix with Console 1. Instead of replicating a single console, we equip you with an album of tried and tested studio gear, such as FET and Opto Compressor, along with new additions such as the Modern and Vintage Equalizers, the Core Panner (mono compatible spatial panning algorithm) and the Tape emulation at the input. And as usual, the Console 1 universe will continue to grow with more sonic possibilities, stay tuned!
Features and Improvements
We added a bunch of features such as the improved preset handling, classic undo/redo, and A/B/C/D states. Some features were sneaked in with an earlier releases, such as: stereo width on output, the ability to load Drive and Filter sections, mark tracks and plug-ins as favorites, and the Compact mode.
All in all, there are many updates. But the core is the same, you can still use Console 1 with your workflow the way you are used to, and you will still feel at home with Console 1. We hope that these improvements will help you improve your workflow and make your job more fun and creative!
Happy mixing!
Hardware User Interface
All functionality of the hardware will be described in detail in following sections, starting with a brief overview of the general workflow features and ideas, then going through all global functionality (such as display modes, presets, settings), followed by all the functionality in the different sections (the EQ, compressor, etc). The last part describes how the hardware displays work.
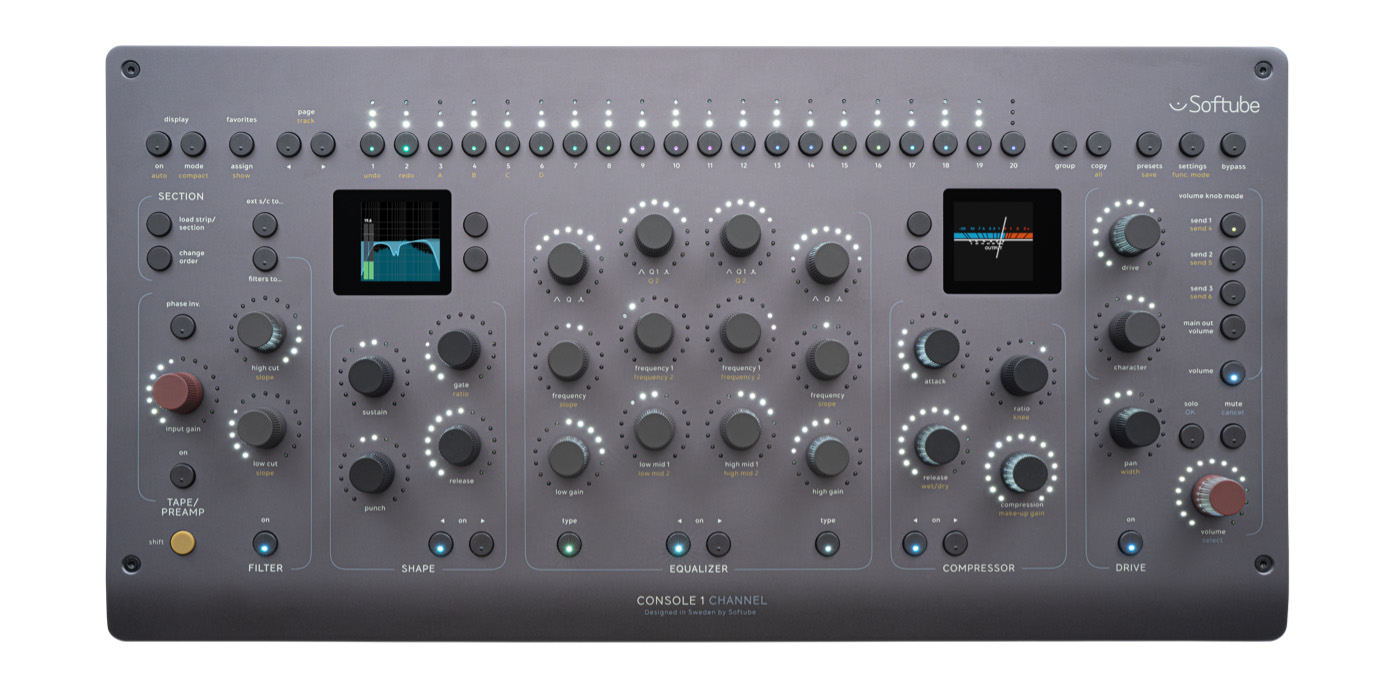
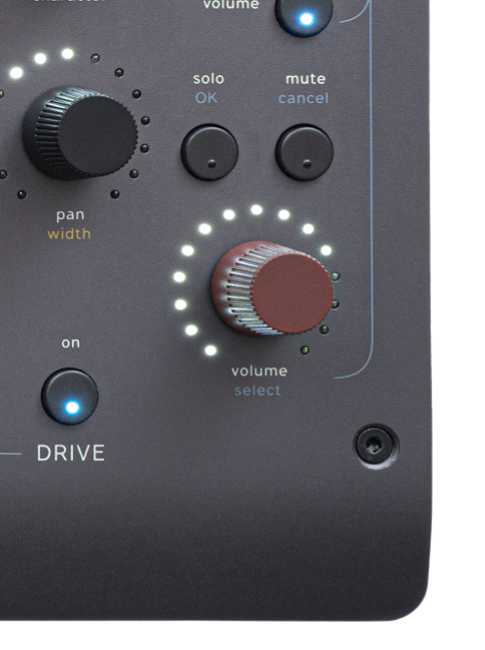
The Console 1 Channel Mk III hardware. Top Row: global functionality and track selectors, below those are the buttons to change sections and section order and change the displays. Further down you’ll find the different processing sections. On the lower left is the yellow Shift button, and on the lower right the red Volume control.
General Workflow
Console 1 was built to keep you in the zone while producing and mixing. You hear something, you react. The same knobs in the same spots every time. No unnecessary interaction with “do you really want to… yes or no?” dialogs. Muscle memory and intuitive controls.
There are a lot of features in Console 1. Don’t worry, you don’t need to know them all. The most important parts are right at your fingertips, screen printed on the aluminum surface: volume, EQ, compression and sends, etc. Insert Console 1 on all your tracks and adjust these basic parameters from the hardware, and your workflow will be massively improved!
Fast Workflow
Console 1 doesn’t ask for confirmation when you change things, because that would slow you down. Instead we have Undo/Redo (Shift + 1/2) for when you make mistakes, and A/B/C/D (Shift + 3/4/5/6) for when you know beforehand that you want to experiment.
Undo/Redo and A/B/C/D are located at the first 6 track selector buttons.
If you know just what controls you need at your fingertips every time you start Console 1, the Default Preset feature allows you to save a default signal chain to be loaded each time Console 1 is inserted, and presets allow you to save your favorite chains (or sections) for quick access.
Scroll/Ok/Cancel
Whenever you need to scroll through a list, for example when loading a section or strip, you use the output volume control (Volume/Select) to select items in that list, and to confirm or cancel you use the two buttons just above Volume/Select: Solo/OK and Mute/Cancel.
There is always contextual help at the bottom of each message/dialog.
Scroll with Volume/Select, confirm with Solo/OK, or cancel using Mute/Cancel.
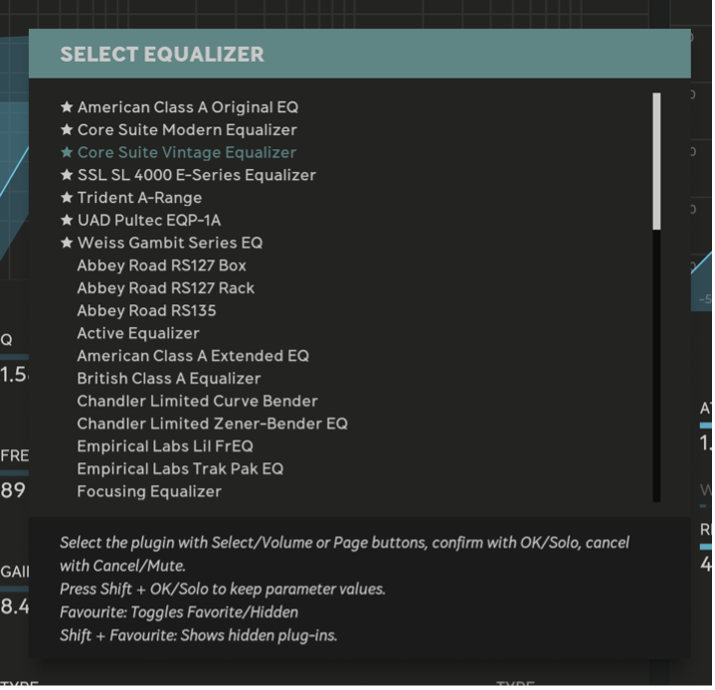
Select Equalizer menu, with the contextual instructions at the bottom.
More Is More
In general, a clockwise adjustment of a knob means more. More compression, tighter Q, more attack time, more gain, etc. There are many different standards on different gear, but in Console 1 the general rule is “more is more”.
Dual Section’s “On” Buttons
To use the dual sections for Shape, EQ, and Compressor, you select and engage/bypass the sections using the same button. For example:
- Press EQ ▶ select the alternate EQ
- Press EQ ▶ again to engage it.
Or:
- Press EQ ▶ select the alternate EQ
- Turn an EQ knob to activate that EQ.
If you want to bypass the alternate EQ, you press the EQ ▶ button while the alternate EQ is selected.
You also use these buttons to select the section when you want to change the plug-in in that section, or change order:
- Press and hold Load Strip/Section
- Press EQ ▶ to load a new plug-in into the alternate EQ slot.
Using Menus
As mentioned above, you can press and hold Load Strip/Section and then click on a section button to immediately load a plug-in to that section. The same type of procedure applies for many of the menus: if there is a logical way to immediately select something using the buttons on the hardware, the menu will allow you to do that. But it is also always possible to use the Volume/Select button to scroll through a list and confirm with Solo/OK. Most menus have several ways of interaction, from fast to slow.
Here are some examples. You want to mark a track as favorite:
- Select the track you want to mark as favorite.
- Click on Favorites Assign
Or you can do it in the reversed way:
- Press and hold Favorites Assign
- Select the track you want to mark as favorite
- Release Favorites Assign
The second way is interesting, since it lets you select multiple tracks as favorites:
- Press and hold Favorites Assign
- The track selectors light up for all tracks marked as favorite
- Select one or several tracks as favorite
- Release Favorites Assign
Quick Select
If you want to solo several tracks at once, you can press and hold Solo and select the tracks using the Track Selectors.
- Press and hold Solo
- The track LEDs are colored yellow, and soloed tracks are bright yellow.
- Select the tracks you want to solo.
- Release Solo.
The same functionality works for Mute, but also for the section’s On buttons. So if you want to turn off the compressor for multiple tracks, just press and hold the compressors On button.
Global Functionality
This chapter will go through every global function on the Console 1 Channel Mk III.
Display
Display On: Turn on or off the On-Screen Display on your computer screen. The LED is turned on when the On-Screen Display is visible. If the LED blinks, it means that a message dialog which requires input is showing on the On-Screen Display.
Display Auto: The On-Screen Display will automatically show when you touch or change a parameter. By default, the On-Screen Display will show for 4 seconds before hiding, but this time can be adjusted from the Settings menu “Set auto display delay”.
If Display is set to Auto, you can quickly open the On-Screen Display by touching a knob. It will stay open as long as the knob is touched.
Display Mode: Toggle through the different display types of the On-Screen Display. In the Settings menu you can choose which display modes are enabled (“Settings: Enabled View Modes”).
- Channel View: The normal view showing each section of the selected track.
- Track Overview: A simplified overview of 20 tracks at the time.
- Knobs View: Same as “Channel View”, but without the shape, compressor and equalizer graphs.
- Meters View: A small view that only shows the track names, track numbers, volume, gain reduction and output level.
- Scribble Strip View: A minimal view that only shows the track names and numbers. This view is useful if you want to see an overview of the track navigation at the same time as your DAW is visible on the rest of the screen.
It’s a good idea to only enable the view modes that you frequently toggle between, for example the Channel View and Track Overview, so that you can quickly switch between those. You enable/disable view modes from the Settings menu.
Display Compact: Show only tracks that can be controlled with Console 1. For example, if you only use Console 1 on buses, and these are located very sparsely at track 11, 34, 48 etc. you can engage Display Compact to relocate these instances to track numbers 1, 2, 3, etc. Exit by pressing Display Compact again.
Whenever you are using the “Display Compact” feature, the status line on the On-Screen Display will say “Compact Mode”.
Compact mode is a life saver for large projects where you just want to place Console 1 on the important tracks. If you have a large amount of Console 1 plug-ins, and just want to see a subset of them, use the Favorites feature instead.

The lower left corner of the On-Screen Display shows the status line, in this case it's indicating that the tracks are in "Compact Mode".
Favorites
Favorites is a way to easily access the most important tracks in your mix, for example your buses, lead vocals, and returns. Favorites are saved with the project.
Favorites Assign: Use assign to select which tracks are marked as favorite. This is indicated by a star next to the track number on both the On-Screen Display and the hardware screen.
- Press and release Favorites Assign: the current track will be marked (or unmarked) as favorite.
- Press and hold Favorites Assign: use the Track Selector buttons to choose which tracks to mark (or unmark) as favorites.
Favorites Show: Enter or exit “Favorite Mode”, which is indicated in the status line on the On-Screen Display.
To be able to easily work with your mix, try a top-down approach by limiting the mix to 10 important elements, for example Bass (track), Drum Bus (bus), Lead Vocal (track), Backing Vocals (bus), Guitars (bus), Synths (bus), Other stuff (bus), Reverb return (track), Delay return (track) and Main Out (track). Assign all these as favorites for easy access and balancing. If you need to access all individual tracks and buses, just exit Favorites Mode.
Mark Plug-Ins as Favorites
Favorites can also be used in the “load” menus to mark sub-plugins or channel strips as favorites, or to hide them. To mark a channel strip as a favorite or hidden:
- Enter Load Section/Strip
- For the selected subplugin, press Favorites Assign to toggle between Favorite, Hidden and Normal.
- To show the hidden subplugins, press Favorites Show.
Plug-in favorites are saved on your computer.
Are you usually only using one or two compressors? Mark them as favorites and they’ll appear at the top of the list when you load a compressor.
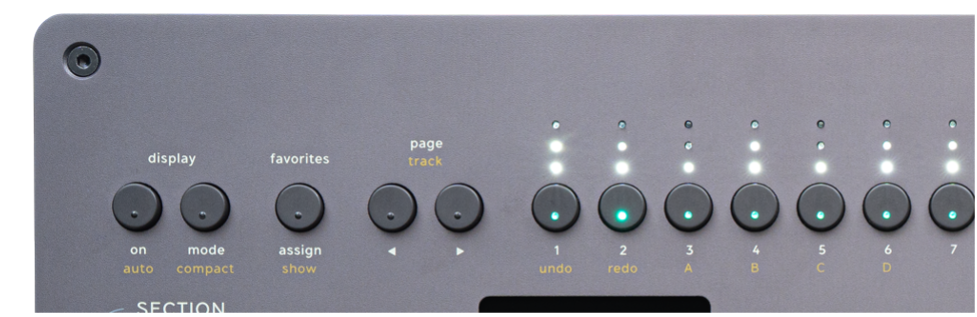
Track Selectors
Page ◀ ▶: Press to get to the previous or next page, for example going from tracks 1-20 to tracks 21-40.
Page Up/Down can also be used when navigating menus, Press Page ▶ to get to the next item in the list.
Track ◀ ▶: Press Shift + Page ◀ ▶to get the previous or next track, for example from track 2 to 3.
Track Selectors 1-20: Select which track you want to work with.
Undo/Redo and A/B/C/D
Undo/Redo: Hold Shift while pressing either Track Selector 1 (Undo) or Track Selector 2 (Redo).
Shift + Track Selector 1 will undo the last change on the current track. In the upper right corner, you will see dots for each undo step you can take on the selected track. When these dots are available it’s also possible to use the Volume/Select knob to scroll through the undo list.
Press Shift + 2 (Undo) to show the dots that indicate the available undo steps. Once these dots are shown, it is possible to use either Volume/Select or Undo and Redo to step through the list.
Please note that Undo/Redo does not work together with the Group and All features.
We designed Console 1 with speed and flow in mind. We won't ask you "are you sure" if you want to do edits or change things, because that would stop your flow. Instead we make sure that you have Undo/Redo, so that you can always go back if you messed up!
A/B/C/D: Each Console 1 instance has four slots so that you can easily compare changes made to the track. The current slot is shown in the upper right corner when you hold shift. Select a new slot by pressing Shift and Track Selectors 3-6, for slots A-D respectively. By default, all changes are made to slot A until you change slots.
Only the settings of the currently selected slot will be saved in a preset, but all slots are saved in the project.
To copy settings to a new slot, press Copy and then select the slot with Shift + Track Selector 3-6.
Please note that DAW parameters, Volume, Pan, Solo, Mute and Sends, are not included in the A/B/C/D or Undo/Redo.
Group/All
Group allows you to easily adjust multiple tracks at the same time. Groups are temporary and tracks will be ungrouped just by selecting another track. A common use case is if you want to EQ multiple tracks, for example overhead mics or backing vocals at the same time with the same settings.
- Select the first track you want to have in the group.
- Press and hold Group while using the Track Selectors for all other tracks that should be grouped.
- Release Group to confirm. The tracks are now grouped and changes made will be applied to all grouped tracks at once.
- When you are done with your grouped changes, click the Group button or select another track to ungroup the tracks.
Changes to the High Cut, Low Cut, Input Gain, Drive, Drive Character, Pan and Volume will be applied relatively, so that you for example can increase the gain by 3 dB on all tracks without affecting the initial gain.
Changes to all other parameters will be applied absolutely, basically overwriting the previous settings on the grouped tracks.
To see the changes applied to all grouped tracks at once, switch over to the “Track Overview” mode using the Display Mode button.
All has the same functionality as Group, but applies to all tracks with a Console 1 plug-in. Access All by pressing Shift + Copy.
Please note that Group/All does not apply when you change a parameter from a fader on a Console 1 Fader unit. Group/All is only active when you change a parameter from a knob or switch!
Copy
Copy lets you copy entire tracks or individual sections to another track.
- 1. Select the track you want to copy from.
- 2. Press and hold Copy.
- Select
a. The track(s) you want to copy to
b. If you want to copy individual sections from one track to another, for example the “EQ ◀”, select that EQ with the “EQ ◀ On” button. - Release Copy to confirm.
Please note that DAW parameters, Volume, Pan, Solo, Mute and Sends, are not included when you copy settings.
Presets
Console 1 offers two different ways to work with presets. You can either open Preset Collection from the plug-in window as with any other Softube plugin, or you can access a list of presets using the Preset button on the hardware. The difference is that from Preset Collection you only have access to full channel strip presets, while the hardware allows you to access each section's individual presets.
For example, if you have loaded the Tube-Tech CL 1B into the compressor section, you can access all presets from the Tube-Tech CL 1B plug-in directly from the Console 1 hardware.
The sound of a preset might be different from within Console 1, since some parameters do not map to the Console 1 hardware. Unmapped parameters, such as an Output Gain control in an EQ will be set to a default value.
Load a channel strip preset:
- Press Presets to open the presets window.
- Select the preset and press OK.
- Press Cancel to exit the preset window.
Load a section preset:
- Press Presets to open the presets window.
- Select which section you want to get the presets from by pressing that section’s On button.
- Select the preset and press OK.
- Press Cancel to exit the preset window.
Save a preset:
- Press Shift + Presets to open the “save preset” window.
- Either press OK to save the entire channel strip as a preset, or select one or several sections to only save their settings as presets.
- Press OK to confirm
- Enter the name in the OSD window, and press the Enter key on your keyboard to confirm.
Please note that DAW parameters, Volume, Pan, Solo, Mute and Sends, are not saved with the presets.
Default Preset
The default preset defines the settings with which a new instance of the Console 1 plug-in will load.
- Save the preferred default settings as a normal preset, following the steps below.
- Press Presets to open the Preset menu.
- Scroll down to your saved preset, and click Favorites Assign to set it as default. A small house icon should appear next to the preset.
Use default presets to setup your preferred order, sections, and their start values. Leave all sections OFF in your default preset so that the preset doesn’t take CPU unless you engage the sections.
Settings
The settings menu contains all user settings for the Console 1 Mixing System.
Knob Speed: Select which type of knob movement you prefer. Please note that you can set different settings for Mk I/II and Mk III Channel hardware. The “Linear” mode is the preferred mode for the new ultra-precision Analog Feel™ knobs of Mk III, while “Accelerated Smooth” is the preferred mode for the old knobs of Mk I and Mk II.
- Accelerated Smooth: The knob movements will get gradually more precise when the knob is turned slowly. This is the preferred mode for Mk I and Mk II hardware.
- Accelerated Stepped: Same as above, but with two distinct speeds.
- Linear: A full turn of a knob will match a full parameter range, and the knob will turn at an even speed, but with less precision. On Mk I and Mk II hardware, this will mean that the resolution of the parameter changes will be very coarse. This is the preferred mode for Mk III hardware.
- Linear Slow: Same as Linear but 2x more precision.
Most controllers on the market uses “encoders” for their knobs, and encoders typically have very few steps per turn. That means that it is impossible to go from min to max value in a single turn with any kind of precision, it’s usually 25 steps or less per turn. Console 1 Channel Mk III uses potentiometers with a precision rivalling analog consoles, which means that you don’t need any “accelerated” modes, “fine tune” modes or other software trickery. You can do the tiny adjustments as well as fast and broad changes with a single turn, just like on a real console.
Enabled View Modes: Select which view modes the Display Mode button toggles through. See the Display Mode section for more information on the different view modes.
Analyzer Mode: Select the decay smoothing of the frequency analyzer. Default is “Hold Average”
- Fast: Quick updates, useful to discover problem areas.
- Slow: Slower updates which correspond more to how we experience differences in sound levels over different frequencies.
- Hold Average: This section will calculate the average frequency response over a very long period of time and is useful to see the overall frequency response of a song or to find troublesome resonances. Reset the analyzer by pressing Shift or switching tracks
- Hold Peak: Same as Hold Average, but with a preference to emphasize peak values in the frequency spectrum. Useful to see the overall frequency response of a song or to find troublesome resonances. Reset the analyzer by pressing Shift or switching tracks.
Analyzer Position: Select if the frequency analyzer should be placed at the input, output or to disable it. Default is on output.
Analyzer Blocksize: Blocksize is a trade-off between update speed and frequency resolution. A higher block size will lead to a frequency analyzer that is slower to react to audio changes but has a better frequency resolution. Default is 2048.
- 1024: 40 Hz frequency resolution, updated 40 times per second.
- 2048: 20 Hz frequency resolution, updated 20 times per second.
- 4096: 10 Hz frequency resolution, updated 10 times per second.
Accessibility: Special settings for accessing modes designed for visually impaired.
- Use Mode button to toggle screen reader training mode: If engaged, the Display Mode button is used to enter the “screen reader training mode”, where the screen reader reads aloud the name and current value of each knob, but no changes are made to your mix project.
DAW Settings: Settings specific for how Console 1 communicates with the DAW.
- Renaming/rearranging: Rename or move the current track. Only applicable with DAWs that don’t support track name and number.
- Alert Notifications: Turn off alerts, typically which DAW features are available, or choose to only alert when they change.
- Turn off all internal Solo and Mute: Turns off all internal Solo and Mute parameters. This should only be used if you have an older project saved without DAW Control, and using the Console 1’s built-in Solo/Mute functionality, and then opened it in a DAW with DAW Control where the Solo/Mute buttons control the DAW’s solo and mute.
- DAW Control Settings: Turn on/off features related to how the Console 1 communicates with the DAW (DAW Control). Only applicable for DAW:s with DAW Control.
- DAW Control: Turn DAW Control on/off. Turning it off will disable DAW Volume, DAW Pan, Sends, etc.
- Track Number: Turn on/off automatic track numbering.
- Track Selection: Turn on/off mutual track selection, when you select a track in the DAW it will get selected in the Console 1 and vice versa.
- Track Color: Turn on/off automatic track coloring.
Not all DAW Settings options are available for all DAWs.
Software Settings: Contains general settings for the Console 1 software.
- Set current window position as default: Save the position of the On-Screen Display as default.
- Set auto display delay: Set the amount of time before the On-Screen Display disappears in Display Auto mode.
Hardware Settings: Contains general settings for the Console 1 hardware.
- Set LED brightness: Sets the brightness of the LEDs on the Console 1 Channel Mk III hardware. If the unit is in Low Power Mode, it might not be possible to set the LEDs to the brightest setting.
Press OK to toggle through preset values, or hold Shift while scrolling with Volume/Select to set value. Press Cancel to exit the menu. - Set hardware display brightness: Sets the brightness of the displays on the Console 1 Channel Mk III hardware.
Press OK to toggle through preset values, or hold Shift while scrolling with Volume/Select to set value. Press Cancel to exit the menu. - Meter Bridge Type: Set if the hardware meter bridge should show the input or the output levels.
- Enable reset value on double tap: Engage to set the current parameter to its default value when the knob cap is double tapped.
- Low power mode alert: Alert the user when the unit is connected to a USB port that can’t provide enough power to fully light up all the LEDs and screens.
System Info: shows and copies system information regarding the Console 1 Mixing System.
- Copy system info: Copy all relevant, and de-personalized, information to the copy/paste buffer, so that you can easily paste it into an email in case you need to contact support.
- Open legal notices: Show legal notices, licenses, and copyrights for third party libraries. Opens in a separate window.
- About Console 1: Shows version info of software and hardware.
Function Mode
Used to toggle between different operating modes. At the moment you can change between:
- Console 1 mode: The normal way of using Console 1.
- Apollo Central: Controlling the plug-ins in Universal Audio’s Apollo Console. Only applicable for UAD-2 Apollo users with a connected Apollo audio interface.
Bypass
Bypass the entire channel strip on the currently selected track.
To bypass processing on many tracks:
- Press and hold Bypass
- Select which tracks to be bypassed using the Track Selector buttons.
To bypass the processing on all tracks:
- Press and hold Shift.
- Press All (Copy) to enter “All” mode.
- Release Shift.
- Press Bypass to toggle bypass on all tracks.
- Release All
If you want to A/B your settings using the Bypass function, you probably want to use the internal Output Volume control and not the DAW Volume to match the output gain level. Press Shift while changing the Output Volume to set the internal output volume.
Shift button
Shift is used to access secondary functions printed in yellow on the hardware. Some secondary functions, such as the compressor's Parallel and Make-Up Gain, and the Width control in the output section are always available. For other controls it depends on which section has been loaded.
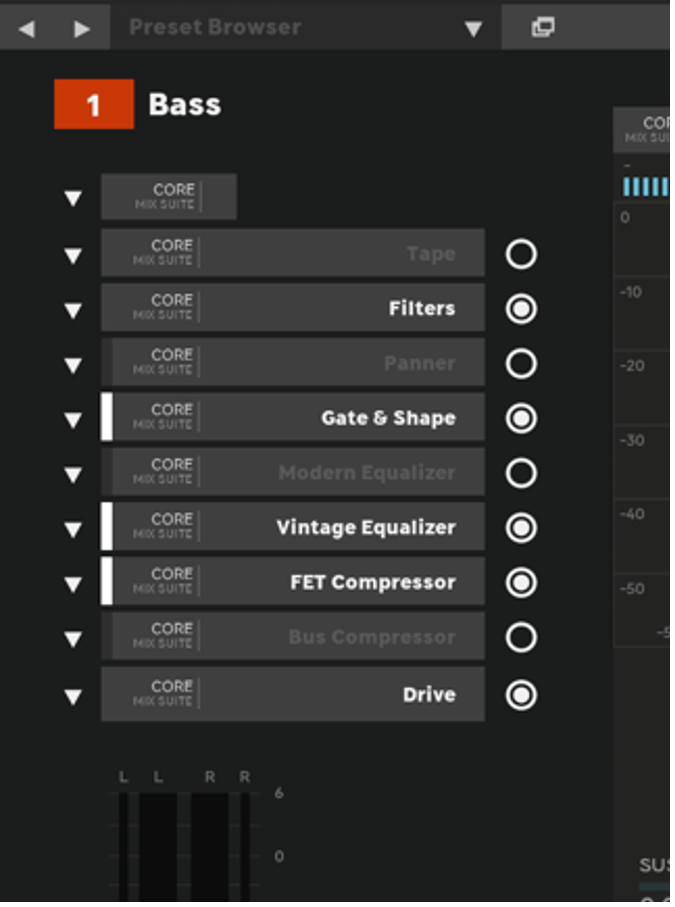
The Sections of Console 1
The sections are the things in Console 1 that change the sound, the things that you use to mix your music. In Console 1 Channel Mk III you have nine sections of processing where you can change sections or load other Softube plug-ins.
For specific information regarding the included plug-ins, please see the separate manual for Core Mixing Suite.
- Tape/Preamp: This section is always first and can be used to get tape or preamp flavor on your track. Drive the Input Gain harder to get a more pronounced effect.
- Filters: This section is always in the second position and contains high and low cut filters. These can be used for sidechain filtering as well as for normal filtering.
- Dual Shape sections: The shape sections can contain things that “shape” the sound, such as the Transient Shaper, gate, or utility tools such as a sample delay or de-esser.
- Dual EQ sections: Two equalizers, typically one for precision jobs and one for broad stroke mojo.
- Dual compressor sections: One fast and one slow? One limiting and one pumping? Your choice.
- Drive section: The drive is always last and contains harmonic processing.
The On button beneath each section is used to turn the section on/off, as well as selecting that section where you have more than one (Shape, Equalizer and Compressor). To turn on/off a section that isn’t currently visible, you first have to select it and then toggle it's on/off state.
A section that is OFF doesn’t take any CPU! Even if you put it on all tracks, you only are using DSP based on the sections you decide to turn on.
The On button is also used to point to a section. For example in Load Strip/Section, Change Order of a section or sending the filters to a specific section’s sidechain.
For dual sections (Shape, Equalizer, Compressor), the LED on the On button shows the current states:
- On LED is white: Section is selected and on.
- On LED is dimmed white: Section is selected and off.
- On LED is yellow: Section is on, but not selected.
- On LED is off: Section is off and not selected.
In the On-Screen Display, the selected section has the lit title, while engaged sections have a lit arrow next to it.
In this example, both equalizers are on (Core Vintage and Modern), as indicated by the white arrows next to the titles. In the shape section, the Core Shape is on and selected, while the Core Panner is turned off.
When you start Console 1, all sections are placed in a default order which was selected to be a good starting point for most projects. The default order and functionality of the sections are listed below. Sections marked in bold are the primary/first sections. It is of course possible to change the default order by saving a default preset.
If you want another default order or if you want to load other plugins as your default strip, make a preset and set that preset as “Default” (see earlier chapter).
Load Strip/Section
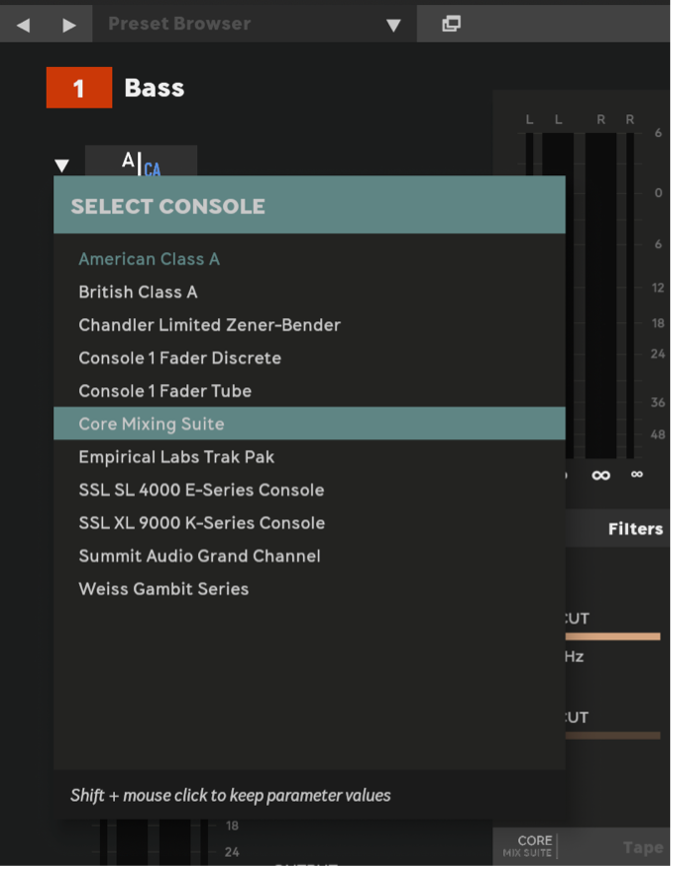
This functionality is the heart of Console 1 and allows you to customize Console 1 to your needs and sonic desires. From this menu you can either load a full console (strip) or individual sections. For example, swap out the built-in Core Mixing Suite for an Empirical Labs Trak Pak or SSL SL4000E Series console, or switch out the default FET Compressor for a Tube-Tech CL 1B or one of the many UAD-2 compressors that are compatible with Console 1. The availability of different sections and strips depends on what you own and have installed on your computer.
To load a full channel strip:
- Click Load Strip/Section
- Since “Strip” is already selected, just release Load Strip/Section to confirm.
- Scroll to the strip you would like to load and press OK.
a. If you don’t want to reset the parameter values when you load a strip, press Shift + OK instead. Please keep in mind that it doesn’t always make sense to carry over the settings from one processor to another and that you might get very weird results!
Depending on the type of strip you load, it might not occupy all sections of Console 1. Most consoles only have a five sections; filters, shape, single EQ and compressor and an output drive, and will get loaded into the left hand slots (marked with ◀). All other sections will remain as they were.
To load a section:
- Press and hold Load Strip/Section
- Press the On button of the section you want to change or use the Volume/Select to scroll down to the section you want to change and press OK.
- Scroll to the selected sub-plugin and press OK.
a. If you don’t want to reset the parameter values when you load the section, press Shift + OK instead. Please keep in mind that it doesn’t always make sense to carry over the settings from one processor to another and that you might get very weird results!
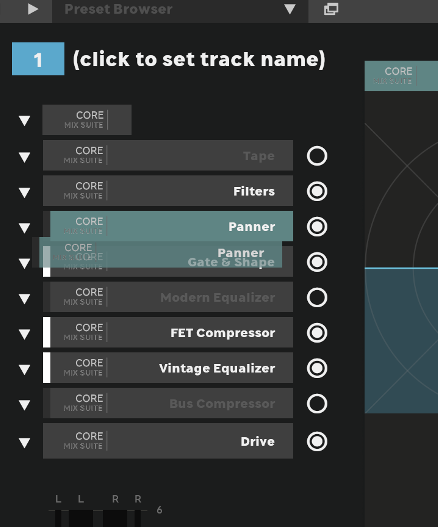
Change Order
You can change the order of the six middle sections (two shapes, two equalizers, and two compressors) freely. The Tape/Preamp, Filters, and Drive sections are always placed first and last, respectively.
- Press and hold Change Order.
- Select the section you wish to move with its On button.
- Release Change Order.
- Select its new position by either:
a. Using Track Selectors 1-6 for the new position
b. Scroll to the desired location and press OK.
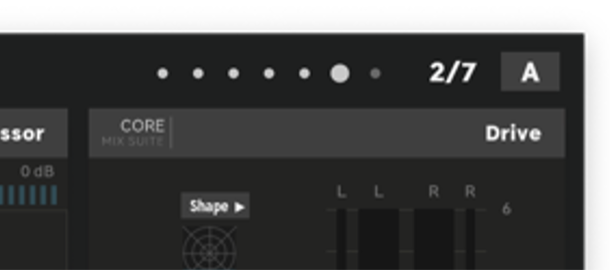
The current order of the sections is visible in the graph overview next to the large output meter on the On-Screen Display. It’s also visible in the Track Overview mode.
The current order of the sections can be seen next to the output meter.
Ext. S/C To…
If one of the dynamics sections can accept external sidechain, you can route Console 1’s external sidechain to that section by using Ext. S/C To.
- Press and hold Ext. S/C To…
- Select the section that should receive external sidechain. You can only choose between the Shape and Compressor sections.
You need to make sure that the plugin accepts external sidechain, this is typically done in the plug-in window header in the DAW.
To disable external sidechain, just press the Ext. S/C To button again. Pressing again will enable external sidechain to the same section again.
The Ext. S/C To… functionality is visualized by an XSC icon ![]() in the header of the section.
in the header of the section.
Tape/Preamp
The Tape/Preamp section is the first processing that Console 1 makes. It is loaded with a Tape emulation by default, and as with all sections it is turned off by default to save CPU.
To drive the Tape/Preamp harder, increase the Input Gain. Audible distortion typically happens when the input meter reaches above 0 dB.
Phase Invert swaps the phase of the input signal.
Filter
Adjust High and Low Cut with the two knobs. If it’s possible to change slope of the filters, it is done by holding Shift while turning High Cut or Low Cut.
Filters To… disables the filters from the main audio path and instead uses them to filter the sidechain path in one of the dynamics sections. A typical use case would be to filter out noise in the sidechain of a Gate or filtering the low end in the sidechain of a compressor. To use the filters in the sidechain:
- Press and hold Filters To…
- Select the Shape or Compressor section with its On button
The Filters To functionality is visualized by a low cut icon ![]() in the header of the section.
in the header of the section.
Shape
The Shape sections are typically used for dynamic shaping (Transient Shaper, Gate, etc.) or utilities needed to clean up your mix work.
For more information, please see the Core Mixing Suite manual.
Equalizer
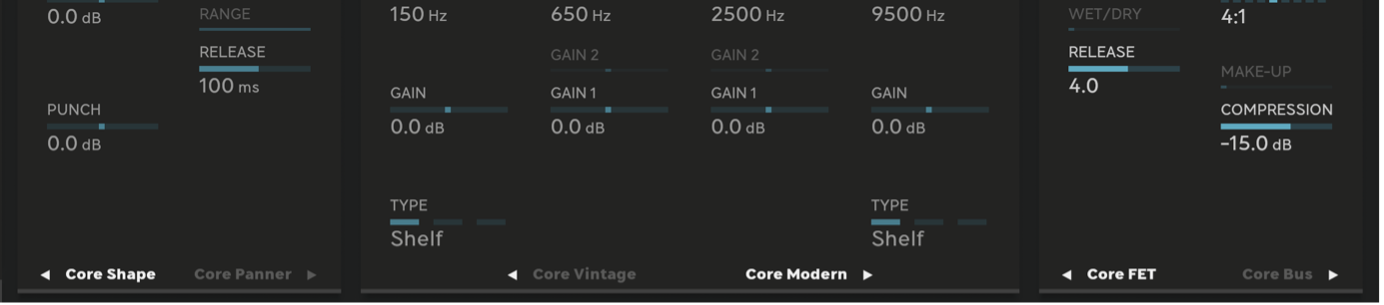
The equalizers consist of four fully parametric main bands, as well as two auxiliary bell bands. Each column of knobs has Gain, Frequency and Q, and the two outer bands can be switched between Shelf, Bell and Cut filters as well as change the Slope in cut mode.
Exact features depend on the current equalizer. Some equalizers only have three or four bands by design, and not all equalizers are fully flexible. The Modern Equalizer in the Core Mixing Suite supports all these features.
For all Console 1 strips, the EQ Type LED typically uses the following color indications:
- Green: Bell
- Red: Cut
- Yellow: Shelf
For other equalizers, the meaning of the colors might differ.
Compressor
The compressor features differ a lot from compressor to compressor, but most have Compression (amount of compression, like a reversed Threshold), Attack, Release and Ratio. Some, like the Bus Compressor, also support the Knee parameter.
Common for all compressors are these built-in parameters:
Wet/Dry: Increase to get more parallel processing.
Make-Up Gain: Set compressor make-up gain manually or use the built-in auto make-up functionality. When Make-Up Gain is fully counterclockwise it is set to automatic make-up gain. Turn Make-Up Gain clockwise to disable the automatic gain and adjust output gain of the compressor from -10 to +40 dB manually.
Drive
The amount of distortion, saturation or harmonics can be adjusted with the Drive knob. Character typically makes the drive brighter when turned clockwise, but that depends on which sub-plugin that is loaded into the Drive section.
Output
The output section is clean and doesn’t have a sound. If your DAW supports DAW Control, the output section will control the respective functions for that track in your DAW. Otherwise, it controls the functions inside of the Console 1 plug-in.
Pan: Sets the pan of the output signal.
Width: Sets the width of the output. Turning Width counterclockwise will make the bass frequencies mono, turn it fully counterclockwise and the whole output will be mono. From 12 o’clock clockwise it will increase the width of a stereo signal by increasing the gain in the side and lowering it in the mids. Turn it fully clockwise and you have no mono/mid part left. Width only works when the Console 1 plug-in is inserted as a Stereo or a Mono-to-Stereo plug-in.
DAW Volume/Volume: Controls the fader volume in the DAW*, to control the internal output volume in Console 1, press Shift while adjusting Volume.
Solo/Mute: Soloes or mutes the current track*.
In addition to these functions we have five Volume Knob Mode switches, which decides what the Volume knob controls.
- Volume: This is the default setting, and the Volume knob controls the output volume.
- Sends 1-6: The volume knob controls the send level of the selected send*.
- Main Out Volume: The volume knob controls the output volume of a designated Main Out track. To select a track to be assigned to this button, press and hold Main Out Volume while selecting the desired track.
*) If the DAW supports DAW Control.
Solo Safe
This section only applies to DAWs without DAW Control where we can’t control their Solo/Mute functionality (eg. Pro Tools).
Solo Safe is used to prevent busses from being muted when you solo a track. Console 1’s internal solo will automatically mute all other instances of Console 1, and to prevent Console 1 instances on busses from being muted you need to turn on Solo Safe for Console 1 plug-ins on busses.
To set up Solo Safe, open Console 1’s plug-in window for the instances of Console 1 that is placed on a bus, and press the Solo Safe button.
Solo Safe: For DAWs without DAW Control, Solo and Mute won’t work on busses unless you turn on Solo Safe for the Console 1 plug-ins that are used on busses.
Hardware Displays
The displays are also used to show all menus and dialogs that the On-Screen Display shows, so that you get even closer to a completely mouse-free and computer screen free mixing experience!
Up/Down buttons: The Up/Down buttons next to the screen toggles through the different display modes:
- Adaptive: Adaptive display that shows the latest adjusted sections and parameters.
- Track: Always show track name and number.
- VU Meter: The left meter shows the input VU, while the right shows the output VU. The VU is scaled so that -12 dBFS is shown at 0 VU.
- Shape: Always show the Shape section.
- EQ: Always show the EQ section.
- Compressor: Always show the Compressor section.
On-Screen Display Overview
The On-Screen Display is the heads-up display of Console 1, where you can quickly navigate your session and see what’s going on. It is also the application that communicates with the hardware and the plug-ins in your session, so it is essential that the Console 1 On-Screen Display application is running whenever you use Console 1.
The application icon can be seen in the menu (macOS) or tray (Windows) and is green whenever the hardware is connected.
The On-Screen Display reflects the layout of the hardware.
- Input section with input gain and metering, Filter section and Tape/Preamp section.
- The currently selected Shape section
- The currently selected Equalizer section
- The currently selected Compressor section
- Output section with Drive section, a section order overview and output volume, metering and sends
- Meter bridge with track names, numbers, colors, and meters.
- Window footer with additional info
The layout of the OSD will change depending on whether you have connected a Mk I/II or Mk III hardware. In this manual, we only describe the Mk III layout.
Switching Between the Dual Sections
In the On-Screen Display you can choose which one of the two compressors (EQ, or Shape) you want to see (and control) by clicking the corresponding On button on the hardware. The currently visible section’s name will get highlighted in the footer.
The arrows next to the section names are lit when the corresponding section is turned on.

The section footers show what each section contains, and whether it is selected and engaged. The currently selected sections (Core Shape, Core Modern and Core FET) are lit up. The arrows next to the sections indicate that the section is engaged (Core Panner is not engaged, but Core Vintage is).
If you need to see what is affecting the sound on your track, take a look at the section overview next to the Output Volume meter. It shows the visualizations and metering for all six middle sections, including those that aren’t currently visible in the main interface.
Shift Parameters
Some controls are accessed by pressing Shift on the hardware while adjusting a knob. These controls can be seen above their main control, such as Make-Up Gain above the Compression control, but with a minimized view with only the parameter name.
Pressing Shift will highlight all those controls and show their parameter values.
Input Section
Input Meter
The input meter shows the input level after the input gain, the thin meters on the outside show peak levels, while the thick meters in the middle show the RMS levels.
Filter
Filters To...: Shows if the filters have been assigned to the sidechain of one of the dynamics processors (Shape or Compressor).
The EQ curve of the filters are shown in the EQ graph, regardless of which EQ you have selected.
Preamp/Tape
The preamp doesn't have any parameters on its own, it is controlled by the Input Gain parameter.
Shape, EQ and Compressor Sections
These sections can host two units each, which can be seen in the footer of the section. For example, the Shape section is by default loaded with Core Shape in the first slot and Core Panner in the second. The arrow next to the name indicates whether the section is on or not.
Each section has a visualization that shows relevant metering and curves.
Output Section
The output section shows both the settings of the Drive section, as well as other output parameters and metering.
The Section Overview
At the top left you can see the order of all the six middle sections, and a visualization for each. This is the same sort of view that you see for all tracks in the Track Overview view mode.
Output Meter
The Output meter shows peak (thin meters) and RMS (thick meters) on the output. Depending on the DAW, these meters will either be the actual channel meters reported by the DAW (Logic Pro, Cubase), or calculated from the output level of Console 1 together with the track volume. If you make large gain changes using plug-ins after the Console 1 plug-in, the meter can be misleading.
Drive Section
The Drive section features the Drive and Character controls.
Output Controls
The value of Pan, Width, Volume, DAW Volume, Solo and Mute are displayed here.
Above the volume controls you also see the Sends (if applicable) and the Main Out Volume. The currently selected volume will be lit up.
Meter Bridge
The meter bridge at the bottom of the On-Screen Display shows the following for each track.
- Solo/Mute/Bypass at the top
- Output meter
- Gain reduction meter
- Output volume (white slider)
- Track number, and a star symbol if it's favorited
- Track name and color
The current track is highlighted with a slightly brighter background color. Touching a hardware control will also highlight the track belonging to that control.
Window Footer
The window footer will sometimes display what state you are in, for example if Shift is pressed, or if you are in Favorite or Compact mode.
Track Overview Mode
The track overview mode shows you an overview of 20 tracks. At the top you see the current console's name, and below the order of the six middle sections and their graphs.
Below the graphs you see four controls. Touching a control will automatically switch to showing it, along with the three most adjacent controls.
The Track Overview mode.
Plug-In User Interface
The Console 1 plug-in allows you to modify all parameters, loading and reordering different sections, even if you don’t have the hardware at hand.
Some Console 1 features that depend on the full Console 1 system can’t be used from just the plugin, such as Group, Copy, A/B/C/D, Favorites and more. DAW specific features (track volume, pan, sends, solo, mute) are also not possible to adjust from the Console 1 plugin, and if the DAW supports Integrated DAW Control these controls will be missing from the plug-in interface.

The plug-in user interface. The plug-in will always show the sections in the order they are processed in, as compared to the OSD that always reflects the layout of the hardware.
Resizing
The plug-in window is resizable, and by increasing the height of the window you will make the window contents larger. By increasing the width of the window, you will be able to see more sections.
Sections
The names of all sections are listed to the left in the plug-in window. Each section in that list corresponds to a section to the right, where you can adjust the section’s controls.
The section list shows the name of the loaded strip, the loaded sections and their order. The drop down menu (down arrow) lets you select another strip/section, and the bullet to the right indicates whether the section is engaged or not.
The plug-in window. Click the down arrows to change a console or section.
Click and drag in the section list to move sections around.
Load Strip/Section: The drop down menu lets you change what is loaded into that section, with similar functionality as “Load Strip/Section” on the hardware.
Navigate to a section: Click the name to directly bring that section’s parameter in view. It also possible to scroll or click and drag in the area to the right to navigate to a particular section.
Change Section Order: Click and drag the name to change the position of that section.
Bypass Section: The On/Off button to the right of the name lets you engage or disable the section.
Collapse Section: A section can be collapsed by pressing the “<<” symbol in the footer of the section.
Filters To… and Ext. S/C To…
To send the filters and/or external sidechain to a compressor or shape section, navigate to that section’s parameter and click on the Filters To or External Sidechain text.
Integrated DAW Control
Most DAWs support Integrated DAW Control, or "DAW Control" for short. With DAW Control you are able to control track parameters in the DAW's mixer, such as DAW Volume, Pan, Solo, Mute and Send Level, if sends are available. If a track is selected in either the DAW or the hardware the track selection will be mirrored in the other at the same time.
As of now, all major DAWs support Console 1's Integrated DAW Control, except Pro Tools which only supports track name and number.
Always use the VST3 version of Console 1 if your DAW supports VST3!
Metering with DAW Control
With Integrated DAW Control, the output meters will display the levels after the DAW’s fader and pan has been applied. This level is approximated, and if you have processing between the Console 1 and the DAW’s fader, the metering can be incorrect. However, in Cubase and Logic Pro, the output meters in the On-Screen Display are reported from the DAW and are not approximated.
If you want to see the output levels coming out of Console 1, without the DAW’s volume and pan, press the Shift button, and the output meter on the On-Screen Display will show the output levels of the Console 1 plug-in.
Disabling DAW Control
It is possible to disable DAW Control from the Settings menu, and if you disable DAW Control you can choose to keep track number, selection and color on.
DAW Control for Logic Pro
Logic Pro 10.7 and higher supports DAW Control for Console 1 through Apple’s Control Surface support. With this you can access track volume, pan, sends, solo and mute, for both tracks containing a Console 1 plug-in, as well as tracks without a Console 1 plug-in.
Differences from DAW Control in Studio One and Cubase
Users familiar with the DAW Control in other DAWs (using the VST3 DAW Control interface) will notice some differences.
Track Layout: The track numbering in Console 1 will always follow the order of the tracks in Logic’s mixer! Only tracks that are visible in the mixer will be accessible from Console 1.
Limited Tracks: Tracks without a Console 1 plug-in will also be visible and controllable from Console 1, but without Console 1’s audio processing.
Installation
Installing DAW Control for Logic Pro is automatic and will only be required once. In some cases, for example when the computer network settings change, you might be required to do it again.
- Make sure the latest version of Console 1 is installed and that the “Console 1 On-Screen Display” application is running.
- Start Logic
- Logic will display a message: “OSC app “Console 1” on “Console 1 [computername] wants to connect to Logic Pro.”
- If there are several computers running Console 1 on your network, make sure that the message refers to your computer and press OK.
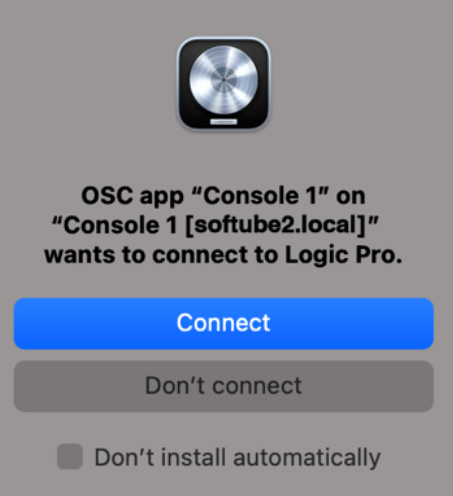
Figure 1. Console 1 asks for permission to connect to Logic Pro. Make sure to only connect to your own computer (“softube2”) in this example.
Advanced Installation
If there are more than one computer with Console 1 on your network, Logic will ask if you if you want to connect to Console 1 on every computer that has the Console 1 On-Screen Display application running. Do not click OK for other computers than the computer you sit at! DAW Control will only work with the computer that has the Console 1 connected to it.
If you happened to add another computer on the network by mistake, it’s easy to fix by removing Console 1 from Logic Pro after the initial message, go to the menu Logic Pro > Control Surfaces > Setup… You should only see a single instance of Console 1 there.
The Control Surface configuration requires that you have enabled advanced features in Logic. Go to Logic Pro > Preferences > Advanced… and select “Enable Complete Features”.
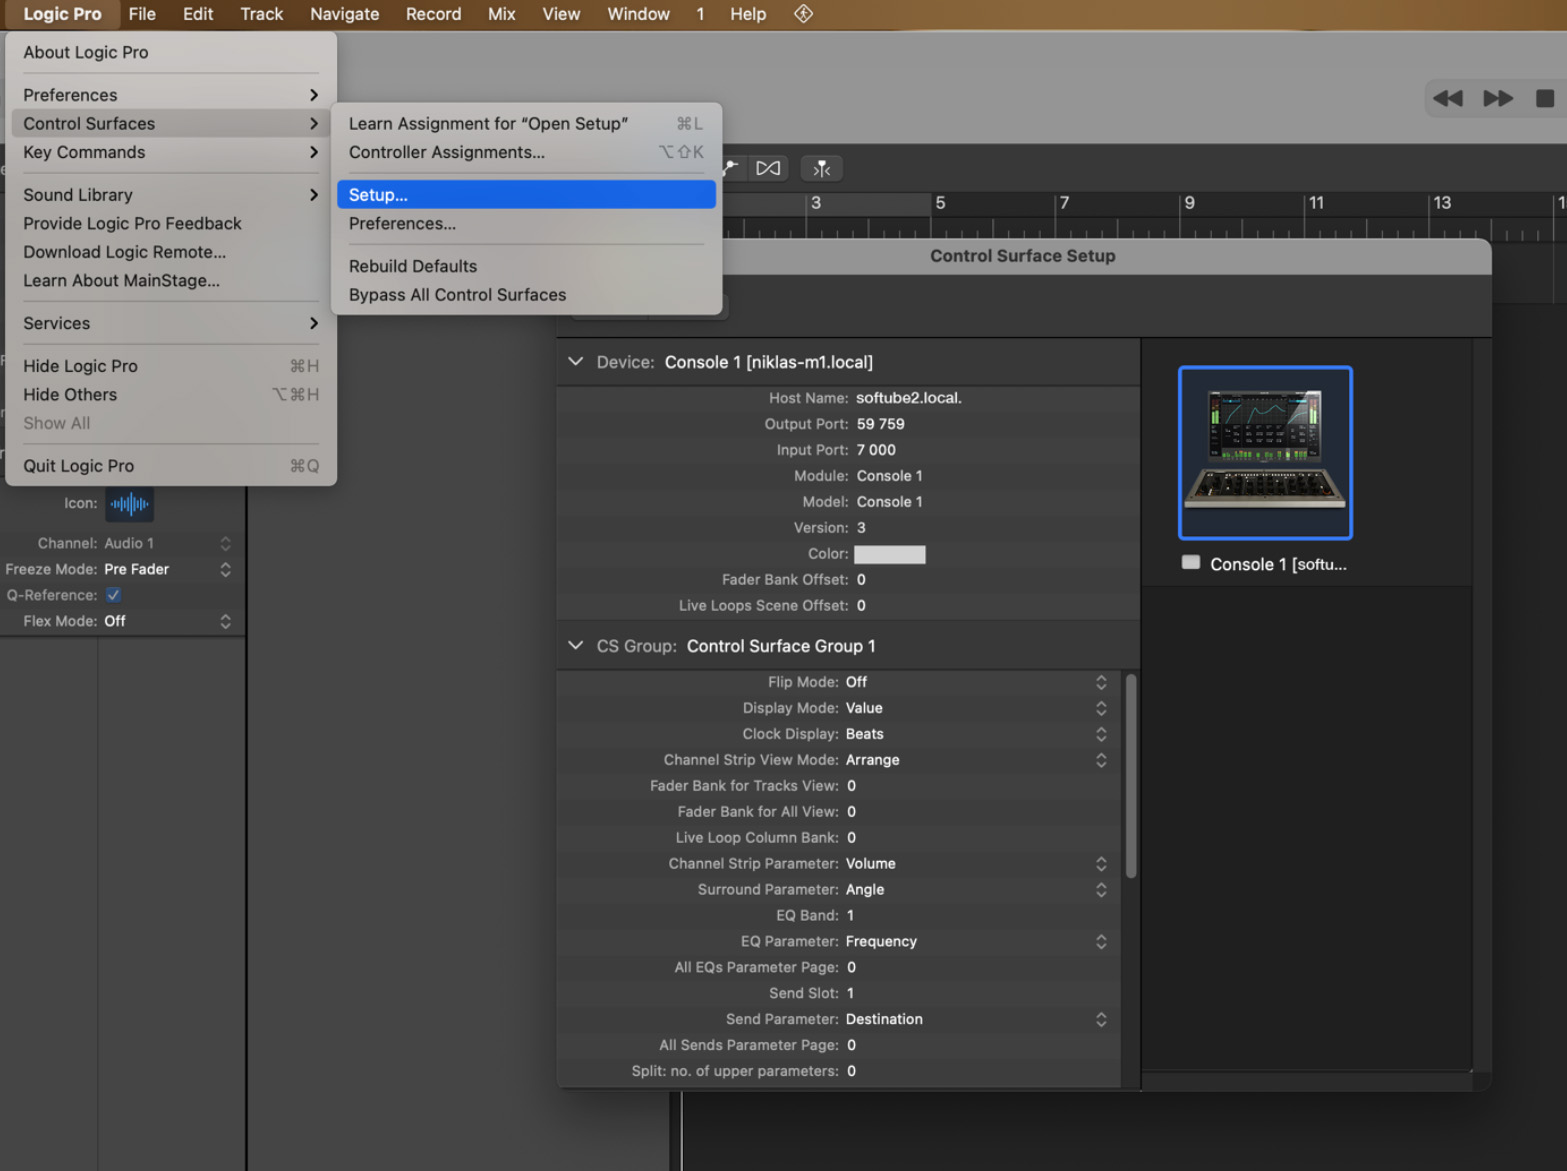
Figure 2. Enter Control Surface Setup to remove or add Console 1 support. This is usually not necessary.
Track Control
Console 1 can only control tracks that are currently visible in Logic’s mixer.
It will show different sets of tracks depending on your current Logic mixer configuration (eg. “Single”, “Tracks” and “All”). Furthermore, Console 1 hides tracks that are not currently visible in Logic’s mixer, like subtracks in a closed Track Stacks.
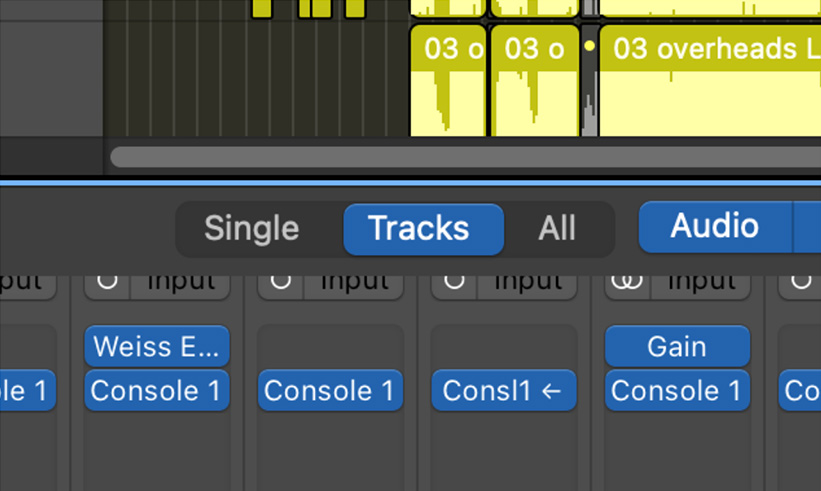
Figure 3. Only tracks visible in the mixer can be controlled by Console 1. "Single", "Tracks", and "All" changes which tracks are shown.
If the track view in Console 1 is out of sync with Logic, you can toggle “Single”, “Tracks” and “All” in the mixer to get it to re-sync.
Limited Tracks: Track Control without Console 1 plug-in
With Logic Pro, you don’t need to have a Console 1 plug-in on the track to be able to control the basic functionality (Volume, Pan, Solo/Mute, Sends). This type of track is called a “Limited Track”.
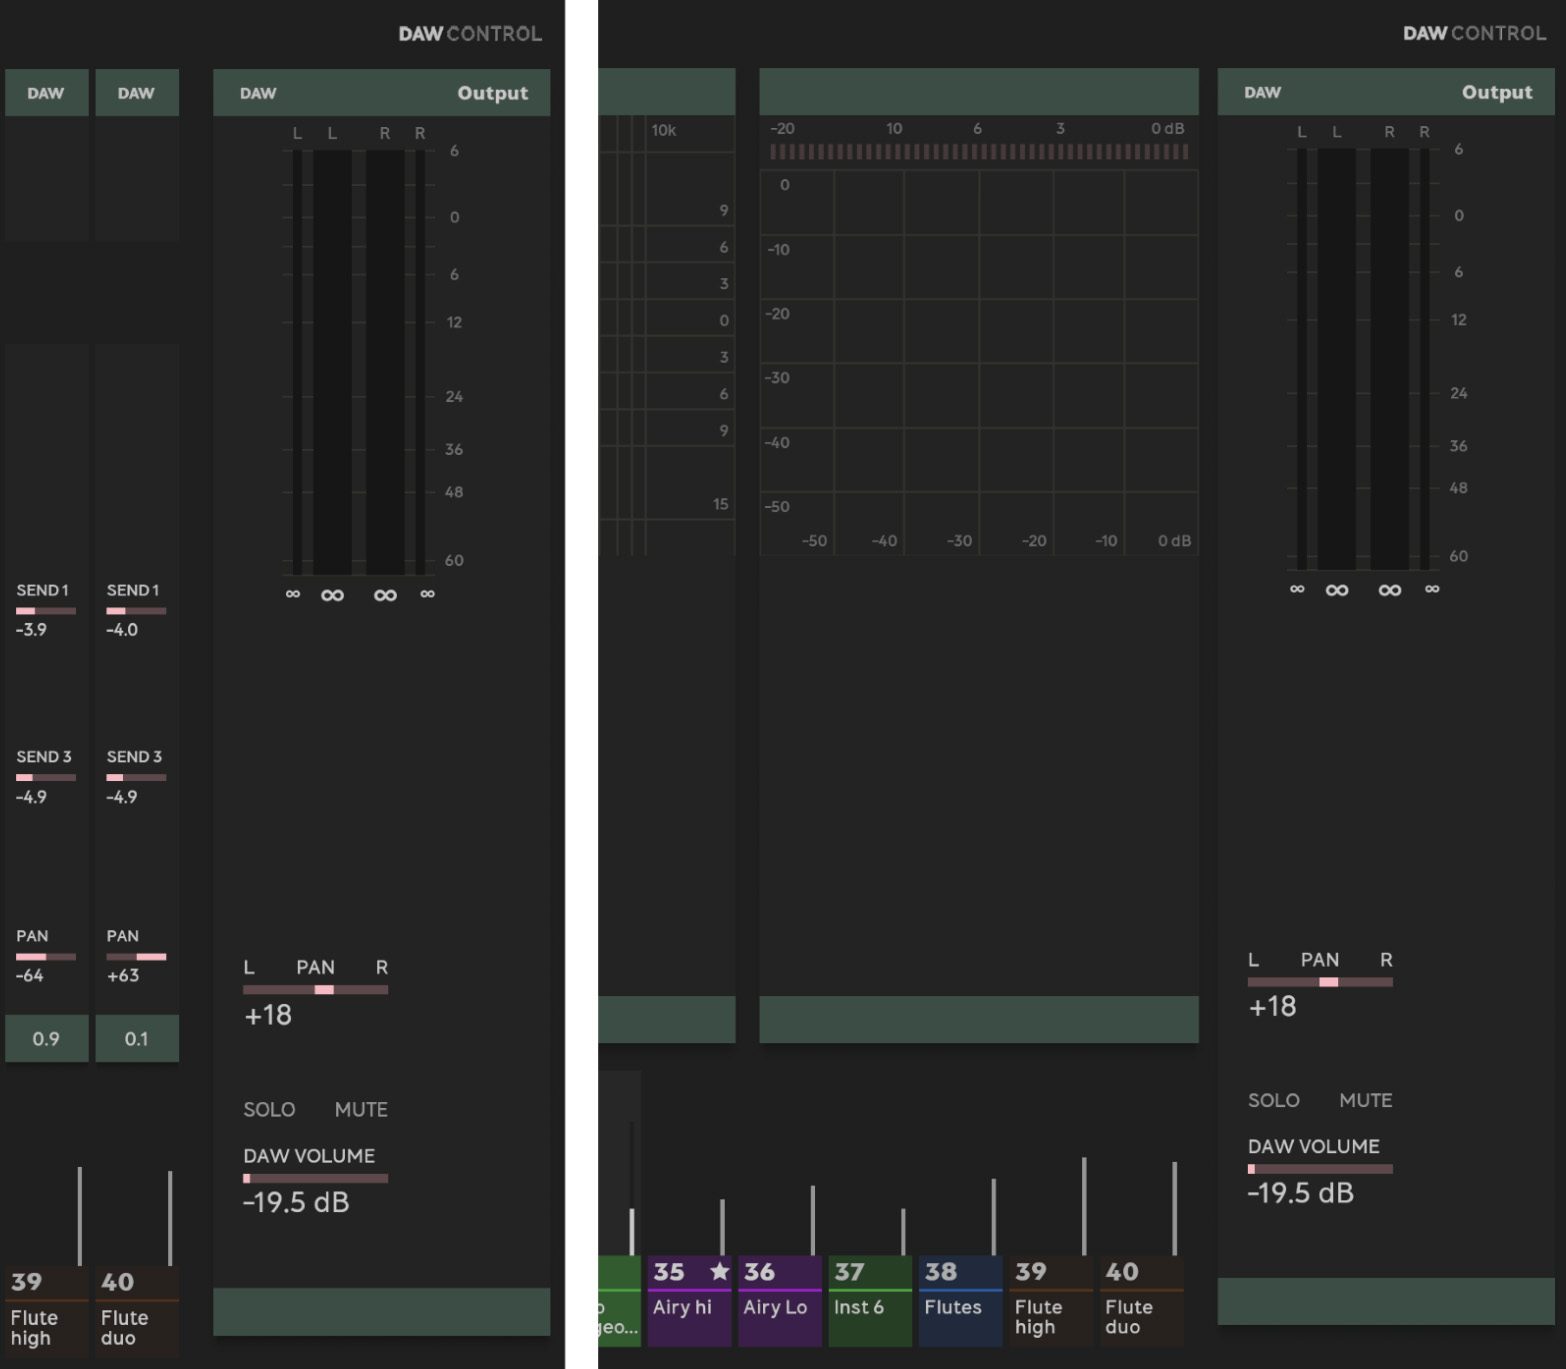
Figure 4. A "Limited Track" is indicated by the text "DAW CONTROL" at the top right, the green color and the lack of audio processing (no controls in the sections except the DAW controls.
Sends On Faders
Logic Pro has the option to place the sends on the fader, which is not recommended to use in Console 1. Instead, use the dedicated send controls on the Console 1 or Console 1 Fader hardware.
Maximum of 200 tracks
Console 1 can only control 200 tracks at a time in a project. It is possible to have more than 200 tracks in a project, but some Console 1 functionality, such as “Favorites”, “Copy” and “Group” will only work within 200 adjacent tracks.
If you have a project where you have used Console 1’s internal Solo, Mute or Solo Safe functionality, you will need to turn off all Solo, Mute and Solo Safe in your saved projects before using DAW Control for Logic Pro.
To turn off all internal Solo, Mute and Solo Safe:
- Go to Settings in the On-Screen Display (Shift + Track Selector 20)
- Click on “Turn off all internal Solo and Mute”
If more consideration is required, turn off DAW Control in Console 1, and manually turn off Solo, Mute, and Solo Safe:
- Turn off DAW Control: Shift + Track Selector 20, DAW Feature Setting, DAW Control On/Off. A restart of the DAW and OSD is required.
- Re-open the project and turn off all Solo, Mute that’s inside Console 1, and replace them with the DAW’s Solo and Mute.
With DAW Control for Logic Pro, the Solo and Mute buttons on Console 1 will be used to control Logic Pro’s solo and mute functionality, and it isn’t possible to toggle Console 1’s internal solo and mute functionality with DAW Control turned on.
Introduction for Visually Impaired
The layout of the hardware is as follows.
Front Panel
Top Row:
- On Screen Display toggle button. Toggles Console 1’s on screen display on or off.
- Display Mode button. Press to cycle through Console 1’s display modes. If accessibility mode is on, press this button to toggle between default mode and training mode.
Holding Shift (the button furthest down to the left) while pressing Display Mode will switch to Compact Mode. - Page Up and Down buttons. Scrolls through banks of tracks in DAW. Also used to scroll through parameters in menus.
Holding Shift while pressing Page Up and Down will cycle through tracks instead of banks of tracks. - Track Select buttons 1 through 20.
- Group button.
- Copy/All button.
- Presets button. Hold Shift and press Presets to save a new preset.
- Settings button. Hold Shift to enter a different function mode (such as the Apollo mode)
- Bypass Console 1.
Second row:
The second row consists of four groups with two buttons each, positioned vertically. From left to right:
First group:
- Load Section/Strip.
- Change order of section
Second group:
- External sidechain to…
- Filters to…
Third group (to the right of the first screen) selects different visualizations for that screen.
Fourth group (to the left of the second screen) selects different visualizations for that screen.
Column by Column, From the Left
The following section describe groups of controls, column by column.
1 knob and four buttons for the input section:
- Top: Phase Invert button
- Input Gain knob
- Tape/Preamp On button
- Bottom: Shift button, used to access extra functionality.
2 knobs, 1 button below, for the Filters section:
- Top: High Cut (Slope on Shift)
- Middle: Low Cut (Slope on Shift)
- Bottom: Filters On button
2 knobs below the screen are the first half of the Shape section:
- Top: Sustain knob
- Bottom: Punch knob
2 knobs and two buttons, buttons placed horizontally. Second half of the Shape section.
- Top: Gate knob
- Middle: Release knob
- Bottom: Shape 1 (left) and Shape 2 (right) On buttons.
Next are three knobs and one button, positioned vertically to the right of the Shape section. This is the first band, the low band, of the equalizer section.
- Top: Low Q
- Low Frequency
- Low Gain
- Bottom: Low Band Type (Shelf/Bell/Cut)
3 knobs positioned vertically to the right, slightly higher up, of the low band.
- Top: Low Mid Q
- Middle: Low Mid Frequency
- Bottom: Low Mid Gain
3 knobs positioned vertically to the right of the low mid band.
- Top: Low Mid Q
- Middle: Low Mid Frequency
- Bottom: Low Mid Gain
2 buttons, below the Low Mid and High Mid Band knobs, positioned horizontally:
- Left: EQ 1 On
- Right: EQ 2 On
3 knobs positioned vertically to the right, slightly lower down, of the high mid band. These are the last controls of the equalizer section.
- Top: High Q
- High Frequency
- High Gain
- Bottom: High Type (Shelf/Bell/Cut)
2 knobs and 2 buttons vertically to the right of the high EQ band. This is the start of the compressor section.
- Top: Attack
- Middle: Release. Hold Shift to access the Wet/Dry control.
- Bottom: Compressor 1 and 2 On button, positioned horizontally.
2 knobs positioned vertically to the right, and slightly below:
- Top: Ratio
- Bottom: Compression. Hold Shift to access the Make-Up Gain control, which goes from automatic make-up gain at its lowest position to a regular volume control.
3 knobs and 1 button vertically to the right of the compressor.
- Top: Drive knob
- Character knob
- Pan knob. Hold Shift to access the Width control.
- Bottom: Drive On button.
5 buttons vertically with a larger gap between button 4 and 5.
- Top: Send 1 (Hold shift for Send 4)
- Send 2 (Hold shift for Send 5)
- Send 3 (Hold shift for Send 6)
- Main Out Volume
- Volume
These buttons control what happens when the Volume knob is adjusted.
2 buttons positioned horizontally below the 5 buttons:
- Left: Solo. Also used as OK button in menus.
- Right: Mute. Also used as Cancel button in menus.
1 knob below Solo and Mute:
- Volume. Also used to scroll through menus.
Rear panel
On both sides of the indentation are USB-C ports. Any port can be used to connect to your computer.
Screen Reader Functions
The Console 1 accessibility features are only available for macOS users using macOS’s Voice Over. You turn on and off the screen reader for Console 1 with the “Display On” button on the hardware (top left).
Knobs are read when they are touched, while buttons are read when they are pressed, since buttons aren’t touch sensitive.
If you don’t have Console 1 plug-ins inserted on the tracks in your DAW you will only get limited screen reader feedback from the settings menu and similar. Mixing controls and track selectors will be inactive.
If you don’t get any reaction from pressing the display on button, the software might have crashed. Try restarting the “Console 1 On-Screen Display” application.
Please refer to the manual, as well as the accessible tutorial videos for details on how to use all functions of the hardware and software.
Special Screen Reader Functionality
Shift + Solo: Read input meters in real-time.
Shift + Mute: Read output meters in real-time.
Shift + Compressor On (left): Read gain reduction meter of compressor 1 in real-time.
Shift + Compressor On (right): Read gain reduction meter of compressor 2 in real-time.
Shift + Track 11: Monitor input meters at 5 second intervals.
Shift + Track 12: Monitor output meters at 5 second intervals.
Shift + Track 13: Monitor gain reduction meter at 5 second intervals.
Shift + Track 14: Read input peak meter.
Shift + Track 15: Read output peak meter.
Note that the peak value is held for 2 seconds (if there isn’t any higher peak value before that), then it is reset to the current meter value.
Shift + Tape/Preamp On: Turn on Solo Safe on the currently selected track.
Training Mode
When in training mode, all buttons and knobs read out the parameter name plus the current value of the parameter without changing the value.
The buttons that aren’t linked to a parameter, for example track, page, group, copy, preset and shift, just read their names.
This means that you can’t change track in training mode. The Display On button works as normal and the Mode button turns off training mode.
Turn On Training Mode
Open Settings (top row, second button from the right), go to the accessibility option and press OK on the option “Use Mode button to toggle screen reader training mode: Off”. You only need to do this once, then the Display Mode button will turn on and off training mode.
Apollo Central Mode
With Apollo Central you can control your UAD channels and plug-ins in the Apollo Console from the Console 1 hardware. Switch your Console 1 to Apollo Central mode and you will be able to load plug-ins and presets directly in your Apollo Control and you can control the plug-ins, channels, sends and monitoring. You can set up a recording chain with an UA 610 on the vocals, adjusting gain, sending a bit of that to a send with the Lexicon 224, and outputting it to the vocalist's headphones only by using the Console 1 hardware!
- Channel settings, such as Volume, Pan, Solo, Mute, Sends.
- Preamp settings such as Low Cut, Input Gain and control of Unison plug-ins.
- Plug-in inserts. Many UAD plug-ins come premapped to the Console 1 hardware. Just insert a plug-in and you can easily access and tweak its parameters.
- Output monitor track.
- Presets and channel presets.
How to Switch to Apollo Central Mode
When you first start the Console 1 On-Screen Display, it is started in the normal Console 1 operating mode. To switch to Apollo Central, press Shift + Settings (Func. Mode). This mode is indicated by the “Apollo Central” logo in the top right corner. Press Func Mode again to switch back.
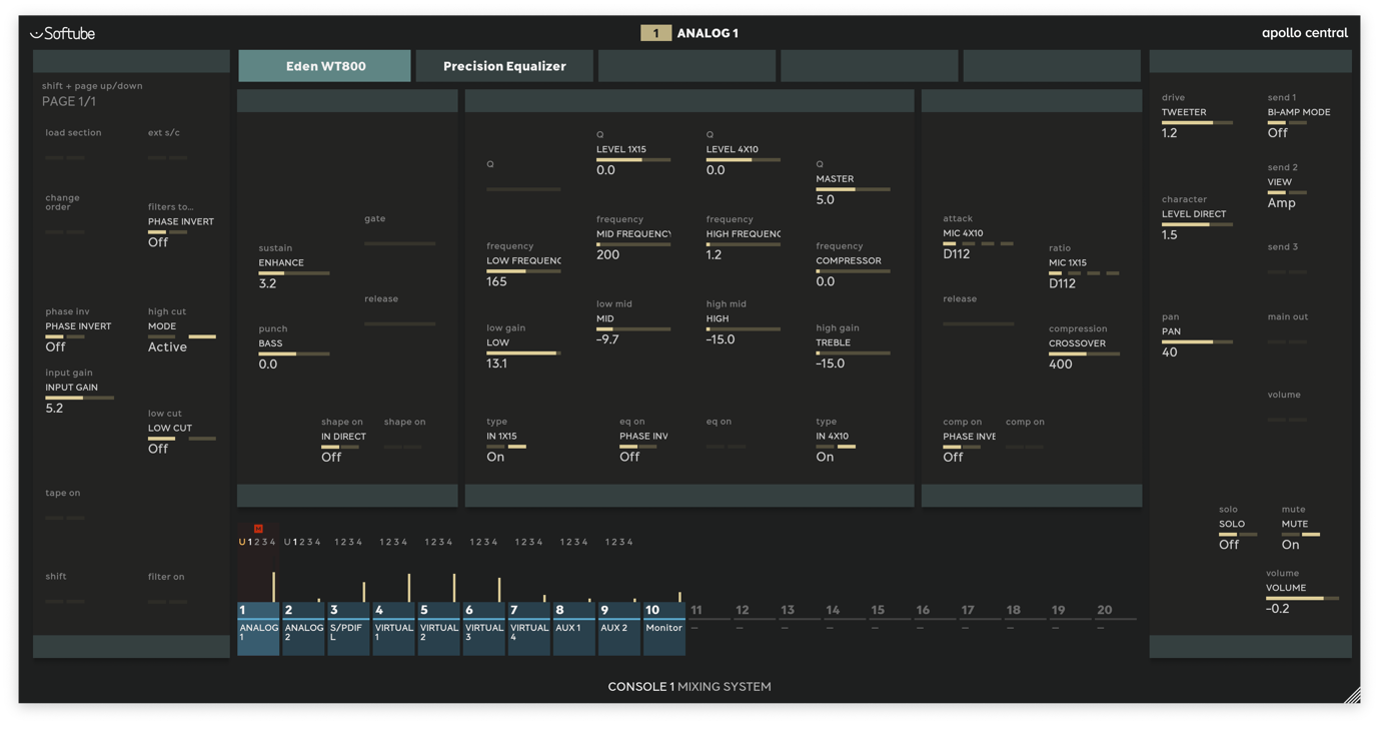
Console 1 in Apollo Central mode, with the Eden WT-800 plug-in selected on the Analog 1 channel.
Features at a Glance
- Open the On-Screen Display with Display On
- Switch over to Apollo Central mode using Func. Mode (Shift + Settings).
Insert a Plug-in
- Select the first track with Track Selector 1
- Press Shift + 1 to insert a plug-in in the Unison slot, Shift + 2 to insert a plug-in in the first plug-in slot, etc. Scroll through the list, Solo/OK to select, Mute/Cancel to exit.
Load a preset
- Press Presets to open the preset list. If no plug-in is inserted it will show the channel presets.
Tweak
- Use the knobs on the Console 1 hardware to tweak settings of the plug-in.
- Click Track Selector 1 to cycle through the different plug-ins on track 1.
- While a plug-in’s controls are shown, hold Shift to get direct access to some of the channel controls, such as Pan and Volume.
Send to Auxes
- While controlling the channel’s parameters, press and hold Shift to access the sends using the knobs that are indicated by the On-Screen Display.
The On-Screen Display
The On-Screen Display functions as a guide for the plug-in and control layouts, as well as an overview of plug-ins and levels. Resize the window by grabbing and dragging the lower right corner. The On-Screen Display accepts no mouse or keyboard input, except for window resizing.
Header
The header shows which plug-in have been inserted and if they are activated. If no plug-ins are inserted, only the first slot is active and says “Channel”.

Three plug-ins are loaded: Eden WT800 in the Unison slot, Precision Equalizer in the first plug-in slot, and the Ampeg B15N in the third slot. The Ampeg is grayed out, and is deactivated. Plug-in slots 4-5 have no inserts.
The status of the plug-ins are shown in the header, as well as in a short form in the meter bridge.
Selecting Tracks and Inserts
Selecting a track in Apollo Central mode is as easy as it is in Console 1 mode. The big difference is that you can click the same track selector button again to cycle through the different plug-in inserts on that track (if there are any inserts).
- Select track X with the Track Selector X button. If you have more than 20 tracks, use Page Up/Page Down to navigate to your track.
- When you select a track for the first time, you'll see the channel's settings, or if you have a Unison plug-in on that track, the Unison plug-in's settings.
- Click the Track Selector X button again to cycle through the different plug-ins inserted into that track. The currently selected insert slot is highlighted in the On-Screen Display's header.
- The On-Screen Display shows how the plug-in's parameters are mapped to the hardware.
Basic Mixing ("Channel View")
When you're in the "Channel" view (the first colored slot at the top of the Console 1 On-Screen Display), you can access the basic channel settings.
By selecting a track from either the Console 1 hardware or the UAD Apollo application, its basic functions (Volume, Pan, Solo, Mute) become directly available from the Console 1 hardware.
Sends
Access the channel's sends by pressing Shift on the Console 1 hardware. All six sends become available on knobs in the Drive and Compressor sections. Even if your hardware only supports a limited number of sends, Apollo Central will always show all six.
Preamp Settings
If the channel has preamp settings (Input Gain, Phase Invert and Low Cut) these are also immediately accessible from the hardware.
Unison Preamps
Inserting a plug-in in the Unison slot will make its settings available from the channel view, together with the channels "normal" parameters (Volume, Pan, etc).
Controlling Track Parameters
Select the track and make sure you're in first slot, indicated with "Channel" or the name of the Unison plug-in inserted as a preamp. For input tracks, you can control:
Low Cut
Phase Invert
Input Gain
Pan
Solo
Mute
Volume
By pressing Shift you can also access:
All 6 Sends
Recording monitor (record with or without UAD plug-ins).
Unison enabled tracks have the same parameters, as well as the parameters unique to the Unison plug-in.
Tracks without preamp have the same parameters, except the parameters controlling preamps (Low Cut, Phase Invert, Input Gain).
Aux tracks don't have Solo, Pan or Sends, but you get the ability to control Mono instead of Solo. Press Shift and you can access:
HP Level
Line 3/4 Level
Pre/Post
Controlling Plug-ins ("Insert View")
If a channel has inserted plug-ins, access the plug-in's settings by repeatedly pressing the channels track selector until you have selected the plug-in. If, for example, channel 1 has both the UA 1176 and Precision Equalizer inserted, pressing Track Selector 1 on the hardware will toggle through:
- Channel view (basic mix functions)
- UA 1176
- Precision Equalizer
- ...back to Channel view.
The On-Screen Display remembers the last selected position so that it is easy to jump between different plug-ins on different tracks.
Quick Access to Channel Settings
If you're in Insert View you can quickly access the channel settings by holding Shift and get access to:
- Preamp settings (Input Gain, Phase Invert, Low Cut) if applicable.
- Channel settings (Volume, Solo, Mute, Pan).
- Six sends and cues.
- Current insert's Power button (Shift + Phase Inv).
- Open/Closing the plug-in GUI (Shift + Filters to…).
- Previous/Next page for multi-page plug-ins (Shift + Page Up/Down).
- Recording monitor, record inputs with or without UAD plug-ins. (Shift + Send 1).
If a plug-in needs multiple pages of controls, press Shift + Page Up or Shift + Page Down to jump between pages. A plug-in has multiple pages if the "PAGE: Page 1/x" option is visible in the top left corner of the On-Screen Display.
Loading Plug-ins
Load or remove a plug-in from the Unison slot:
- Select the track.
- Click Shift + 1 to select "Select Unison Plug-in".
- Use the Volume/Select knob to scroll through the list. Choose "None" if you wish to remove the current plug-in.
- Confirm your choice with Solo/OK or cancel with Mute/Cancel.
Load or remove a plug-in from the 4 normal insert slots:
- Select the track.
- Click Shift + 2 to open the selection menu for the first insert. Click Shift + 3/4/5 for inserts 2-4.
- Use the Volume/Select knob to scroll through the list. Choose "None" if you wish to remove the current plug-in.
- Confirm your choice with Solo/OK or cancel with Mute/Cancel.
Loading Presets
To load a plug-ins preset, first select that plug-in from the hardware.
- Press Presets.
- Select the preset with Volume/Select, confirm with Solo/OK or cancel with Mute/Cancel.
To load a channel preset, select the channel instead of a plug-in before pressing Preset.
It's not possible to select a channel preset if a Unison plug-in is inserted on the current track. Remove the Unison plug-in before you access the preset menu to access the list of channel presets.
Specifications
Connectors: 2x USB-C
Power Supply: USB bus powered, or powered by included power supply (depending on the computer’s USB power capability)
Dimensions: 435 x 219 x 45 mm (17.1” x 8.66” x 1.77”)
Weight: 1.80 kg (3.96 lbs)
Included items:
- USB C to C: 2 m cable
- USB C to C: 1 m cable
- USB A to C: 1 m cable
- 4 screws for VESA mount
- 20W USB-C power supply
- License code