User Manual
Fix Flanger and Doubler
Intro
User Interface: Flanger
Tweaking Tips: Flanger
User Interface: Doubler
Tweaking Tips: Doubler
Fix Flanger and Doubler for Modular and Amp Room
Extended Features
Credits
Flanging is a modulation effect that has fascinated music creators and sound engineers for decades. The instantly recognizable “swoosh” sound of a flanger has been widely used both subtly, to add weight and depth to horn sections, as well as heavily for very obvious sci-fi sweeps on everything from the sacral synths of Jean Michel Jarre to the big drums of Led Zeppelin.
The first flanging experiments are attributed to legendary guitarist and sound engineer Les Paul in the 1940s. But it was during the recordings of the Beatles classic Revolver that the effect was achieved when John Lennon and studio engineer Ken Townsend played back the same sound through two synchronized tape machines, and lightly pressed the flange of one of the playback reels about 20ms while recording onto a third machine. This slight delay mixed with the original signal caused a flanging effect-a swirly, metallic jet type of sound.
In the 1970s, dedicated flanging machines came up but were limited to studios due to their large physical size. Later, the flanger was popularized by the flanger guitar pedals that relied heavily on analog delay with the bucket brigade echo technique.
In 1979 Paul Wolff formalized a vision. This vision was a flanging and doubler unit with the sound and user experience of classic tape flanging and vocal doubling, but with the advantages of electronic circuits rather than mechanical tape reels. This vision was turned into a few hardware boxes loved among musicians and sound engineers alike, but they unfortunately never made it into mass production.
The Fix Flanger and Doubler is the reincarnation of his vision, two great plug-in effects featuring the versatility of digital world combined with warmth of the analog world.
For more information regarding the Fix Doubler, please see the Fix Doubler chapter.
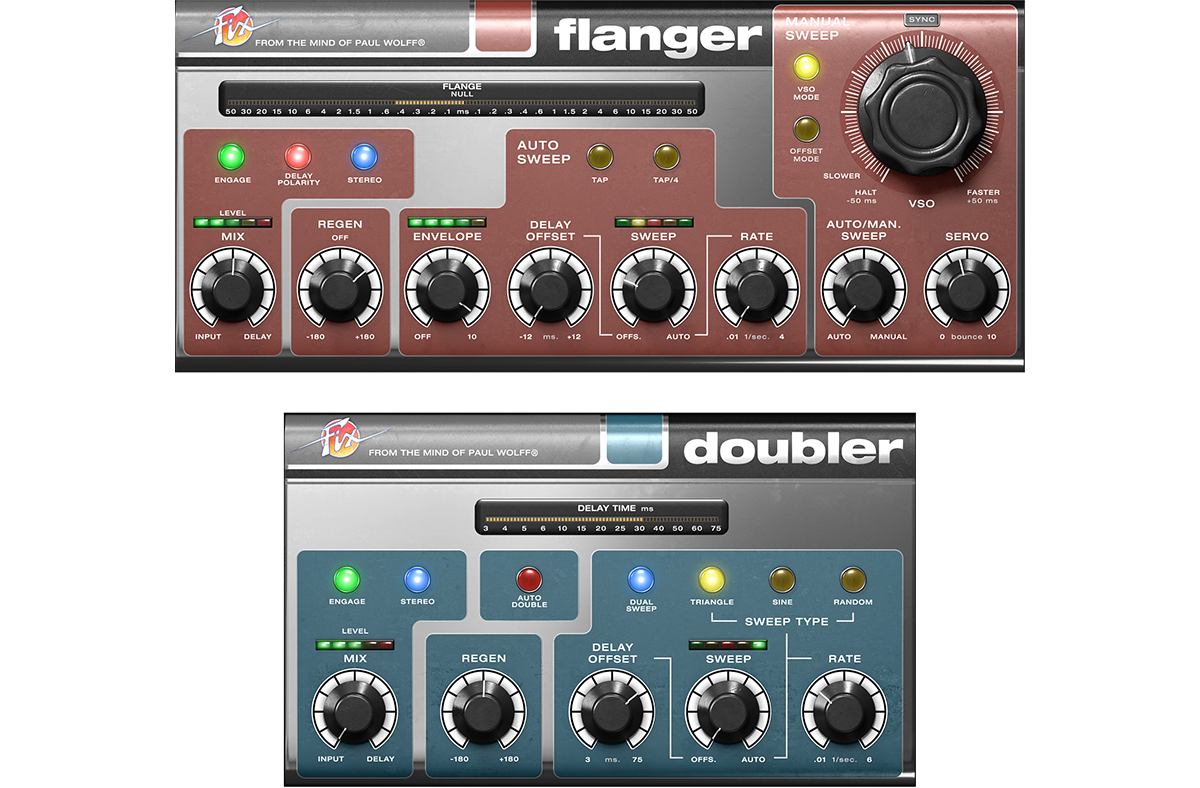
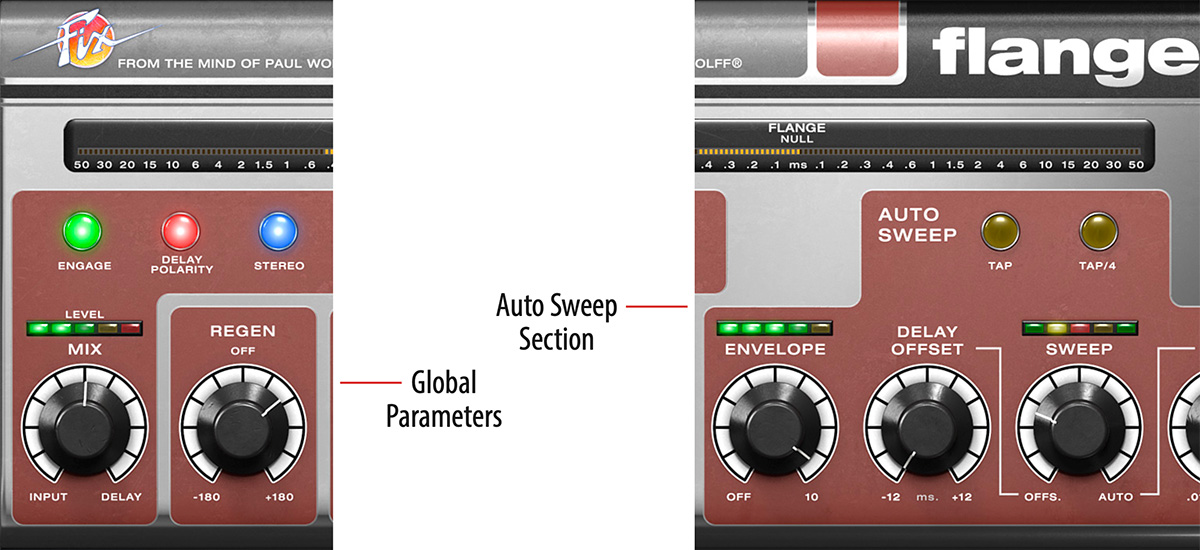
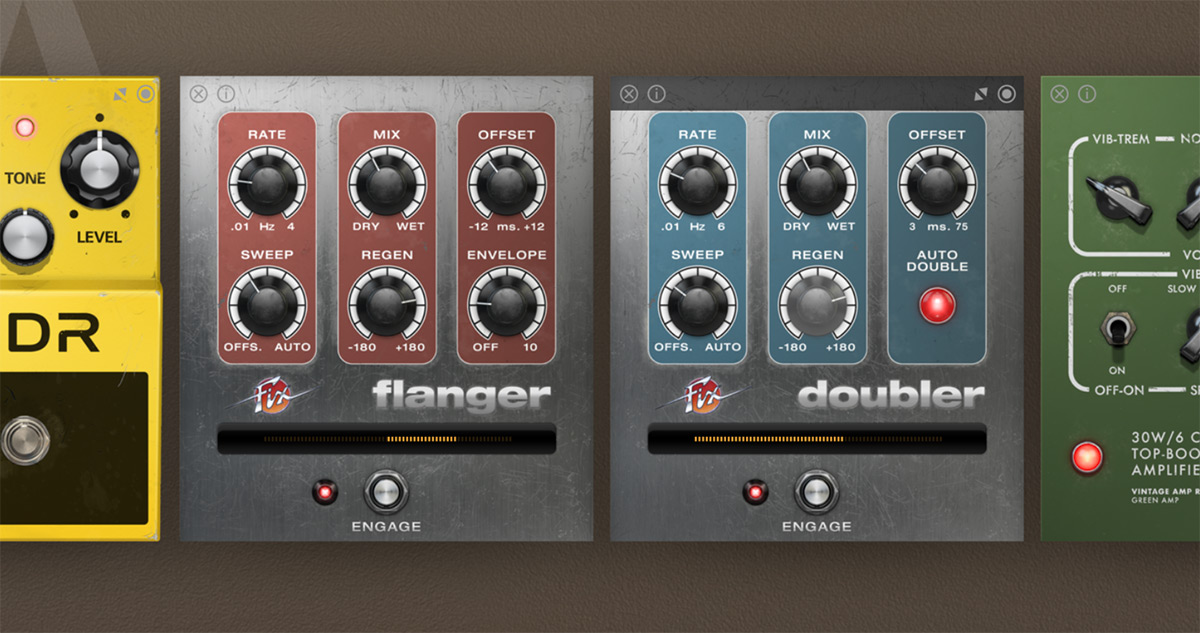
The Fix Flanger consists of two main sections, AUTO SWEEP and the MANUAL SWEEP. These sections both control the flanging effect, but AUTO SWEEP acts more like a regular LFO swept flanger, while MANUAL SWEEP lets you control the flange just like you would if you had two synchronized tape machines. Outside of these sections you have two controls that globally affects the amount of flanging, Mix and Regen.
-
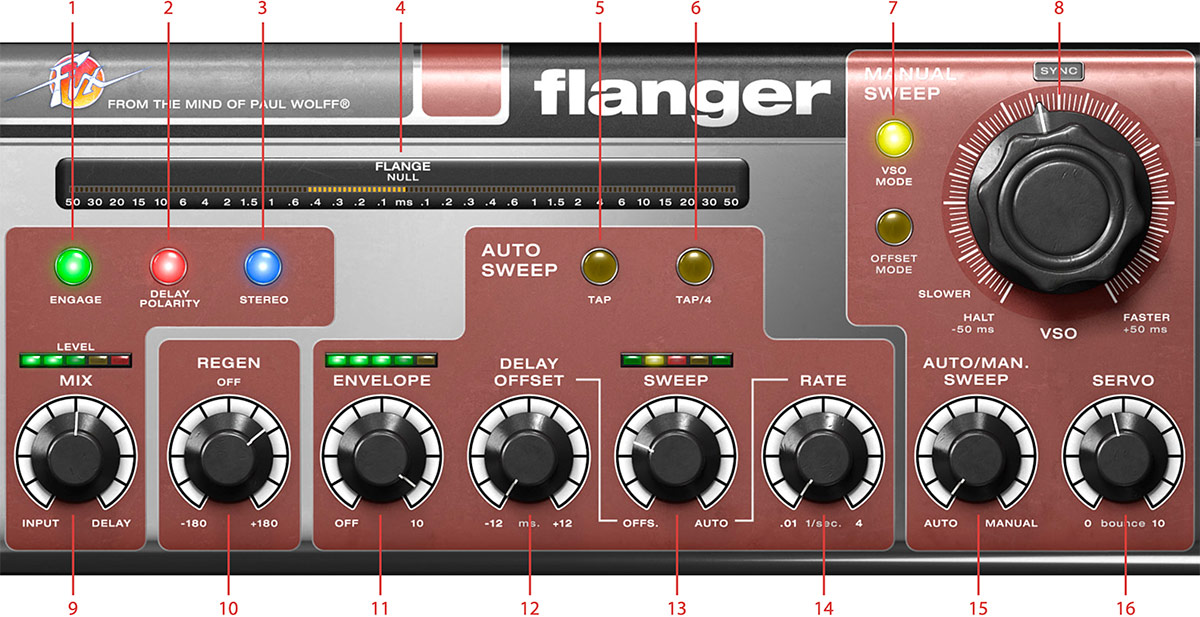
Engage
-
Delay polarity
-
Stereo
-
Flange meter
-
Tap
-
Tap/4
-
VSO mode, Offset mode
-
VSO
-
Mix
-
Regen
-
Envelope
-
Delay Offset
-
Sweep
-
Rate
-
Auto/Man. Sweep
-
Servo
Mix: Sets the balance between the flanger and the direct signal. The plug-in only outputs the original signal when set to INPUT, and only the delayed signal when set to DELAY. To hear the flanging effect between the input and the delayed signal, make sure that you set Mix somewhere around 50%.
Regen: Sets the amount of delay feedback in use. Full positive or negative regeneration will set the flanger into self oscillation. It’s a nice effect, but watch your speakers!
Engage: Use Engage as a smooth bypass if you want to turn on or off the effect during a song.The DAW’s built-in bypass can cause artifacts when turning on/off the Fix Flanger.
Delay Polarity: This is the polarity of the feedbacked signal. Different polarity of the feedback results in different sound of the flanging effect.
Stereo: Enable Stereo to get a wider stereo image. If you are using a STEREO input and output, you will get a wider and more vivid image. If you are using a MONO input with a STEREO output, the Stereo function will make a stereo signal from your mono input. If you are using this function in mono-to-mono, the flanging will sound a bit fuller and a tad different, but won’t make much sense otherwise.
Auto Sweep section
Envelope: Use Envelope if you want the level of the input signal to affect the flange. With Envelope active, a loud sound will force the delay of the flange towards zero, which is a very cool effect on drums. Use sparingly to get a more random flange effect on for instance vocals.
Delay Offset: Sets the starting point of the AUTO SWEEP. With DELAY OFFSET set to 0, the sweep will be both positive (delayed signal) and negative (pre-delay). If you just want a typical delayed flange, set Delay Offset to a positive value.
Sweep: Sets the balance between the Delay Offset and auto sweep. When Sweep is set all the way counterclockwise, the Delay Offset determines the delay time of the flange. When set all the way clockwise, the full range of the sweep will make the delayed signal sweep back and forth +/- 15 milliseconds across the zero crossing point.
Rate: Set the sweep rate, ranging from 0.01 Hz (100 seconds) to 4 Hz (1⁄4 second).
Tap: Tap repeatedly to set the sweep rate. This button cannot be automated.
Tap/4: Divide the current sweep rate by four. This button cannot be automated.
While using the envelope, the best results are often achieved by using a moderate amount of envelope modulation on the flange.
Manual Sweep section

VSO: In OFFSET MODE the VSO knob sets the delay. In VSO MODE, it sets the speed of the delay change (see “VSO Mode” below).
Auto/Man Sweep: Sets the balance between AUTO SWEEP section and the MANUAL SWEEP section. When set fully counterclockwise, only the Auto section will affect the delayed signal. And of course, when set fully clockwise, only the MANUAL SWEEP section will affect the delayed signal and thus the flange effect.
Servo: The amount the delay bounces when the delay is changed.When set fully clockwise, this knob will induce a form of “sluggishness” and smoothness when quickly changing the offset or simulated speed of the slaved tape (VSO). Servo will also affect the parameters on the Auto sweep, but to a lesser degree.
VSO mode: In VSO MODE, the VSO knob emulates how a VSO (Variable Speed Oscillator) knob works on a tape machine. By having two tape machines, where you vary the speed of one machine while blending both outputs together, you achieved the original Beatles style tape flanging. The VSO MODE emulates this behavior. This means that rather than directly setting the delayed offset between the dry and delayed signal, the VSO knob will set the relative speed of the slaved tape recorder and thereby creating slightly different kind of flange behavior. When the VSO knob is set to -50 ms, also marked HALT, the tape reel will stop.
Offset Mode: In OFFSET MODE the VSO can be used to directly set the delay the audio, ranging from -50 to 50 ms.
The Flange effect is highly dependent of the setting of the Mix knob, since the typical hollow flange is created by the differences between the delayed input and the original input.
Since the Fix Flanger can delay the signal with negative delay times, the dry signal passing through the plug-in will always have a 50 millisecond latency (look-ahead) which makes it less suitable for using live. However, Fix Flanger will always work well as post-recording treatment, and all major DAWs will automatically correct this latency.
Through-Zero Flanging
For true “through-zero flanging” set the Mix balance to 50%, use negative Delay Polarity (lamp indicator is ON) and set Regen to OFF. This will completely cancel out the signal when the delay passes through 0 milliseconds.
Using the VSO mode
Since VSO MODE emulates much how an old-school tape flanging rig works, one has to imagine flanging as trying to keep “the second tape-machine” in near sync by speeding up and slowing down its speed against the dry signal. This is achieved by looking at the flange meter and trying to keep the flange as much as possible in the middle by “chasing” the through-zero pass-through with the VSO knob. The servo motor emulation amount can also be handy in order to induce some natural “motor lag” when chasing the flange up and down the sonic spectrum.
By using VSO MODE with a completely wet signal (Mix set to DELAY), you can emulate a tape stop by turning the VSO knob all the way counterclockwise.
Chorus Effect
By using the AUTO SWEEP section and setting the Sweep knob almost fully to OFFSET (2 – 5%), you’ll get a nice chorus-like effect. Adjust the Mix between 25-75% to set the amount of the effect. Delay Offset should be around 10–15 ms, but by setting it to positive or negative offset you can get different styles of chorus.
The Fix Doubler panel contains the following ten controls.
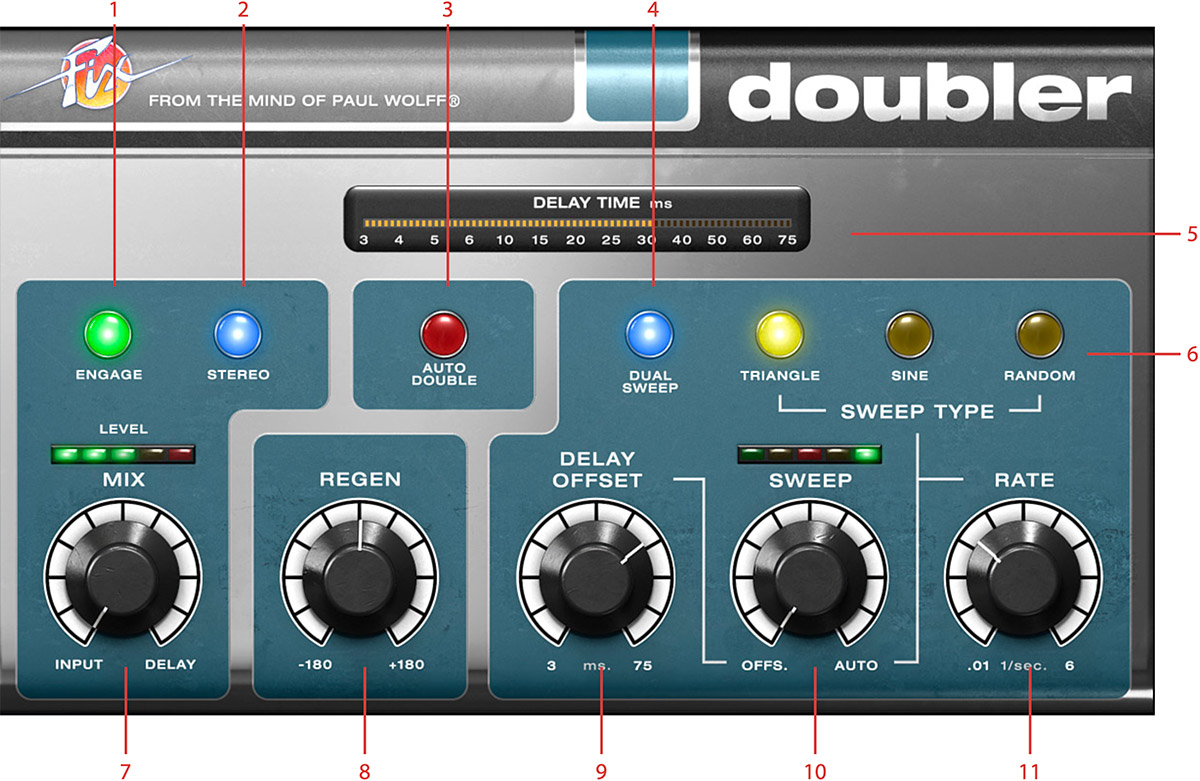
Mix: Sets the balance between the doubled and the direct signal. Set it to INPUT to only get the input sound, or fully to DELAY to only hear the delayed signal. Set it somewhere in the middle (30-70%) to get a nice doubling effect.
Engage: Use Engage as a smooth bypass if you want to turn on or off the effect during a song.
Stereo: Turn on to widen the stereo image, or turn a mono signal into a stereo signal. Make sure to insert the plug-in as a STEREO or a MONO-TO-STEREO plug-in for the widening effect to work.
Dual Sweep can also be used to widen the stereo image or turn a mono signal into stereo
Regen: Sets the amount of delay feedback. Turning Regen up makes the effect sound fuller, but too much Regen will make it sound flangy and hollow. This control is not active (greyed out) when Auto Double is in use.
Auto Double: Turns on and off the AUTO DOUBLE mode. The Auto Double mode will put the secret sauce in the stew and make everything sound great!
Delay Offset: Sets the delay offset of the doubled signal. Longer delay times will yield a more slap back kind of doubling while shorter delay times will sound more flanger-like.
Sweep: Sets the balance between the fixed Delay Offset and the sweep. Turning this knob clockwise will cause the sweep to affect the doubled signal more.
Rate: Sets the speed of the sweep, ranging from 0.01 milliseconds to 6 milliseconds. The sweep amount is also reversely affected by sweep rate (see below), so that faster rates makes the sweep less apparent. This is by design to ensure a more natural doubling sound and a constant pitch change in the delayed signal.
Dual Sweep: Turn this on to get two independent doublers out of phase with each other for the LEFT and RIGHT channel. This can make the doubling effect sound fuller, and also create a nice stereo effect for mono tracks.
Sweep Type: Selects the type of waveform used for the sweep: TRIANGLE, SINE and RANDOM.
TRIANGLE: Constant pitch during the sweep, suitable for low Sweep settings and Dual Sweep.
SINE: Pitch is changing throughout the whole sweep, nice on monophonic instruments and higher Sweep settings.
RANDOM: The pitch shift is random, and will sound more natural when used sparingly. Low Sweep and Rate is preferred for this one.
-
Engage
-
Stereo
-
Auto double
-
Dual sweep
-
Delay meter
-
Waveform type Triangle, Sine, Random
-
Mix
-
Regen
-
Delay offset
-
Sweep
-
Rate
Here are a few pointers to guide you when using the Fix Doubler:
Delay Offset
Using 20 to 45 milliseconds of delay and subtly mixing the delayed signal with the original tends to “fatten up” the sound, especially when using the STEREO or DUAL SWEEP modes.This creates an illusion of more than one singer or player and is also an excellent method of adding lushness to string or horn sections. Instruments with sharp transients, such as rhythm guitars or drums, will typically require a shorter delay, vocals medium delays, and strings and horns slightly longer delay times.
Mix
Mix ratio is essential to the perceived “fatness” of the resulting signal. A completely wet signal (Mix fully clock-wise) can be OK when using more extreme settings in order to create vibrato effects, but normally a mix between 20% and 50% is recommended to create a subtle, natural sounding vocal doubling or chorus.
Sweep
The Sweep is the key ingredient when creating a subtle or fat doubling chorus. Too much Sweep, and it will sound pitchy and wobbly, too little and you’ll just get a slap back echo effect.
Chorus Effect
A natural sounding chorus effect is easily obtained by using the auto double function while setting the delay offset at a low setting (around 20–30 milliseconds), Rate at around 3–4 Hz and Sweep almost all the way to OFFSET.
Tape Wow and Flutter
By using a short Delay Offset at around 7 ms, Sweep set to 2–3%, RANDOM waveform with slow Rate, and Mix fully clockwise, you will get a tape machine like wow and flutter effect.
Vibrato
A vibrato effect can be achieved by using a completely wet signal, a fast sweep (Rate at 5–6 Hz), Sweep at 5–10%, and SINE or TRIANGLE waveforms. Use Delay Offset and Regen to get different characters of vibrato.
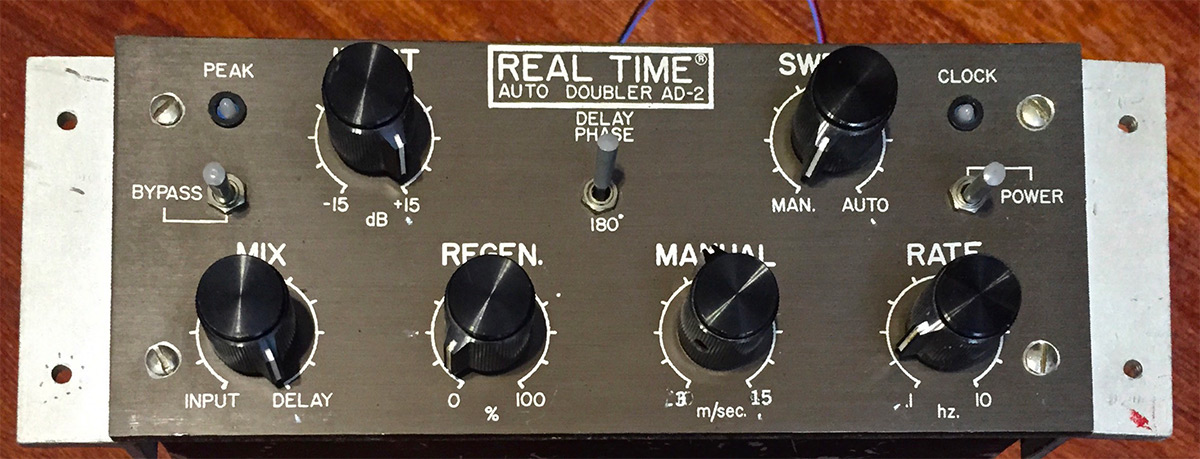
Original Auto Doubler hardware, the Real Time Auto Doubler AD-2 from 1979.
Fix Flanger and Doubler for Modular and Amp Room
Fix Flanger and Doubler can also be used as two separate modules in Modular and as two separate effects in Amp Room.
The algorithms are the same, but the interfaces are focused on the most relevant features for an easy and quick access.
The use in Modular allows for automatic voltage control of some of the parameters.

Fix Flanger and Doubler for Modular.
Fix Flanger and Doubler for Amp Room.
Here a brief description of the features of these modules and effects:
Fix Flanger
Parameters
Rate: Sets the speed of the sweep, ranging from 0.01 Hz to 4 Hz.
Sweep: Sets the balance between the Delay Offset and the auto sweep.
Mix: Sets the balance between dry and wet signal.
Regen: Sets the amount of delay feedback.
Offset: Sets the starting point of the AUTO SWEEP.
Envelope: Sets the amount of input signal affecting the flange.
In addition, the module has:
Inputs
Left input: Input for left channel.
Right input: Input for right channel.
Rate: CV Input for the Rate parameter.
Sweep: CV Input for the Sweep parameter.
Mix: CV Input for the Mix parameter.
Regen: CV Input for Regen parameter.
Offset: CV Input for the Delay Offset parameter.
Outputs
Left output: Output for left channel.
Right output: Output for right channel.
Fix Flanger for Modular and Amp Room runs in an ad-hoc Low Latency mode. This makes the effect more immediate for live playing but limits the range of the negative delay.
A whole range of added control can be accessed with Extended Features. Please see the separate "Extended Features" manual for more information.
Paul Wolff – Idea and original reference
Arvid Rosén – Model analysis and implementation
Niklas Odelholm– Programming and GUI
Kristofer Ulfves – User manual and initial testing
Paul Shyrinskykh – Quality assurance
Ulf Ekelöf – 3D rendering and graphics