
User Manual
Marshall Plexi Classic
Intro
The right way to do it
The Cabinet Choice
The Mic
Amplifier Parameters
Patch Switching
Input Channels
Channel Strip Parameters
The Marshall Plexi Classic is a limited version of the Marshall Plexi Super Lead 1959, but don’t worry, there’s absolutely nothing that’s light weight about this amp. It has the exact same full-bodied distortion as its counterpart, the Marshall Plexi Super Lead 1959, and you can still get the same rebellious tones from this as you could with the original amp, the Plexi reference amp from 1967, borrowed from Marshall’s private museum.
The differences between the Marshall Plexi Classic and the full version is that we have limited the amount of choices you have when it comes to the microphone selection and blending, and left the ultimate workhorse, the SM57, in the plug-in.
The sound you can get from the Marshall Plexi Classic is the true Marshall sound, and you will only find it here (or in Marshall’s museum). Have fun, go make some great music!
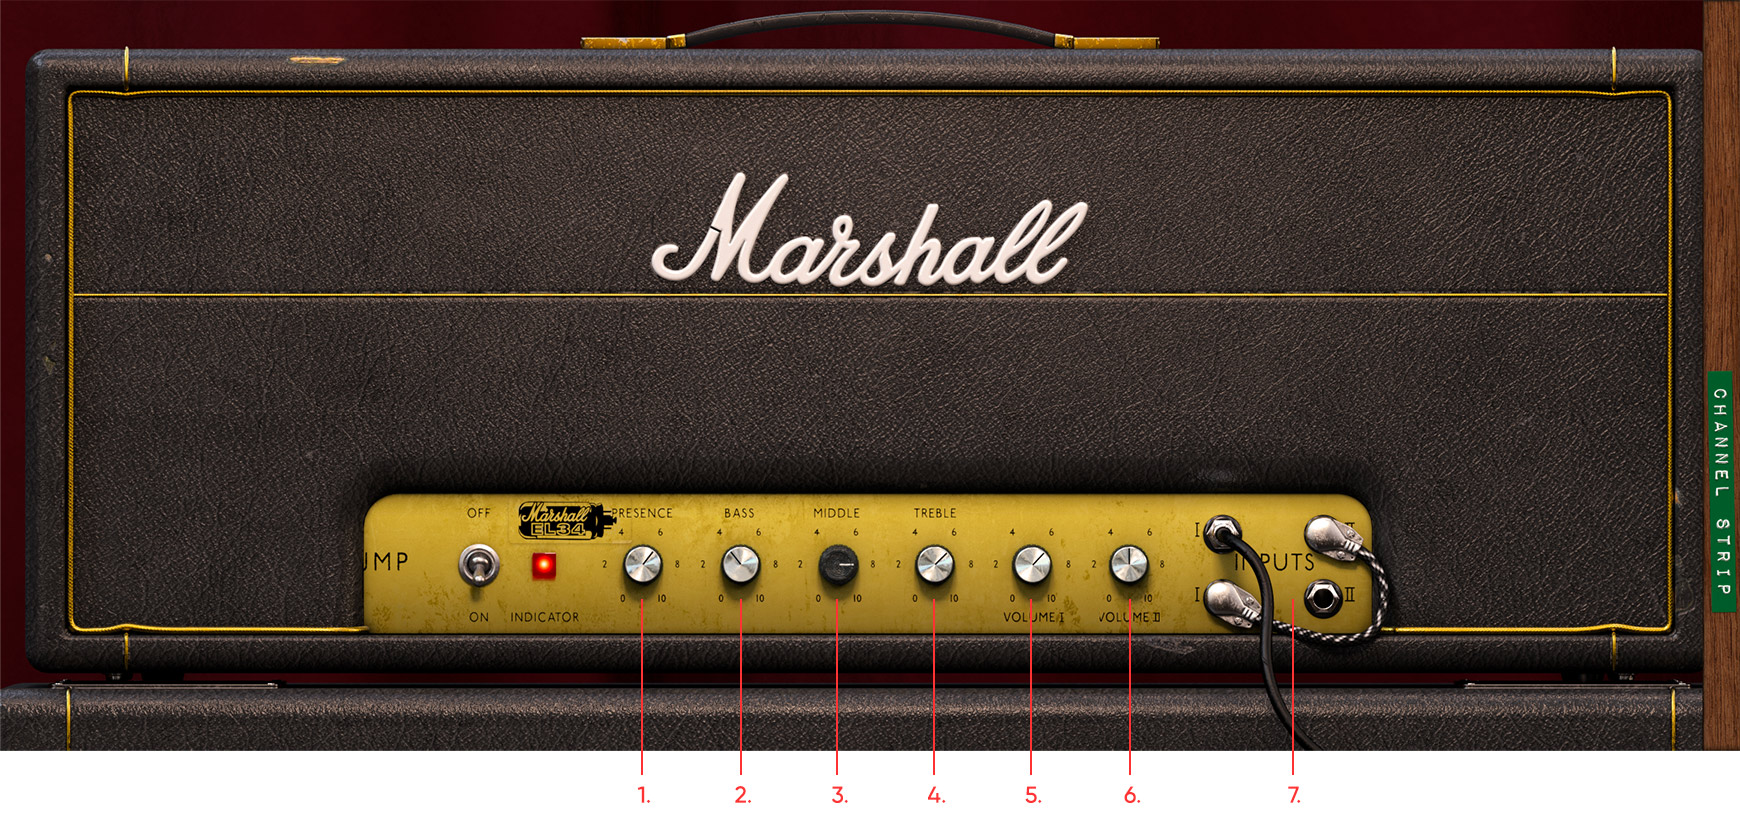
Click here to view the full-sized image in a new tab
- Presence
- Bass
- Middle
- Treble
- Volume I
- Volume II
- Patch Switching
Patching The Plexi has two channels, with a high and low input each. Channel I is bright and present, while Channel II is dark and full bodied. A lot of sonic variation can be obtained from patching these channels together in different manners, which is faithfully modeled in this plug-in.
But the sound of a guitar amp doesn’t just come from the amp itself. The cabinet choice, microphone selection and microphone placement are also vital parts in getting that sound. Therefore, Softube used the expertise of legendary engineer Tony Platt for the cabinet and microphone simulation. Tony’s credentials speak for themselves. Among many other fantastic records, he engineered AC/DC’s Highway to Hell and Back in Black. It’s safe to say Tony knows better than most how to record a loud Marshall amplifier.
The goal for this plug-in was to capture how the Plexi sounded when it was new back in 1967, to get the sound Jim Marshall himself intended. To capture the typical late sixties tone, Tony and Chris—after much testing at Marshall headquarters—chose to use a straight 1960BHW 4x12 inch speaker cabinet, loaded with Celestion G12H-30’s. These are relatively low wattage speakers, similar to those used at the time, which will saturate more easily compared to more modern constructions. This adds a lot of character to the end result. The particular speakers in this cabinet were not from the sixties, as speakers that have spent nearly 50 years reproducing the sound of 100-watt guitar amplifiers will have deteriorated and give a much different sound compared to what was intended. The speakers used had however been well broken in to reach their full potential and liveliness.
An all time classic, the SM 57 was used to record the cabinet. If you need more microphone choices, and also the option to blend and pan different mics together, please check out the full version, the Marshall Plexi Super Lead 1959.
The functionality of the front panel controls correspond exactly to those of the real amplifier. And just like in real life, it is possible to connect the amplifier's two channels in a number of ways.
Presence: Increases the amount of presence—a treble boost accomplished by reducing the amount of high frequencies being subjected to negative feedback in the power amp section.
Bass, Middle and Treble: Tone controls that determine the frequency content from the amplifier.
Volume I: Controls the volume of the brighter sounding Input I.
Volume II: Controls the volume of the darker sounding Input II.
Patch switching: Provides different combinations of high and low inputs for Input I and Input II separately. Clicking one of the four inputs selects it as the main input from the guitar (black cable). Clicking the selected guitar input again rotates between the available patching patters (with the short black/white fabric-covered patch cable).
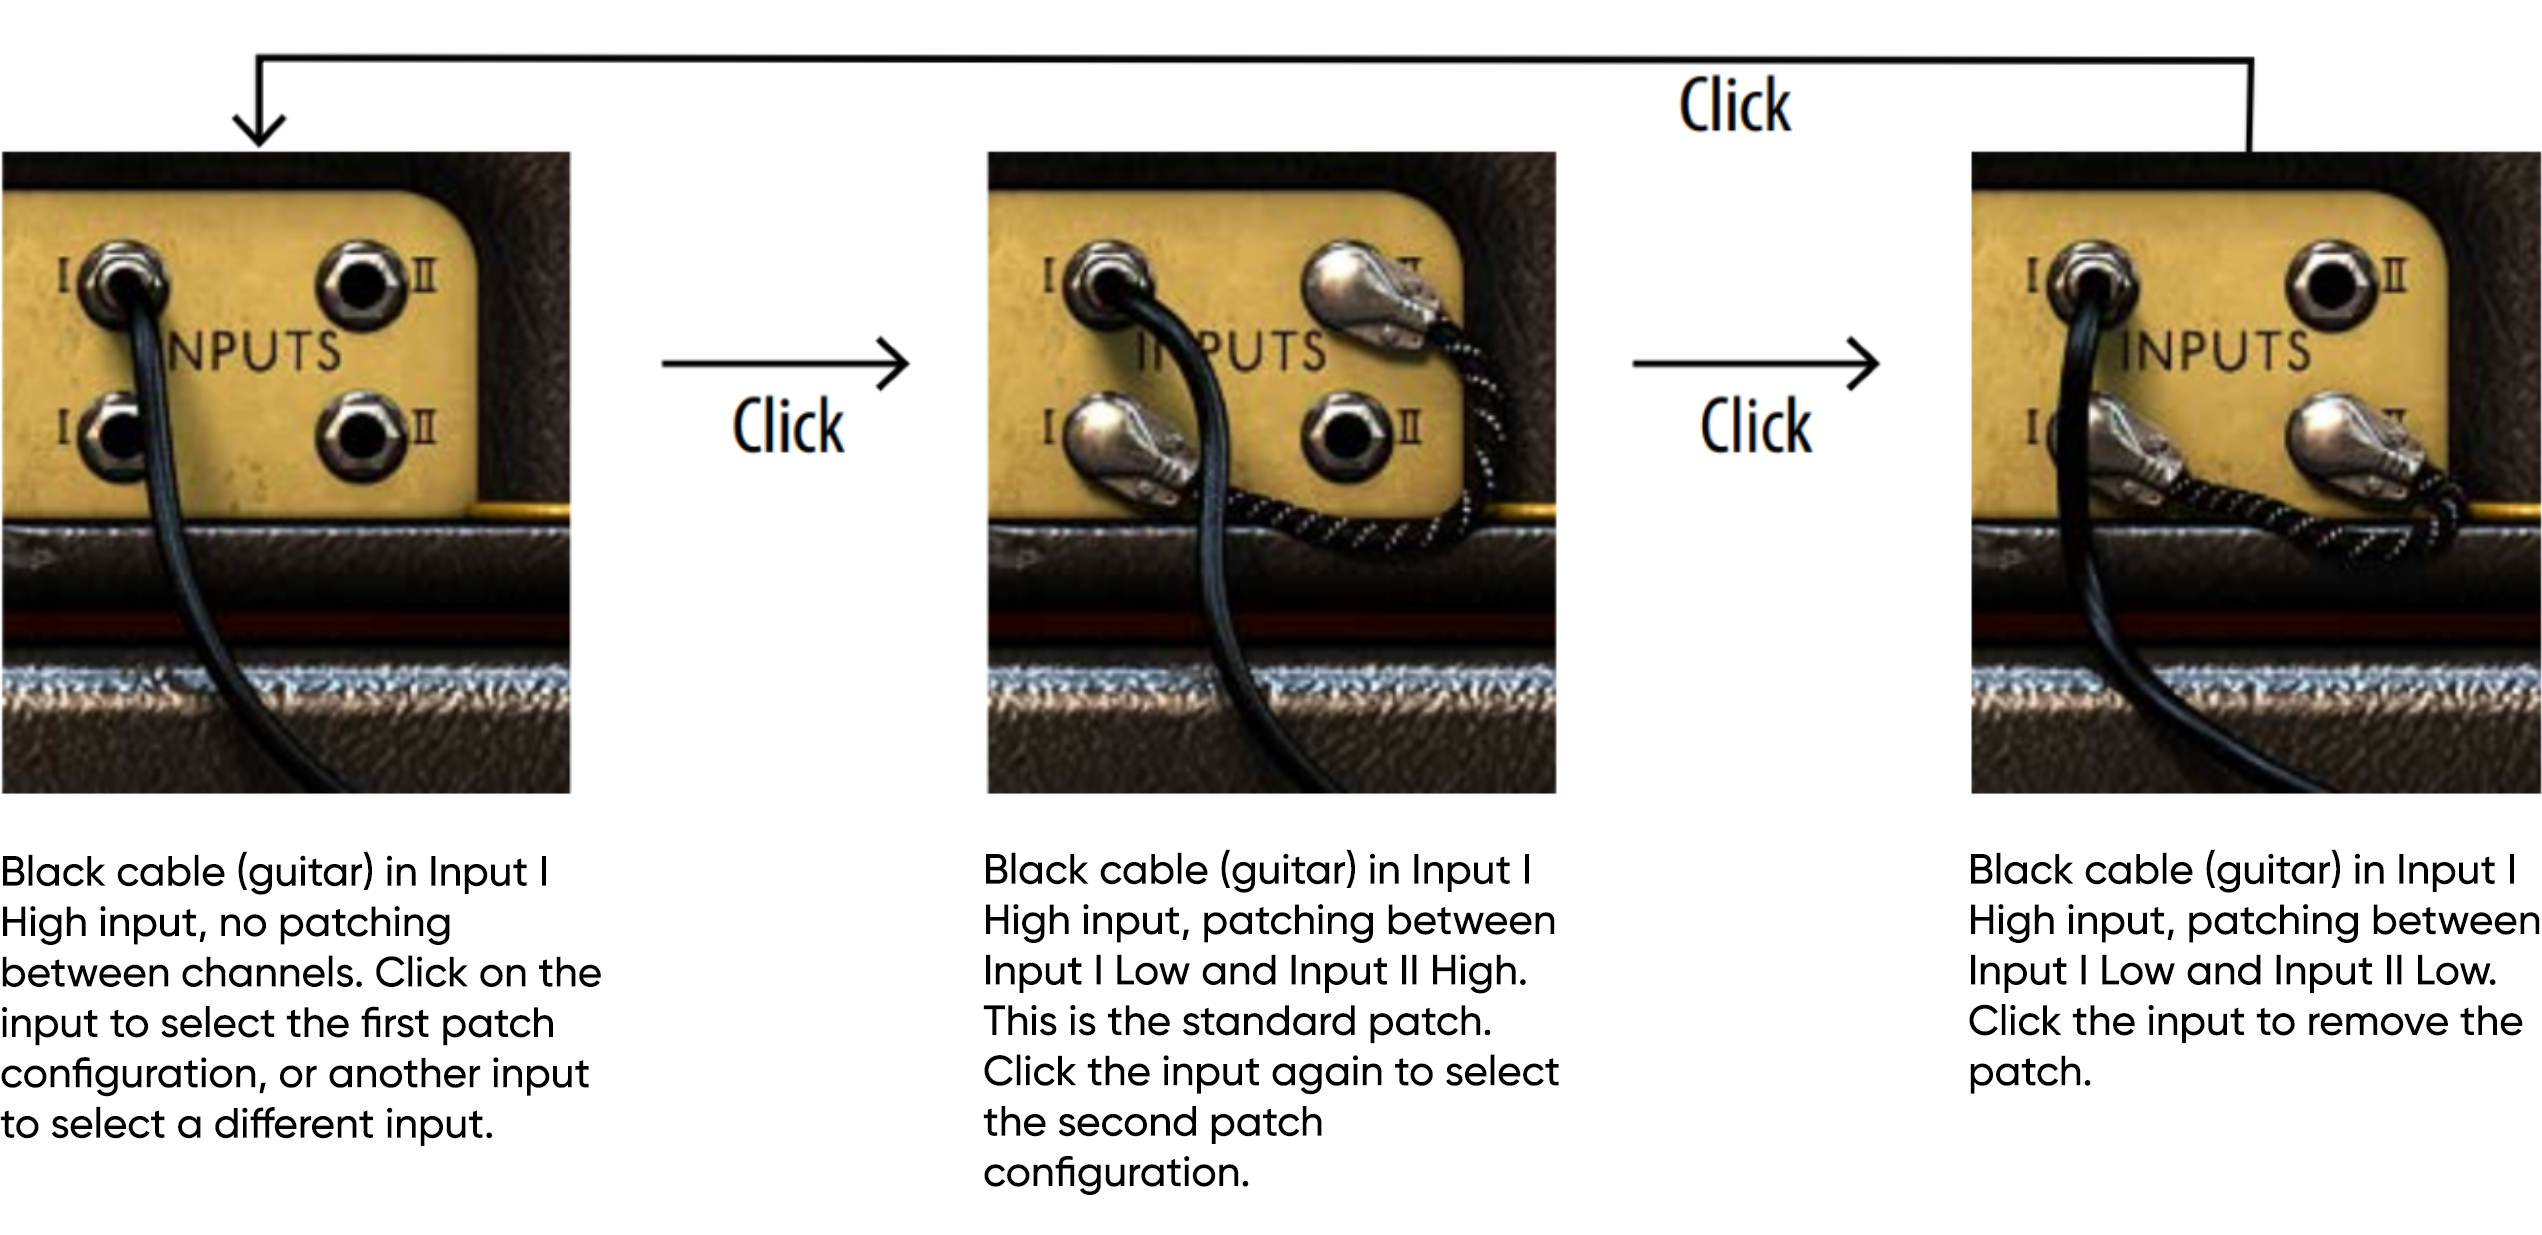
By patching the inputs you will get different input gain and different tonality from the amp. Input II is very dark sounding, and by combining it with INPUT I you can work the Volume knobs almost like an EQ. The most common way of patching is going into Input I at the top, and patching from the low Input I to the top Input II, but feel free to experiment!
Input I (top): Bright, high gain. 1 MOhm input impedance.
Input I (bottom): Bright, low gain. Around 100 kOhm input impedance.
Input II (top): Dark, high gain. 1 MOhm input impedance.
Input II (bottom): Dark, low gain. Around 100 kOhm input impedance.
Note that clicking any parameter name on the front panel resets the corresponding knob to its 12 o’clock position.
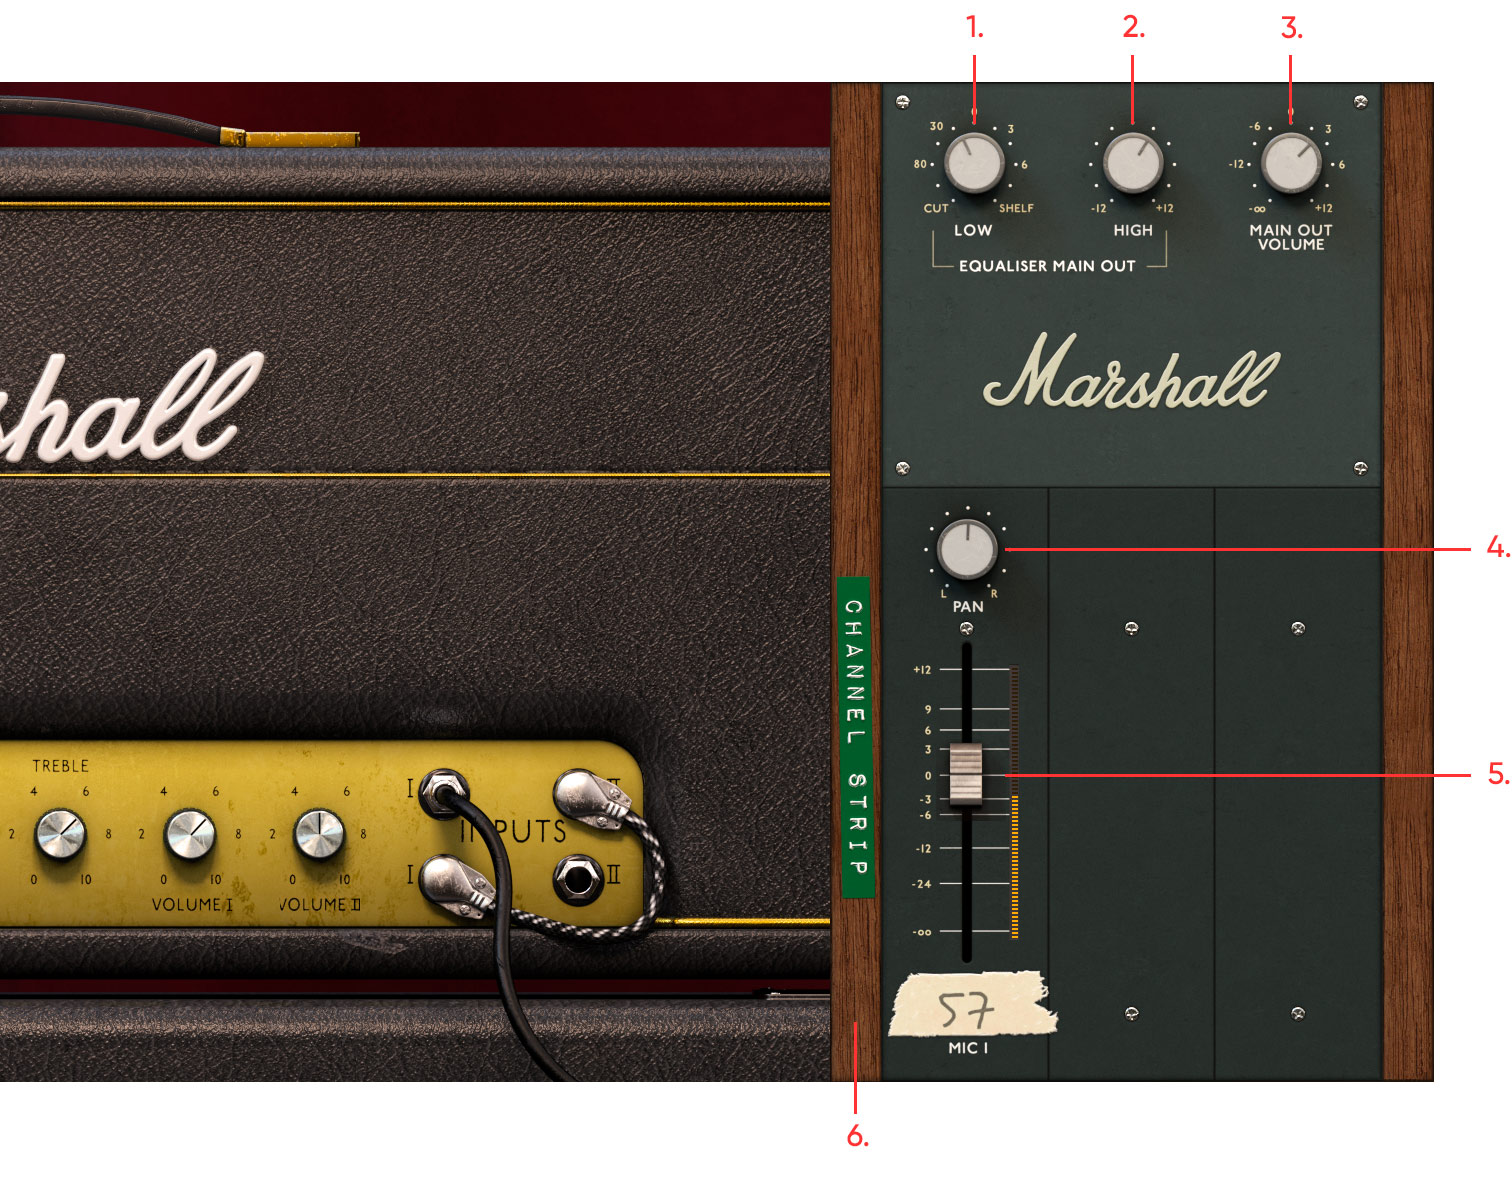
The channel strip can be opened by clicking the wood side with the green Channel Strip sticker. It can be closed again by clicking the same wood side, or by dragging the amplifier to right.
Equaliser Main Out: Low: Neutral/bypass in the 12 o’clock setting. Turning clockwise boosts the low end with a shelving filter. Turning counterclockwise cuts the low end with a low cut filter.
Equaliser Main Out: High: Neutral/bypass in the 12 o’clock setting. Turning clockwise boosts the treble with a shelving filter. Turning counterclockwise cuts the treble, also with a shelving filter.
Main Out Volume: Adjusts the output volume out of the entire plug-in.
Pan: Places the microphone channel in the desired position in the stereo panorama.
Channel fader: Adjusts the volume of the microphone channel.
There are a lot more options in the channel strip in the full version!
- Equaliser Main Out, Low
- Equaliser Main Out, High
- Main Out Volume
- Pan
- Channel Fader
- Click to show or hide the mixer