User Manual
Empirical Labs
Mike-E Comp
Intro
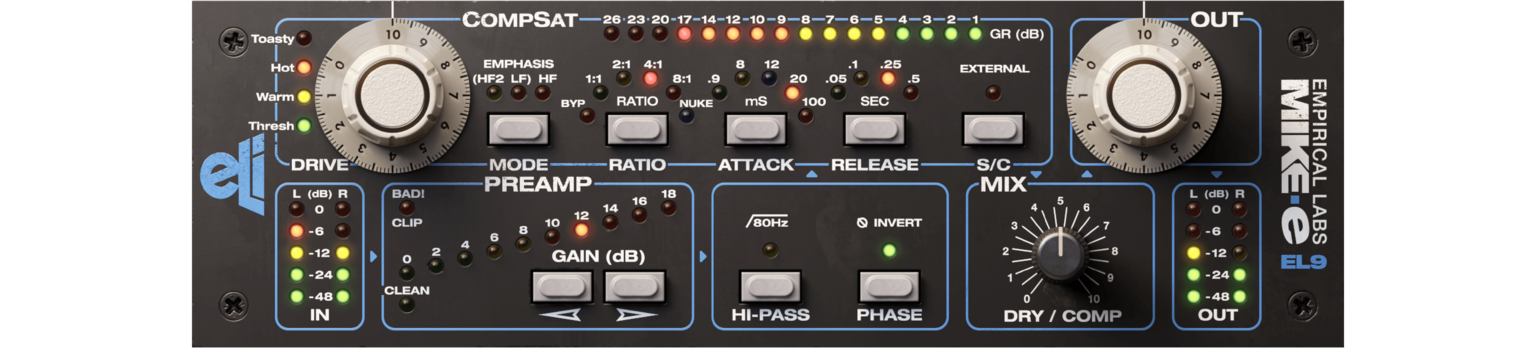
User Interface
Parameters and Meters
Tips and Tricks
Empirical Labs Mike-E Comp in Amp Room
Extended Features
Credits
The quest for analog warmth is at the heart of Empirical Labs. How do you glue tracks together, how do you get the vocals to sit comfortably in a mix, how do you make something distinct without being harsh?
The foundation is of course in a solid and good recording (which all Empirical Labs manuals constantly point out). But the Mike-E and Lil FrEQ are both designed to be puzzle pieces in this quest for warmth. Whereas Lil FrEQ focuses on frequency sculpting, and how to use the DS/HF Lim section to tame highs and maintain the warmth, the Mike-E is designed around the CompSat section, with its unique blend of frequency dependent compression and saturation. It enhances the mix or track, without making it too bright. It shaves off some peaks to get it more tape-like. And it adds emphasis filtering to make the CompSat hit just right.
The combination of all this is what makes Mike-E unique. Even if it’s tempting to crank it up to 11 right away and start nuking your drum bus, it also excels with subtle settings. A little goes a long way: just a bit of saturation and 2-3 dB of gain reduction. You might not hear the effect right away, but you will definitely miss the warmth when you take it away.
Click here to view the full-sized image in a new tab.
The user interface consists of seven sections, here listed in the order they have in the audio path:
- Input Metering: The input meter is unaffected by the preamp gain.
- Preamp: 0-18 dB preamp gain. Can be used to gain stage the audio, or used creatively to distort the audio. Can also be set to CLEAN to turn off all preamp distortion. “BAD” LED will turn on whenever something that wasn’t intended to clip in the audio path distorts.
- Hipass/Phase Invert: 18 dB/octave filtering and Phase Invert.
- CompSat: The heart of the Mike-E. In many ways it is Distressor like, but has other differing characteristics including a much longer available attack time, and additional emphasis circuitry.
- Mix: Your classic Dry/Wet knob.
- Out: Output gain staging.
- Output Metering: Five segment LED bargraph showing the output volume (after the Output gain knob).
Input Meter: Shows the peak level (dBFS) of the incoming audio.
Preamp Gain: Sets the gain of the entire unit, use this if you need to gain the audio to hit the compressor hard enough.
It is possible to get creative with the Preamp distortion when the BAD Led turns on, even if it sounds much more aggressive and harsher than the smooth warmth of the CompSat section.
When set to CLEAN, the Preamp distortion is removed and the preamp is completely clean.
BAD Led: Indicates if any of the OP amps in the unit is within 1 dB of clipping levels.
Hi-Pass: 18 dB/octave high pass filter at 80 Hz.
Phase Invert: Inverts the phase of the audio.
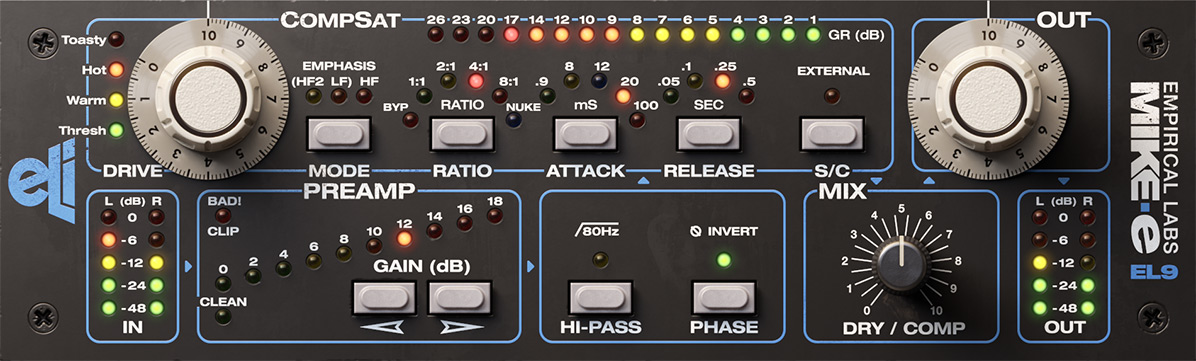
CompSat Section
Toasty/Warm Meter: Shows how much saturation you get from the CompSat circuits.
Drive: Gain into the compressor. Use to get the wanted amount of saturation or gain reduction. The saturation (as indicated by the Toasty/Warm Meter) sits after the compression, so if you need lots of saturation you need to put the compressor in 1:1 mode.
Emphasis: Inserts pre- and post emphasis filters into the audio path to tame high frequencies and make the CompSat warmer and “creamier”. Enhances Mike-E’s popular “tape like” tone.
The original emphasis mode is the HF mode, while HF2 and LF are two hidden modes found in the hardware.
HF: High frequency emphasis in the saturation circuit (hits high frequencies harder).
HF2: High frequency emphasis in the entire CompSat circuit.
LF: Low frequency emphasis in the compressor circuit (less compression for high frequencies).
For a more detailed description, see the chapter below.
Ratio: Sets the ratio of the compressor, bypass the compressor (1:1) or bypass the entire unit (BYP).
BYP: Bypass the entire unit
1:1: Bypass the compression in order to get more saturation.
2:1: The gentles compression mode with a generous 20 dB long soft knee.
4:1, 8:1: Gradually higher compression ratios, but still very smooth with long soft knees.
NUKE: The famous NUKE mode! Very steep (limiter like) with different Attack/Release shapes, great on drum room mics.
Attack: Sets the attack time of the compressor, with one new attack time added (12 ms) that isn’t present on the original hardware. The difference between 20 and 100 ms is more about the shape of the attack and release rather than the actual times.
Release: Sets the release time of the compressor, 50 ms, 100 ms, 250 ms and 500 ms.
External Sidechain: Engages the external sidechain input.
Gain Reduction Meter: Shows the amount of gain reduction.
Output Section
Mix Dry/Comp: Balances the dry, unaffected, audio with the processed audio.
Out: Set the output volume.
Out Meter: Shows the output volume (dBFS peak.
Emphasis Modes
The hardware Mike-E has three different emphasis modes, although two are hidden and not very well known. The original mode (HF) is designed to make the CompSat sound warmer and more tape-like, and the hidden modes (HF2, LF) are two variants on the same circuit.
HF (original emphasis mode)
This mode will emphasis the high frequencies in the saturation circuit, without affecting the compression. The result is that high frequencies become softened and the result gets “warmer” or “creamier”.
”Emphasis was used in all modern tape recorders to improve signal-to-noise and dynamic range. Going to another compressor after this will give you a familiar tape like vocal sound. Compressors react differently after a signal has been soft clipped, or on tape.”
HF 2 (alternative emphasis mode)
The same emphasis as in the original HF mode is now also affecting the compressor, and high frequencies will trigger the compressor more and get softened.
LF (reversed emphasis mode)
This mode attenuates the high frequencies going into the detector of the compressor, making it less easy for the compressor to “react” to high frequencies. It doesn’t affect the saturation circuit at all.
The following tips and tricks are taken from the manual for the Empirical Labs Mike-E hardware! It contains a lot more useful information, so make sure you look it up!
Soft Clip & Tape Emulation
Put the Ratio on 1:1, and adjust drive so the warm light is on often, and the Toasty LED lights on peaks. Set the Mix Dry/Comp to full CW (10) and the user will gain a dB or two of “heat” and headroom. The Mike-E will be flattening the peaks out gently with its saturation circuit. Engaging the Emphasis in HF mode will make the high frequencies clip earlier and soften peaky and possibly harsh “build-ups”. It has the added benefit of decreasing noise. Emphasis was used in all modern tape recorders to improve Signal to Noise and dynamic range. Going to another compressor after this will give you a familiar tape like vocal sound. Compressors react differently after a signal has been soft clipped, or on tape.
Fat, Punchy, Snare
Analog tape was always a big help in getting a fat, punchy, natural snare. If the snare has a plastic edge to the front end, try Ratio at 1:1 with the Emphasis circuits in HF mode to saturate the HF peaks sooner, especially after EQ:ing in some top end. Try turning up the Drive while in 1:1 till the BAD! LED lights up, then backing down a touch, and listen to what full saturation sounds like on the snare. This can really help bring up snare “ghost” strokes, without compressing (one engineer’s favorite use!).
Snare Compression
Compressing the Snare is a blast. So many options, especially when you start using the Mix Dry/Comp control. Lets go over the top with NUKE ratio first. Turn the Mix 100% (full CW on 10) and put the ATTACK on .9 ms, Release. 1 and turn Drive up till all the GR LEDS light up. Notice how smooth the compressor is even at 20 – 30 dB of compression. Now for a sec, turn the Mix control CCW to blend in the DRY signal. You may want to adjust the output volume to compare different Mix amounts. Now the dynamics have returned with the body and tone of the snare appearing quickly underneath as the compressor brings them up.
Adding Analog Heat to Mixes
Just running the CompSat in 1:1 to get some tape like saturation can do magic. Try turning on the Emphasis in 1:1 and keeping the Warm LED on most of the time, and the Toasty light often on peaks. This is going to be very analog tape like.
You can turn the Emphasis off too, and get a less colored sound. The general affect of the emphasis is to soften pointy peaks, and saturate the highs musically if there is an occasional excessive amounts.
Loud Mixes
For the loudest mix, keep the Release fast (.05 s) and Attack slow. With the slow attack and fast release, the transients will come through without over compression, and the fast release will keep the music from pumping after an attack. 1 – 3 dB is usually enough gain reduction. Emphasis can soften some high frequency pile-ups as described above.
Using the MIX Control on Whole Mixes
Once you start mixing in the DRY signal, the transients are going to always be there. Therefore, you can use a faster attack on the compressor, and more compression in general. There are so many options and we are sure folks will come up with really unique ways to use the CompSat and Mix control.
Empirical Labs Mike-E Comp in Amp Room
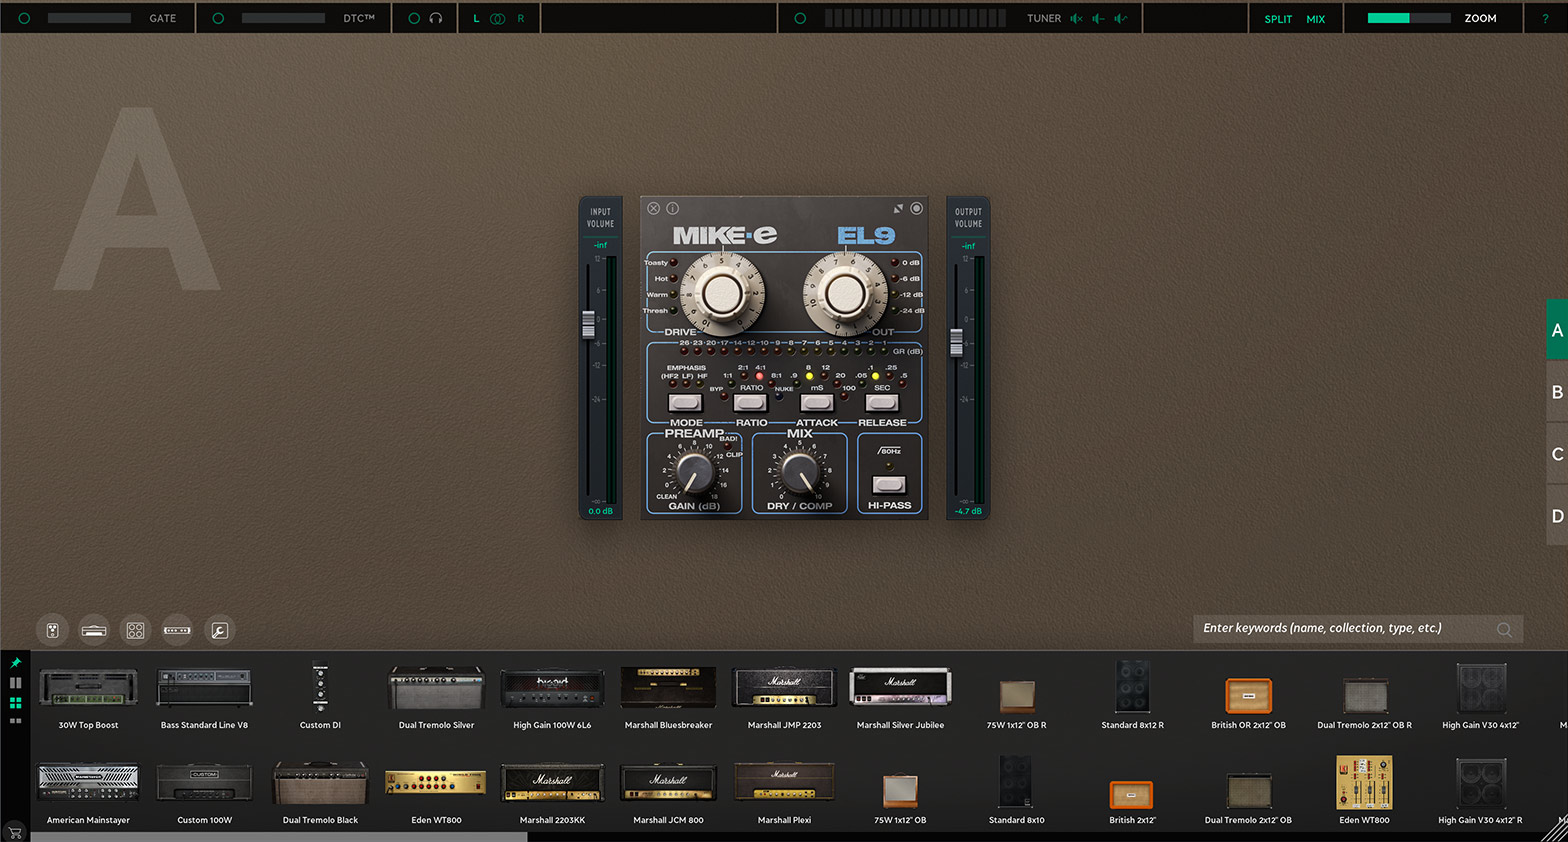
When purchasing this product, you automatically gain access to running the plugin as a module inside the Amp Room platform. The module can be matched and arranged together with any other native Amp Room module or other Amp Room-ready modules that you might own.
A whole range of added control can be accessed with Extended Features. Please see the separate "Extended Features" manual for more information.
Anton Eriksson – Modeling
Filip Thunström – UI programming
Björn Rödseth – Framework programming
Nis Wegmann – UI design
Johan Bremin – Quality assurance, presets
Dave Derr – Quality assurance, presets
Niklas Odelholm – Product design