
User Manual
Console 1 Fader
Intro
Setting up
A quick start
DAW Control
Working with Console 1 Fader
The finer details: Every function carefully described
Using Console 1 Fader with Apollo Central
Using Console 1 Fader without the hardware
Cool ways to use Console 1 Fader
Troubleshooting
Useful information
Credits
Console 1 Fader is a set of physical, motorized faders for your digital audio workstation (DAW).
Console 1 Fader lets your fingers do the delicate job of mixing the levels of your audio tracks. Plus pan, mute and solo, high/low cut, drive, aux sends, and more. In short, you get the benefits of working with a physical mixer, without the price and size.
Console 1 Fader also integrates seamlessly with Softube Console 1, the hardware channel strip that comes fully loaded with EQ, compressor, gate, and more.
Welcome to a hands-on experience that marries our digital audio world to traditional, tactile qualities.
What can Console 1 Fader do?
You can use Console 1 Fader in a number of ways, some which may not seem quite obvious. In fact, Console 1 Fader performs practically every task of a mixing desk (aside from EQ, dynamics, and effects), including controlling several faders at one.
When you connect Console 1 Fader to your computer, you get these physical controls:
- Solo and mute
- High Cut and Low Cut filters
- Aux sends 1–3
- Softube's Drive and Character
- DAW transport buttons
- Pan/balance
- Stereo width
- Ah yes, you can control the volume too
On top of that, Console 1 Fader offers 100 mm motorized Alps faders and DAW Control (remote control of volume, pan, solo, mute, and aux).
Softube’s Drive technology
Softube started in 2003 by emulating distorting circuits, more specifically tubes. We wanted to make the best emulations on the market, and by 2007 we felt we had enough knowledge to release our first product. Ever since we’ve been fascinated with distortion of all types.
Hey, where did you think the company name came from?
Where can Console 1 Fader be used?
The Console 1 Fader soft- and hardware can be used as a channel insert in all 64-bit VST, AU, and AAX compatible digital audio workstations (DAW:s). Console 1 Fader has been qualified to work with the following DAW:s.
Mac OS:
- Ableton Live
- Bitwig
- Cubase/Nuendo
- Digital Performer
- Logic Pro X
- Pro Tools
- Reaper
- Studio One
Windows:
- Ableton Live
- Bitwig
- Cubase/Nuendo
- Digital Performer
- Pro Tools
- Reaper
- Sonar/Cakewalk by BandLab
- Studio One
This list of qualified DAW:s expands over time. If your DAW is not listed here, chances are Console 1 Fader will work perfectly in your environment, but we make no guarantees.
Installing Console 1 Fader, the short version
Connect Console 1 Fader to a USB port and hook up the power supply. Go to www.softube.com/my-account and log in or register an account. When asked, enter the activation code on the card included in the box (format: XXXXXXXX- XXXX-XXXX). Download Softube Central, install and activate Console 1 Fader. Make sure the Console 1 On-Screen Display app is started. Go!
For a more detailed installation description see Useful information.
Using Console 1 Fader in new project
Instantiate Console 1 Fader as an insert effect on as many audio tracks as you want. Console 1 Fader shares the same plugin as Console. The computer will automatically detect Console 1 Fader and load the corresponding plugin GUI. During instantiation Console 1 Fader hardware will move the fader to the default position.
If your track count exceeds 10, you can easily access the higher numbered tracks by pressing Page + on your console. Pressing Page – takes you back again.
At the bottom of the Console 1 Fader channels, there is a row of buttons, the Track Selectors. If you want to adjust Pan or Width, press the appropriate Track Selector button first, or simply touch the fader of that track.
There are numerous other functions available with Console 1 Fader. Read more about them in the detailed sections below.
Using Console 1 Fader as a volume control for an effects input or return can be a very good idea. Just imagine how effective dynamic reverbs and echoes can be in a song.
You can even instantiate Console 1 Fader on the master bus to create a really smooth fade-out. You should use the Solo Safe function found in the small plugin window, to make sure that the master bus is always open, even if you solo another track.
DAW Control – Console 1 Fader becomes part of your DAW
Softube has worked closely with DAW manufacturers to integrate our soft- and hardware. This DAW Control allows you to control your DAW’s channel selection and name, volume and pan, solo and mute, and even aux sends, remotely from Console 1 and Console 1 Fader.
Which software that supports DAW control can be found here.
Please note, that Console 1 Fader integration only works with the correct plugin format (see above).
Important note about DAW Control
In DAW Control mode, volume changes made in Console 1 Fader directly affect the channel faders of your DAW. Thus, Console 1 Fader’s position in the insert rack is not important.
However, when you’re using Console 1 Fader in a non- DAW Control environment, Console 1 Fader runs in series with other insert effects. Consequently, in this mode it makes sense to place Console 1 Fader after your other effects.
You should keep this in mind when working. Some plugins – like e.g. distortion, compressors et cetera – sound different when incoming audio gets softer or louder.
VST2 and VST3 – which is which?
Plugins come in various formats, and it’s important to be aware of the differences.
First, each DAW supports its own format(s), like AAX for Pro Tools, VST2/3 for Cubase, AU for Logic Pro X and so on.
In the case of VST2 and VST3, Console 1 Fader’s integrated DAW Control only works with VST3. In some DAW:s, it’s not always obvious which is which.
In Cubase, the VST2 plugins can be found in a folder with the manufacturer’s name. In the case of Console 1 Fader: Softube. The VST3 version of Console 1 Fader is found in a folder with the category name: Dynamics. The VST3 version also has a /// symbol after its name.
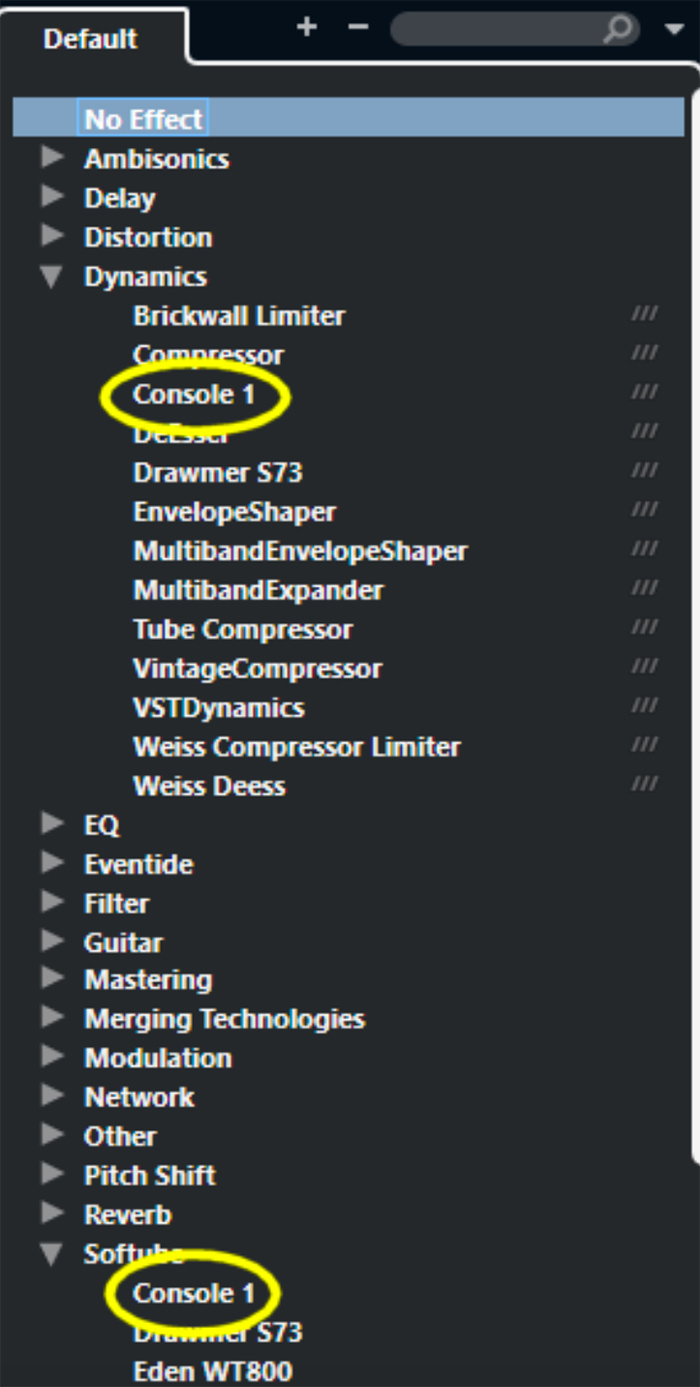
VST3 and VST2 in Cubase
In Studio One, the VST2, VST3 (and on Mac, AU) versions of plugins have different symbols. In the second image, the symbols preceding the formats mean VST3, VST2 and AU.
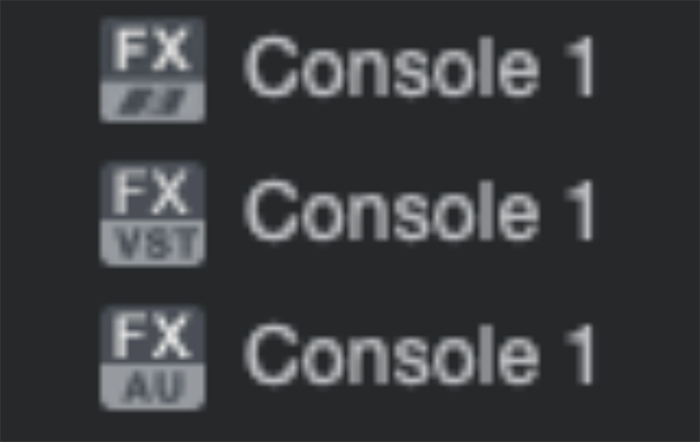
VST3, VST2, and AU in Studio One
The control panels
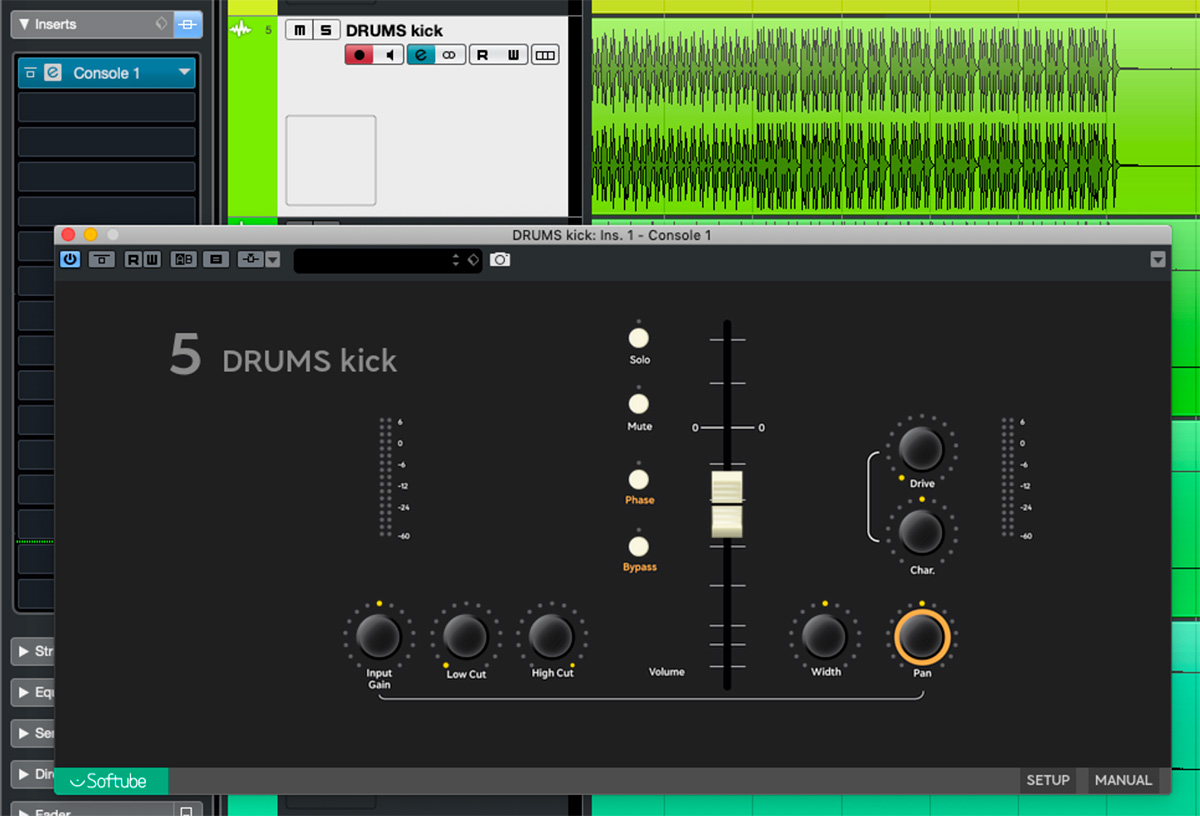
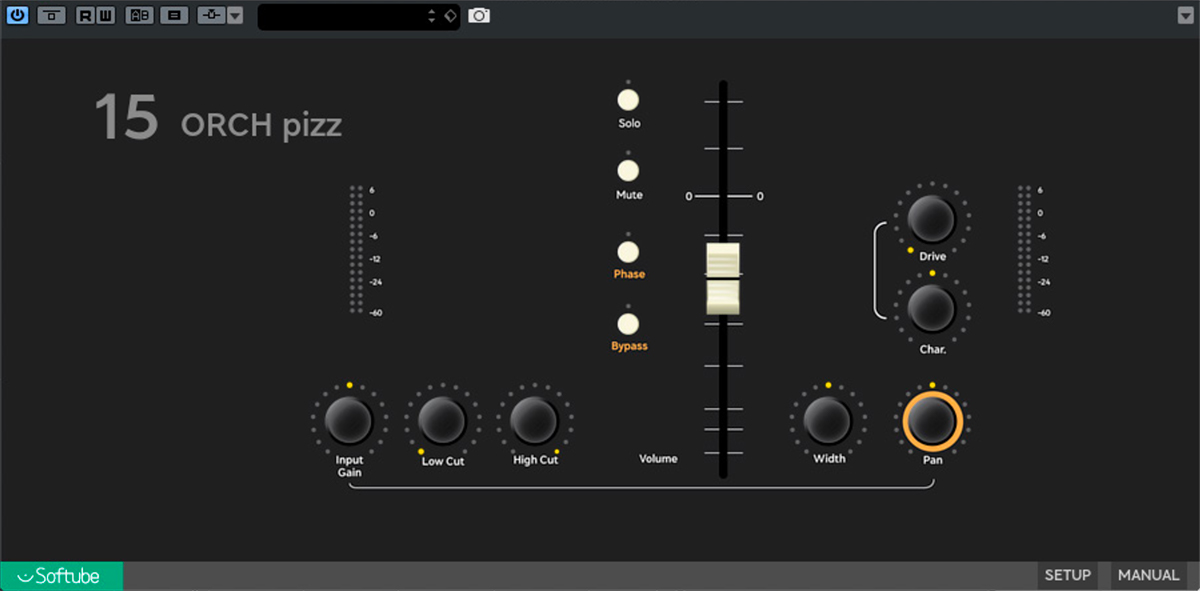
When you instantiate the Console 1 plugin on an audio track in your DAW (Digital Audio Workstation), you are greeted with a plugin window. This is a miniature, one-channel version of the real Console 1 Fader interface and shows many of the functions for one track.
When you press the Display On button on Console 1 Fader (the physical unit), the big interface appears. We call it the OSD, short for On-Screen Display. Everything you do on your physical console is reflected here.
If you feel the OSD windows is too big, you can resize it by grabbing the sizing handle in the lower right corner.
If you have a second computer monitor, you may want to drag the OSD to the second screen. You can move the OSD by clicking and dragging anywhere in the OSD area.
The small plugin window
The Console 1 Fader plugin window, that pops up after you have initiated the plugin on a track, can be used for a number of things.
First of all, it provides an easy method for checking that everything is working as it should. Just move the fader to confirm that Console 1 Fader works correctly. By clicking the Softube logo, you can see what version you’re using.
The Manual button in the lower right corner opens this manual. Very handy!
Under Setup, different settings for Open GL (a standard for rendering graphics on your screen) can be found. These may affect your CPU mileage or graphical issues with non-supported DAWs. If you don’t want full DAW integration, here’s where you can turn it off. The value display setting can also be found here.
While traveling, and if your Console 1 Fader unit is not available, you may use this small panel to make basic adjustments.
Plugin window if only Console 1 Fader is installed
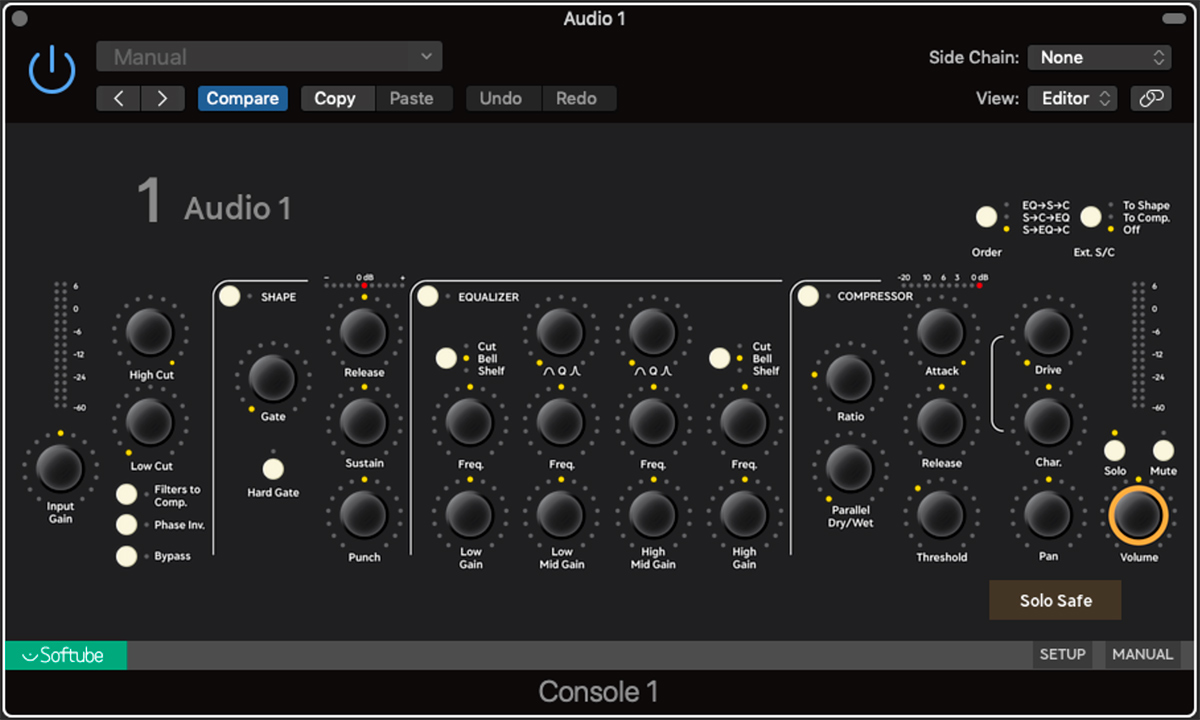
Plugin window looks like this, if both Console 1 and Console 1 Fader are installed
The On-Screen Display (OSD)
When you press the Console 1 Fader button Display On, your screen will be filled by a mixer window, the OSD (On-Screen Display). All actions on Console 1 Fader will be reflected here. This is where you get a graphical feedback of all your edits.
Please note, that the OSD does not react to any form of mouse action (except for resizing and moving the OSD). All fader movements, button pushing and knob twisting happen on the Console 1 Fader unit.
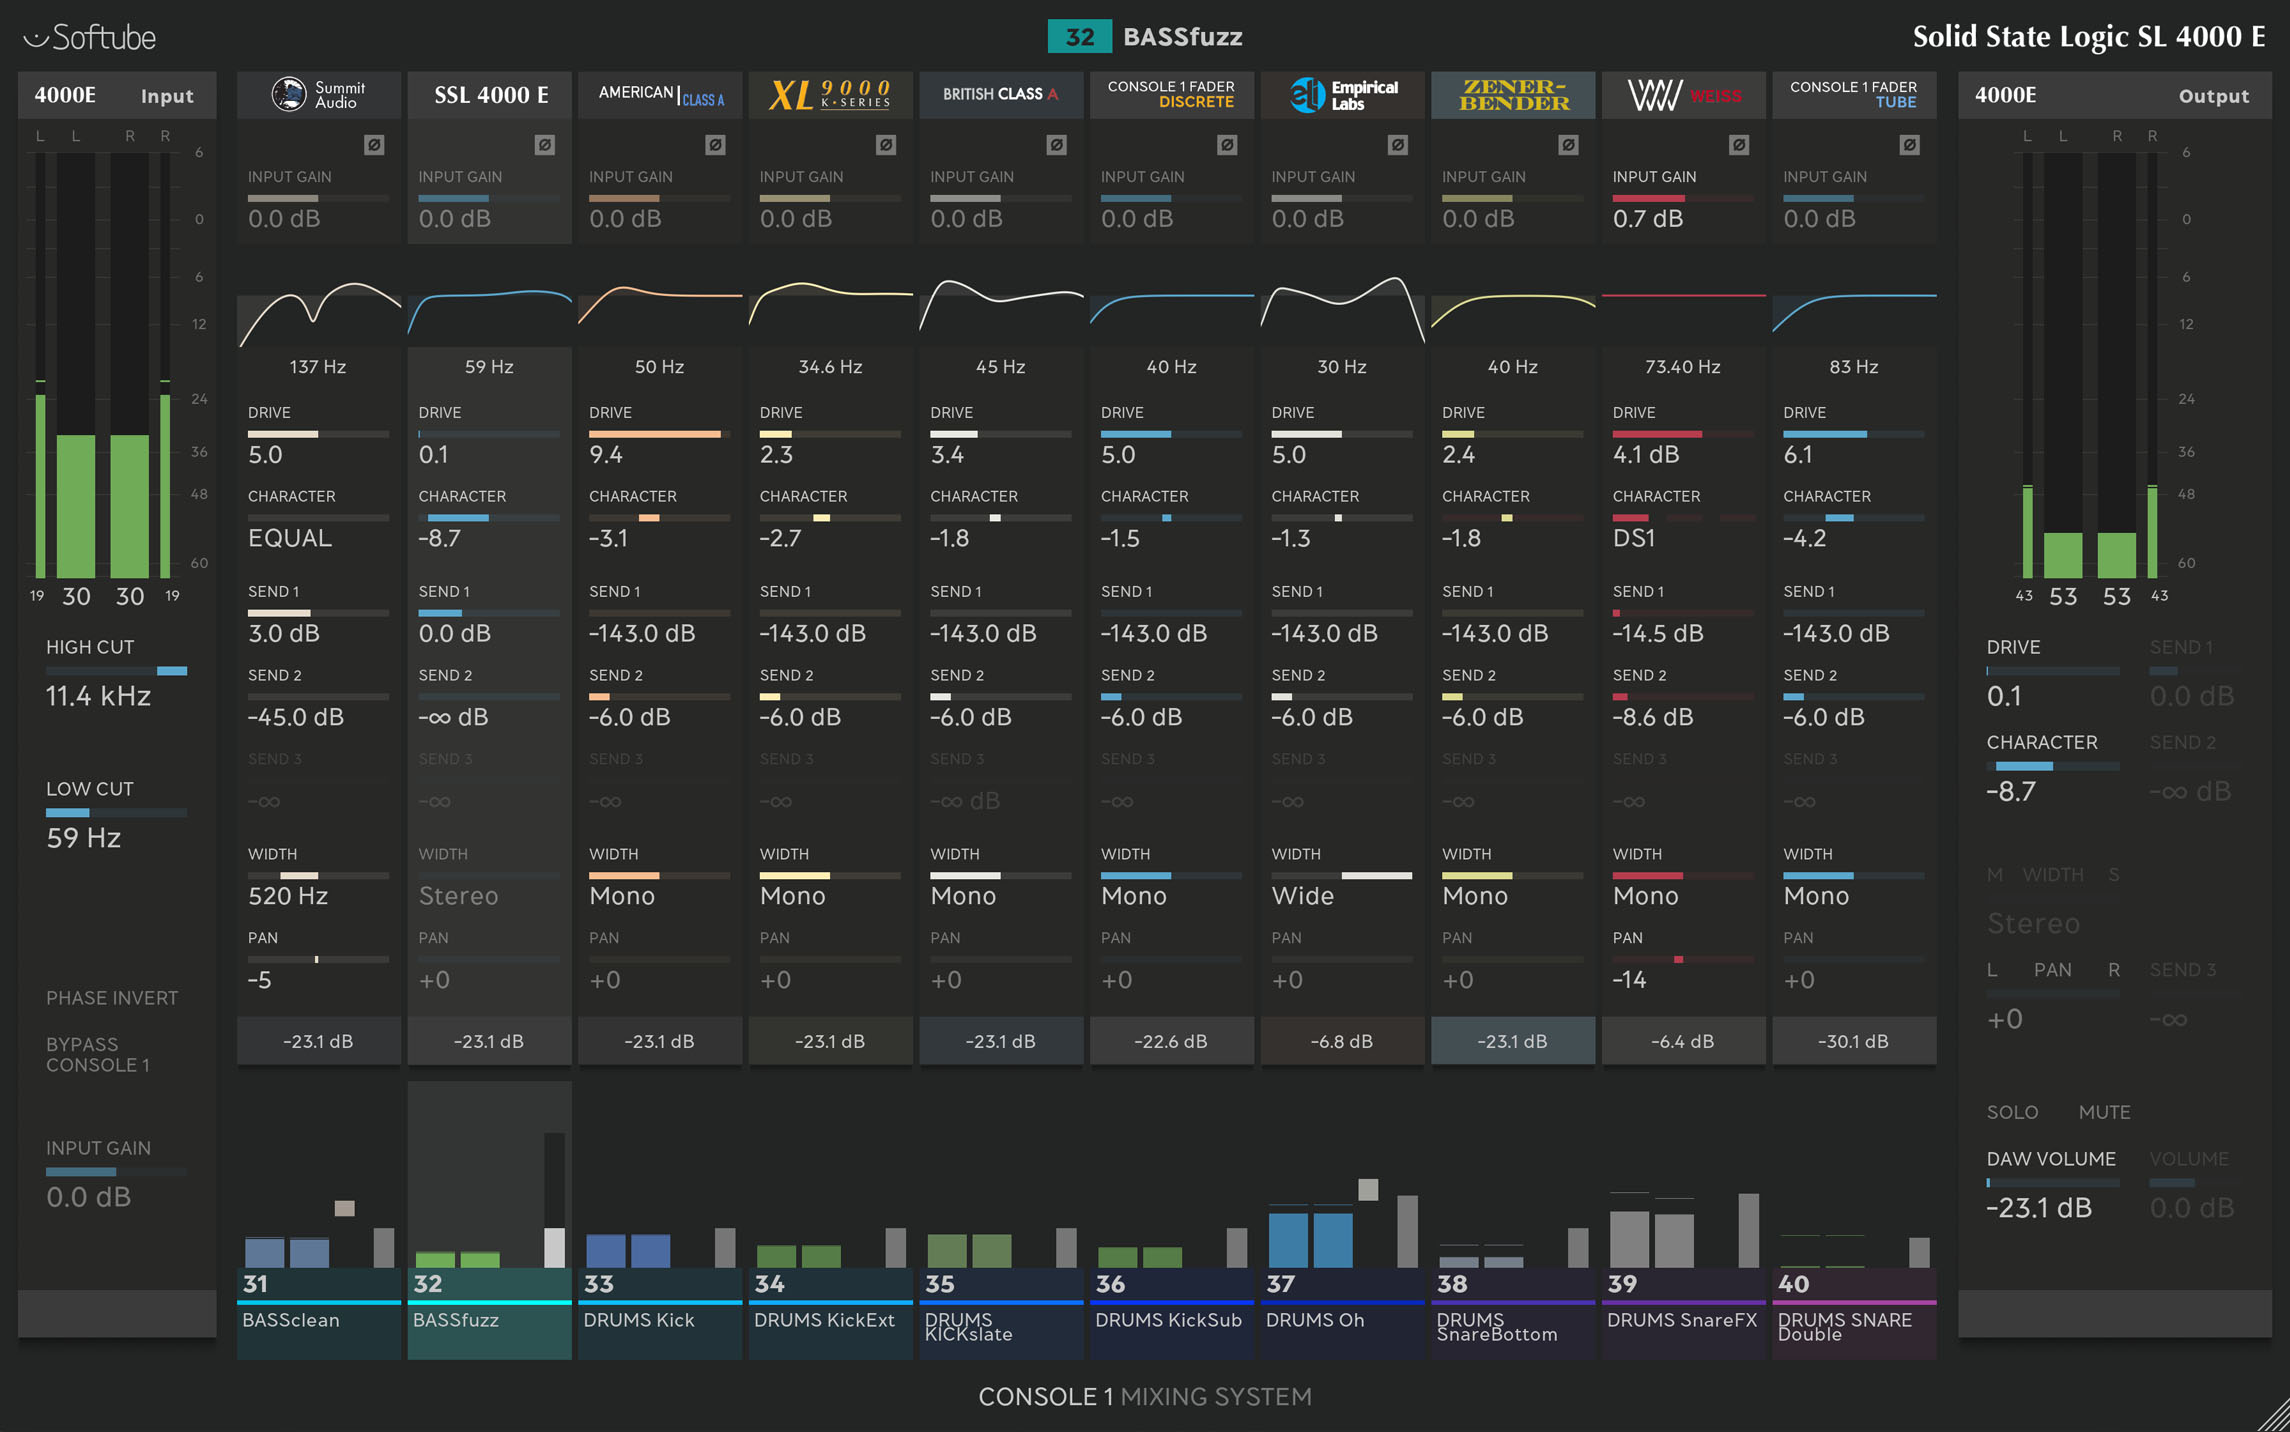
OSD with Console 1 Fader
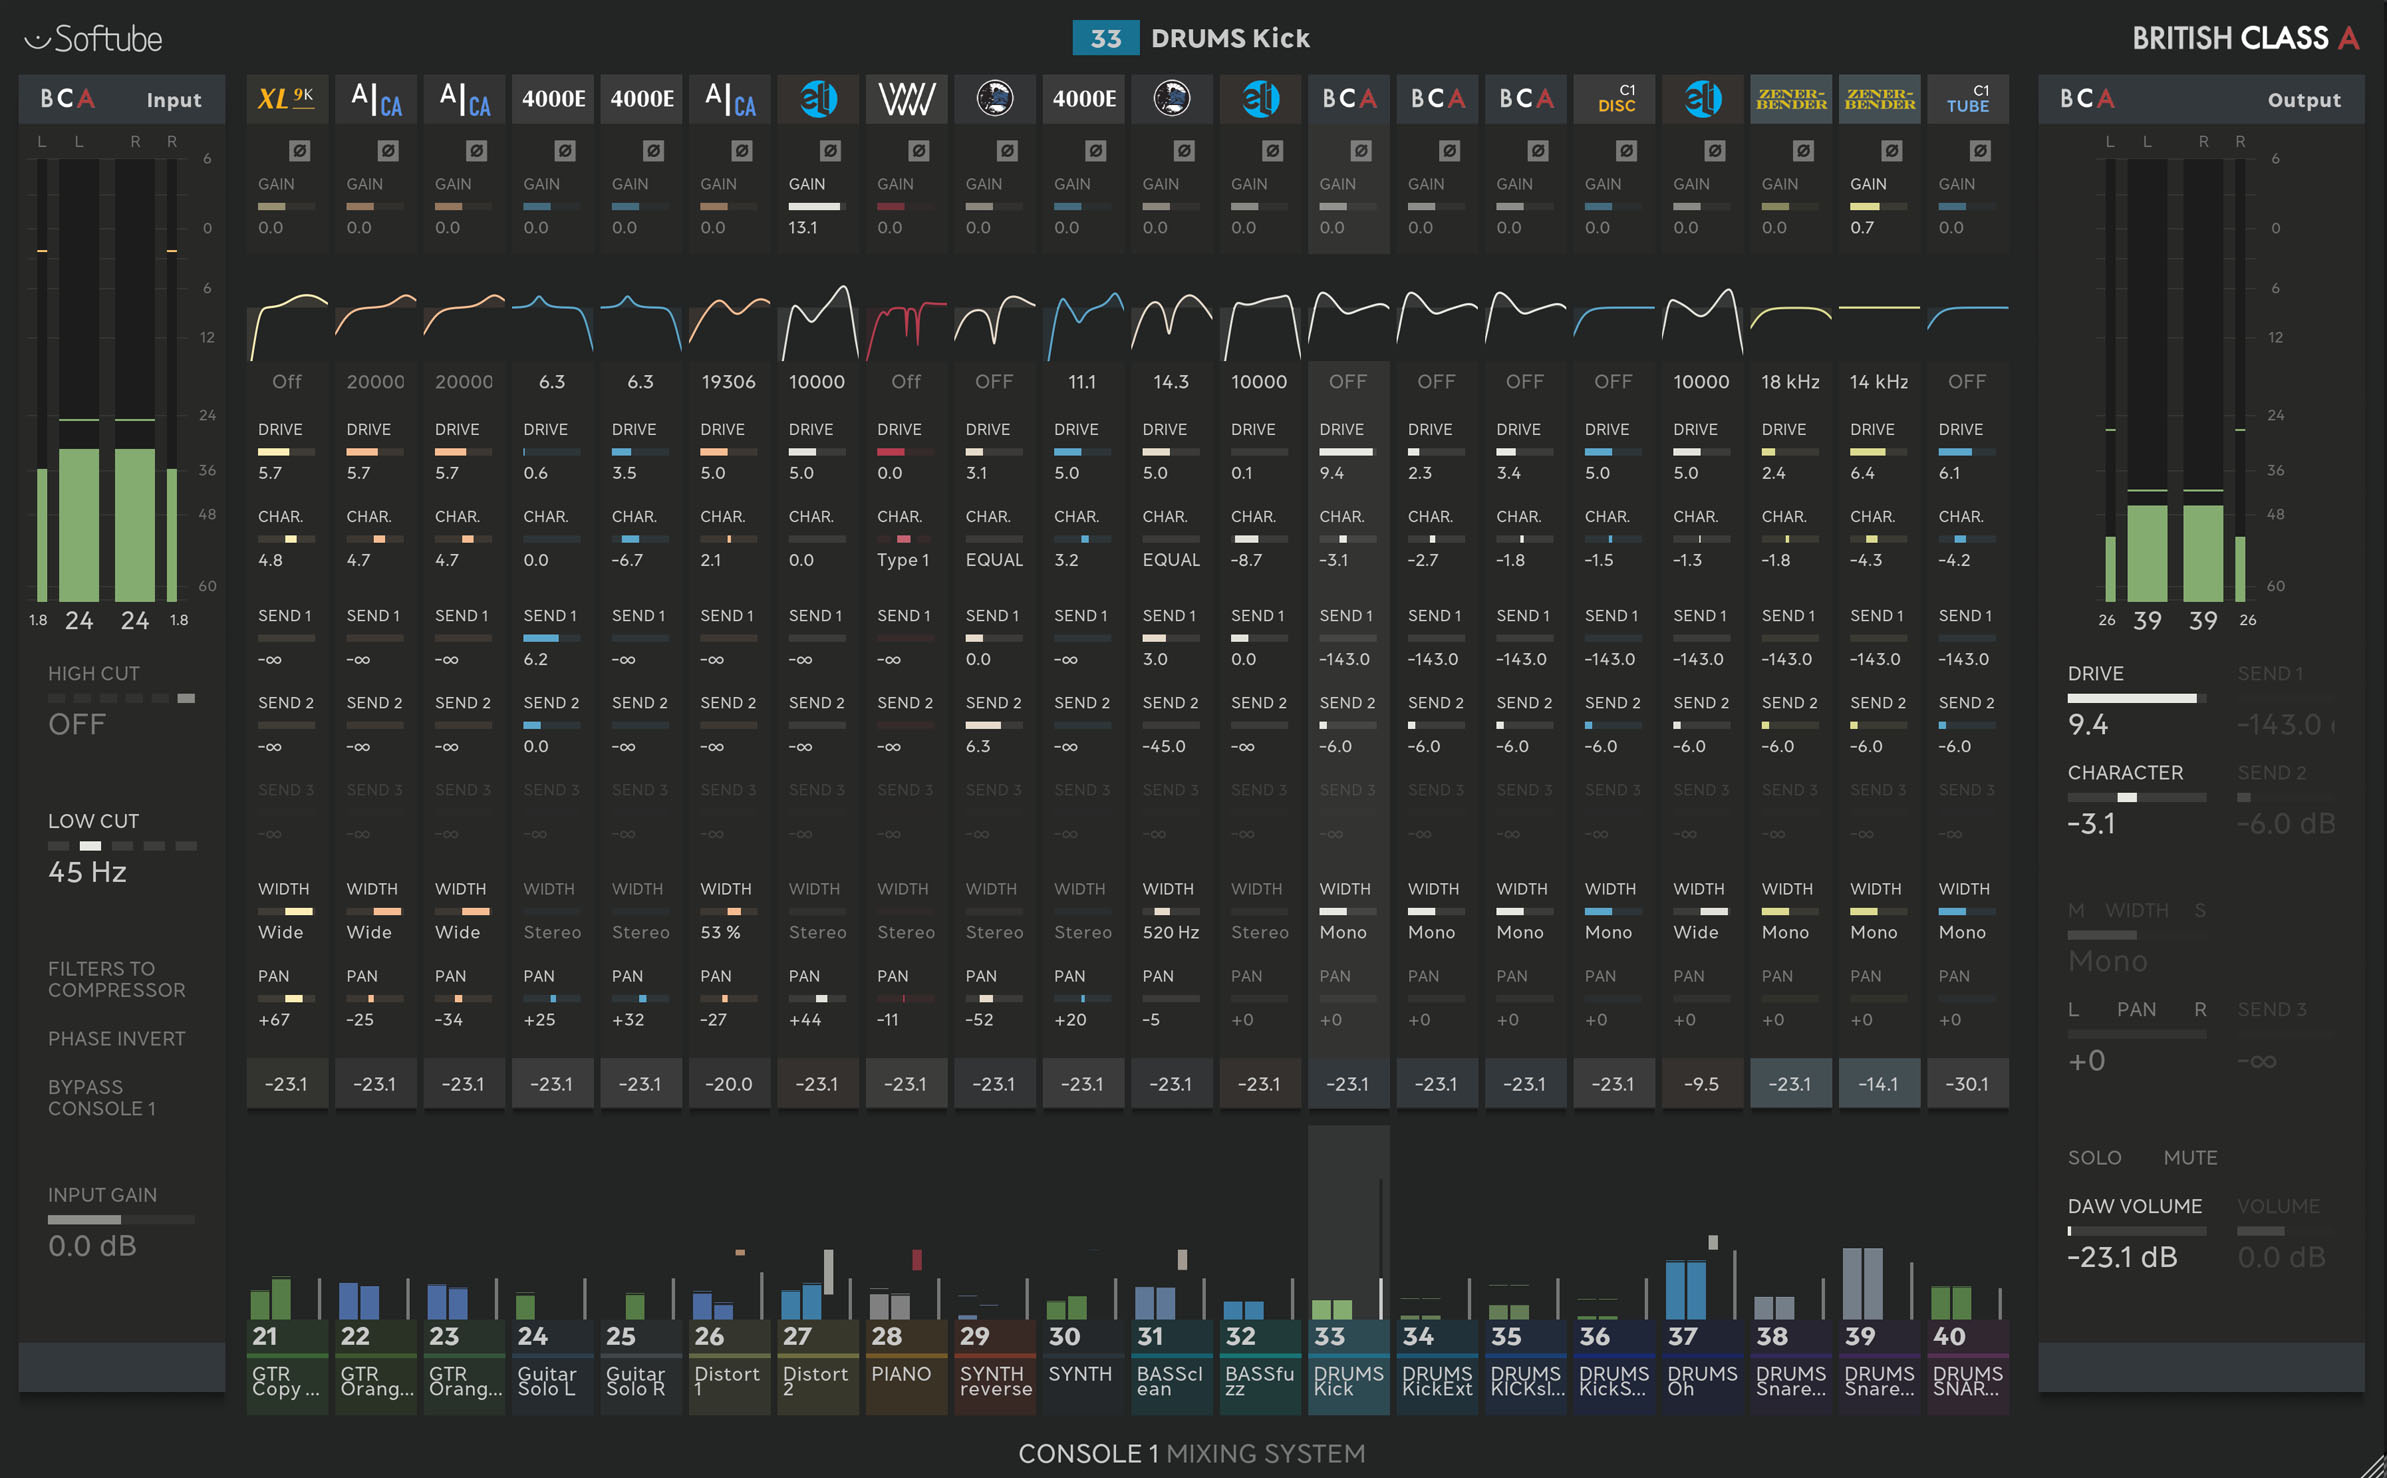
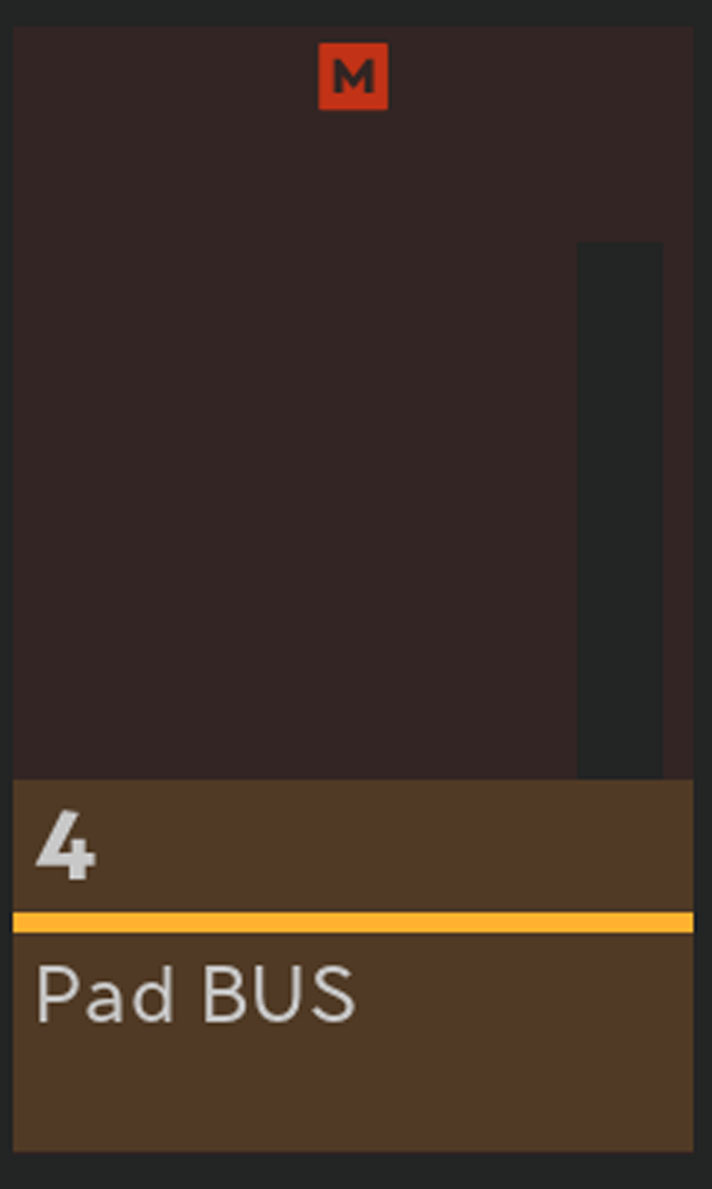
The default OSD view is rather self-explanatory. The left side shows the input section of the selected channel with details about filters, phase, and gain. The right side presents the output stage of the same channel with info on drive, pan and volume.
The middle section shows the first 10 channels, starting with the selected channel strip at the top and the volume and track name at the bottom.
By pressing Display Mode you will cycle through all different view modes. Two of the view modes, Meters View and Mini Meters View, takes a lot less screen real estate. These miniature displays may well be all you need at certain stages of your mix.
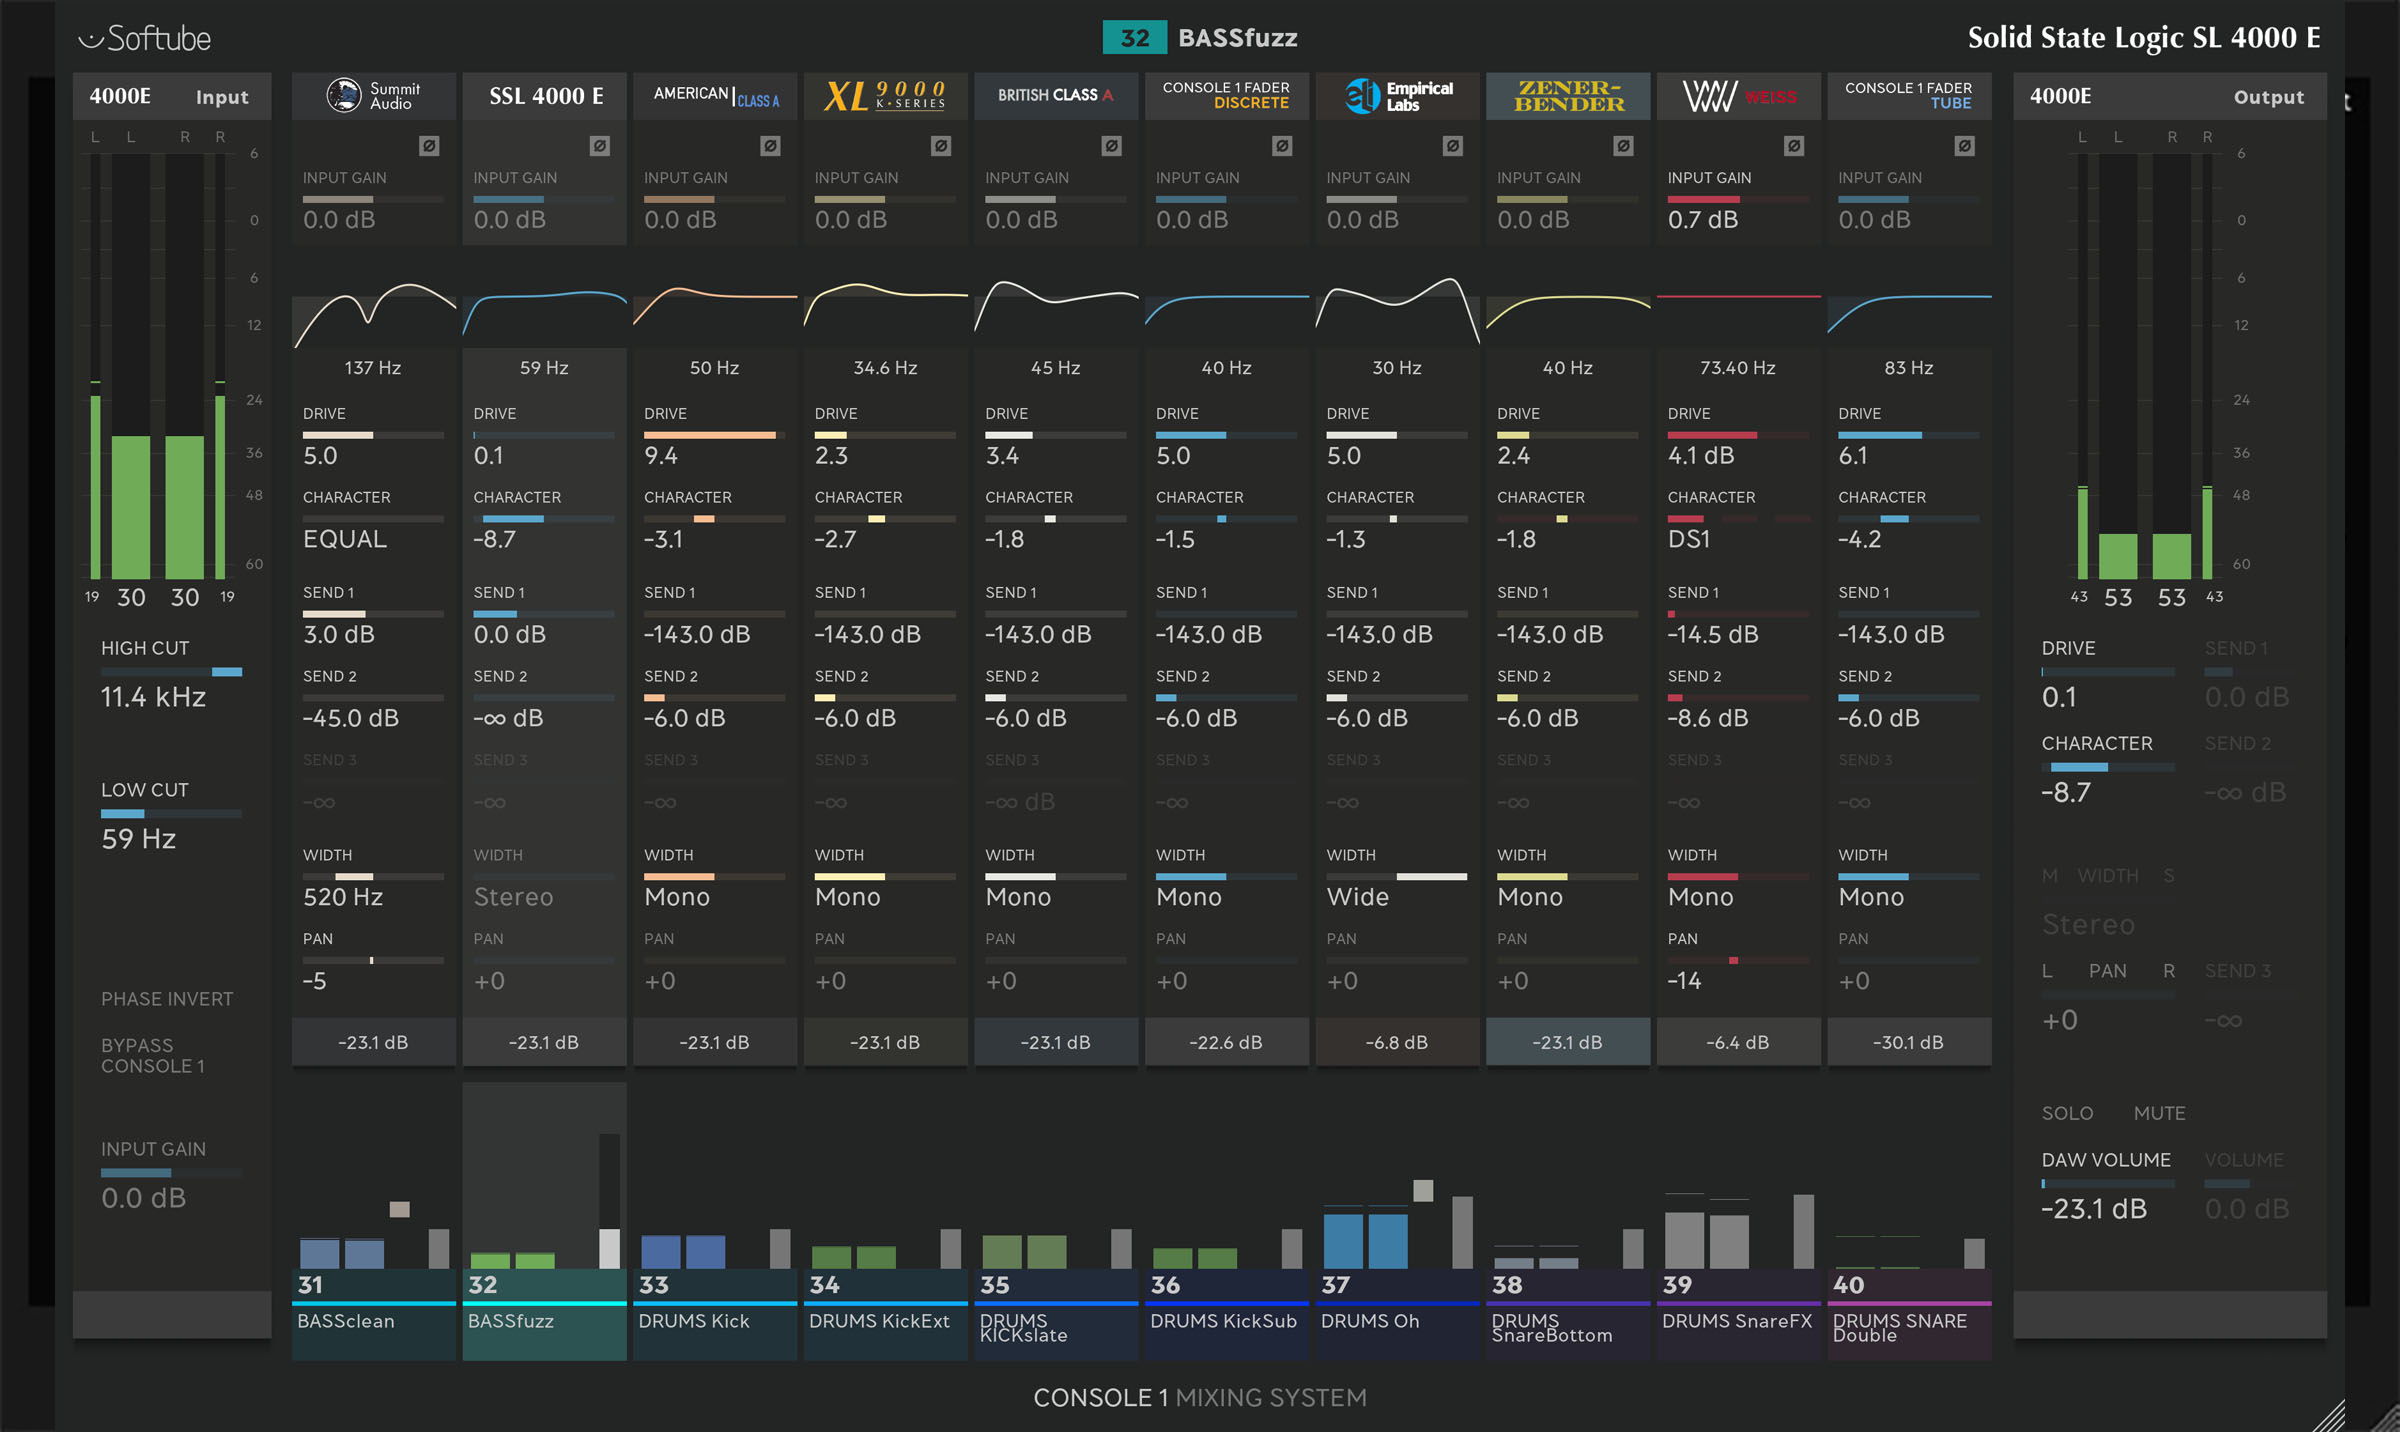
OSD with Console 1 Fader and Console 1
If you are using both Console 1 Fader and Console 1, there are a few more Display Modes than described above.
The first view shows 20 Console 1 Fader channels plus the input and output section of the selected channel.
Pressing Display Mode takes you to a second screen with Console 1 settings for Shape, EQ, and Compressor. All changes you perform on your Console 1 will be reflected here.
Display Mode 3 and 4 are screen-economic miniature modes. Display Mode 5 is similar to mode 2, but also includes a frequency analyzer.
Automation
Automation with our hardware works just like when using a mouse, only better. And with Console 1 Fader, you can work with many faders at once – try doing that with a mouse!

The finer details: Every function carefully described
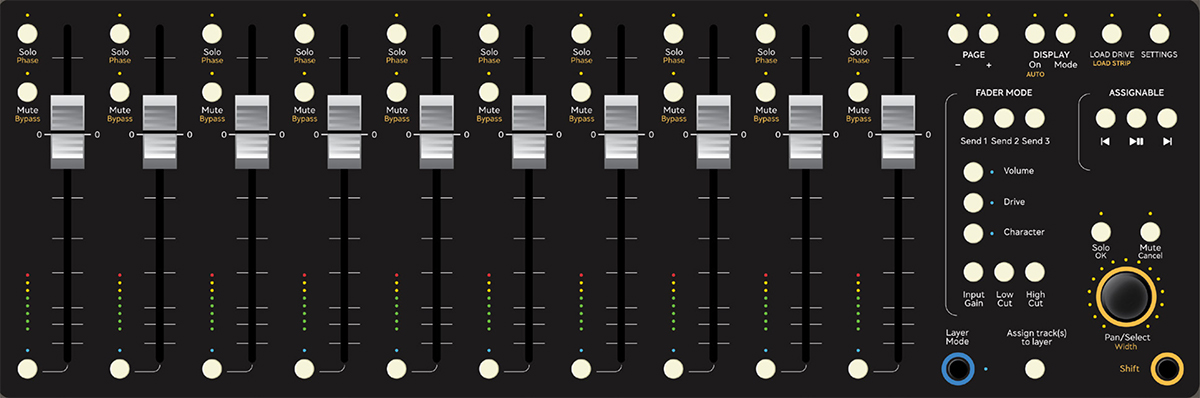
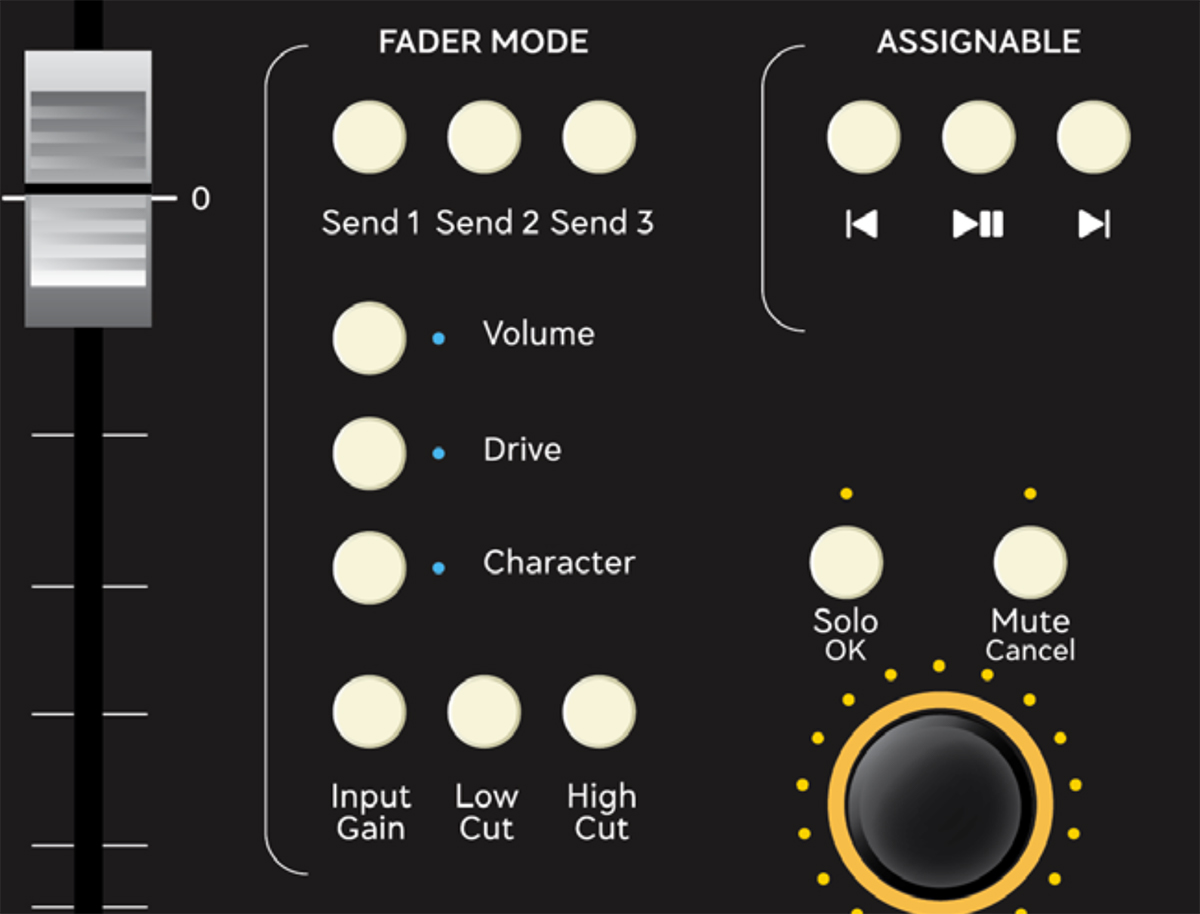
10 faders, 53 buttons, and 1 knob
Do you understand what every fader and button on the Console 1 Fader does? Maybe not at first, but let’s take a closer look. There is a logic behind it all.
Overall, the white text describes the basic function for each button. Solo, Mute, Display, Settings, and so on.
The yellow text describes what alternate functions that are enabled, when the Shift button is pressed and held. Phase, Bypass, Load Strip, Width, et cetera.
The ten unlabeled buttons at the lower end are Track Selectors. If you want to change, say, Pan on track 3, press the track 3 selector button and then turn the knob.
The faders
The faders are the main tools on Console 1 Fader. You can use them exactly as any other mixer, and their graphical positions represent the actual volume settings of the tracks.
They are also motorized, so when you use automation to add dynamic changes to your mix, the faders move accordingly.
The default state of the faders is to adjust volume of individual tracks. This is confirmed by the yellow LED next to the Volume label (on the right hand side).
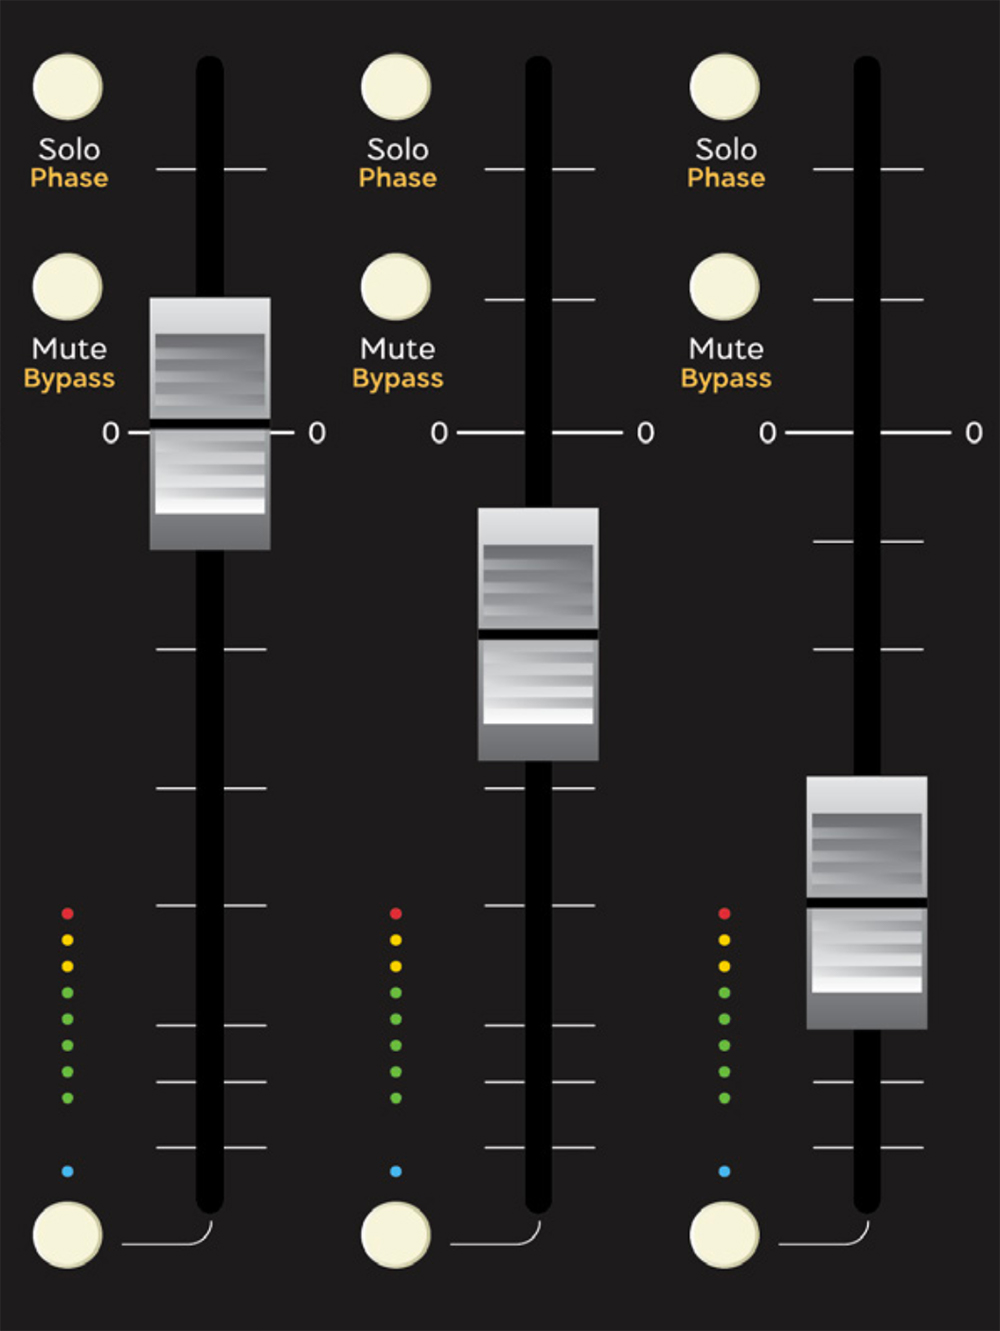
The Track Selector buttons
There are ten unlabeled buttons at the lower part of Console 1 Fader, one for each channel. They are Track Selectors, and their primary function is to select what mixer channel to work on. Notice how the LED next to these buttons change from yellow to white, when a channel is selected.
Yellow: Track mode
White: Selected track
Red: Drive mode
Purple: Character mode
Green: Send, Input Gain, Low Cut, and High Cut mode
If your DAW supports Track Colors, the LEDs will show the track color (or an approximation thereof) when in Track mode (Volume mode).

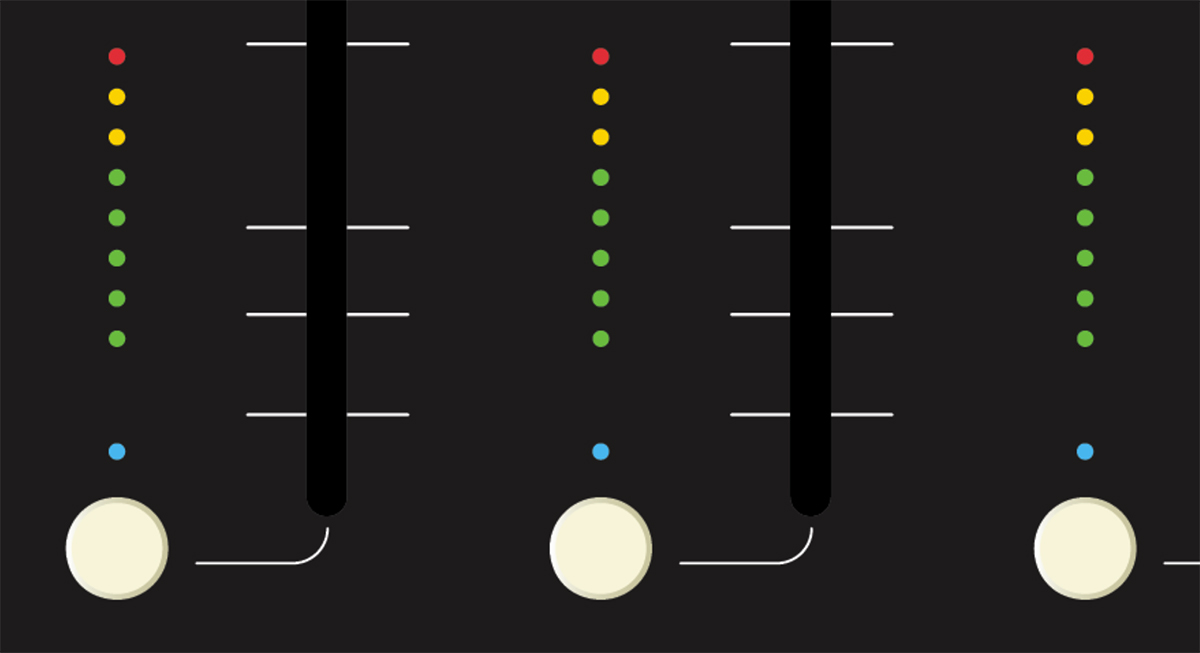
The volume LEDs
There is a discreet 8-segment LED meter next to each fader. When the top LED lights up, the level is around +6 dB, so you may want to back off a bit.
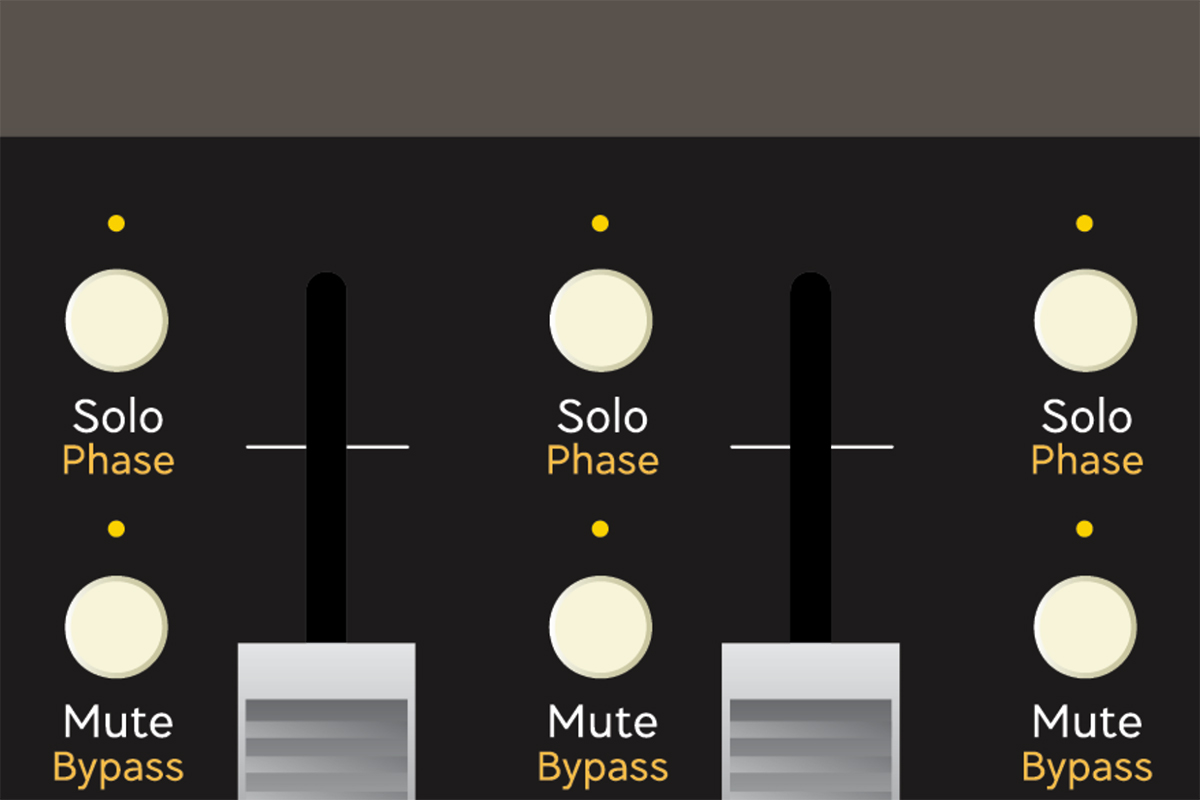
Mute/Bypass
Next up is a convenient Mute button. Press one or several of them to silent one or many mixer channels.
The Bypass function becomes active, if you hold the (Console 1 Fader) Shift button while pressing Mute/ Bypass. With Bypass engaged, all changes you’ve performed on that channel will be bypassed – sound will pass through this channel as if Console 1 Fader didn’t exist.
Solo/Phase
At the top of each Console 1 Fader channel is the Solo/Phase button. The Solo function is convenient, when you want to hear one or several tracks in isolation. Does the vocal track need more Low Cut? Is there too much Drive on the electric piano? Press Solo to find out!
By holding Console 1 Fader’s Shift button, you can turn the Phase of a channel by 180 degrees. This can be useful in a few particular cases, e.g. when miking up a large drum kit.
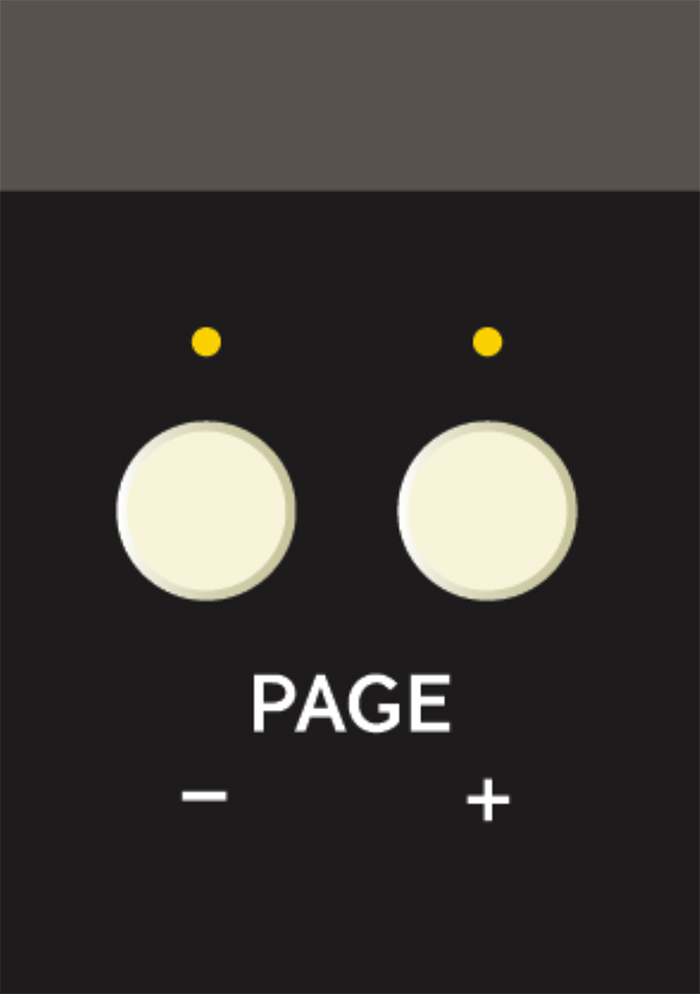
Page
Don’t let the physical ten fader-limitation of Console 1 Fader fool you! As with most digital mixing devices, there are a lot more channels available than meet the eye.
By pressing the Page + and Page – buttons, you can scroll through your mixing channels ten channels at a time. So when looking at channels 1–10, pressing + will take you to channels 11–20, and so on. Pressing – takes you back again.
If you are using both Console 1 and Console 1 Fader, the OSD can show 20 channels at once. The thin blue line at the bottom of the OSD informs you, which 10 channels are currently active on the Console 1 Fader console.
Display On/Auto
After Console 1 Fader has been instantiated on a track, press Display On to see the big On-Screen Display (OSD). This is where the action is! Press Display On again to make the OSD disappear.
Hold down Shift (on Console 1 Fader, not your computer keyboard) and press the Display On/Auto button. You have now activated Auto mode. This is a convenient function that makes the OSD pop up whenever you touch any the Console 1 Fader controls. After a few seconds of inactivity, the OSD disappears.
You can turn Auto mode off by pressing Shift + Display On/Auto again.
The time the OSD stays up after inactivity can be set in the Settings menu.
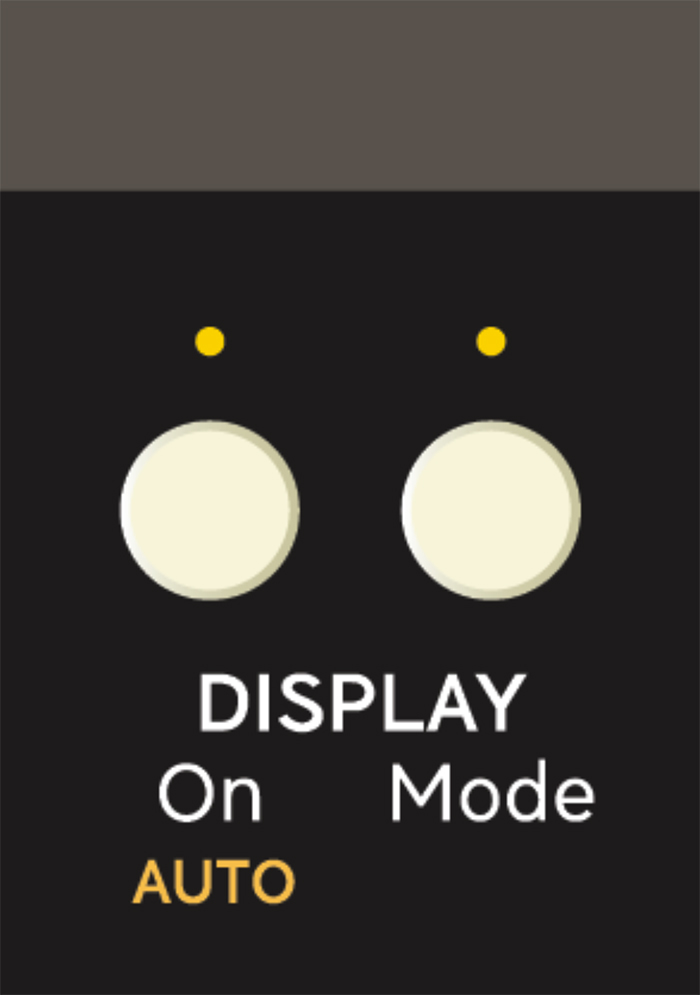
Display Mode
The OSD (On-Screen Display) can be shown in many different styles that may suit different project situations. When you press Display Mode repeatedly, you step through those modes.
If only Console 1 Fader is connected: The first OSD mode shows 10 channels and their settings. All editing you perform on Console 1 Fader is reflected here. Pressing Display Mode again takes you to the remaining two modes. They are small, economic meter bridges that save a lot of screen space.
If both Console 1 and Console 1 Fader are connected: Here, the display modes are a bit different. You are now greeted with an OSD showing 20 channels and their settings plus two Console 1-specific modes, and the aforementioned economy views.
The OSD is clever enough to remember its last position and size. If you move it to your liking, maybe even to a second screen, the OSD will appear with the same position and size next time you start Console 1 Fader. The independent position of the smaller modes of the OSD (containing only the meter bridge) will also be remembered.
Load Drive
Console 1 Fader comes with two Drive algorithms to suit various purposes and tastes. They are an amalgam of our favorite types of distortion. They are not based on a single piece of hardware, but have been put together as a best-of of distortions we have come across over the years.
Press Load Drive to select between them.
Discrete: This type excels at taming transients, but can sound rather harsh on vocals. It’s fast and does wonders on a drum bus.
Tube: This drive is softer and contains a lot of the warm even harmonics. Audio sounds fuller and fatter through it.
If you have installed other Softube plugins with drive functionality, such as Saturation Knob, Harmonics Analog Saturation Processor or Tape, they can also be loaded here.
By loading a new Drive, you get a new algorithm with different characteristics. Try out different Drive and Character settings on various tracks to see what suits your project best.
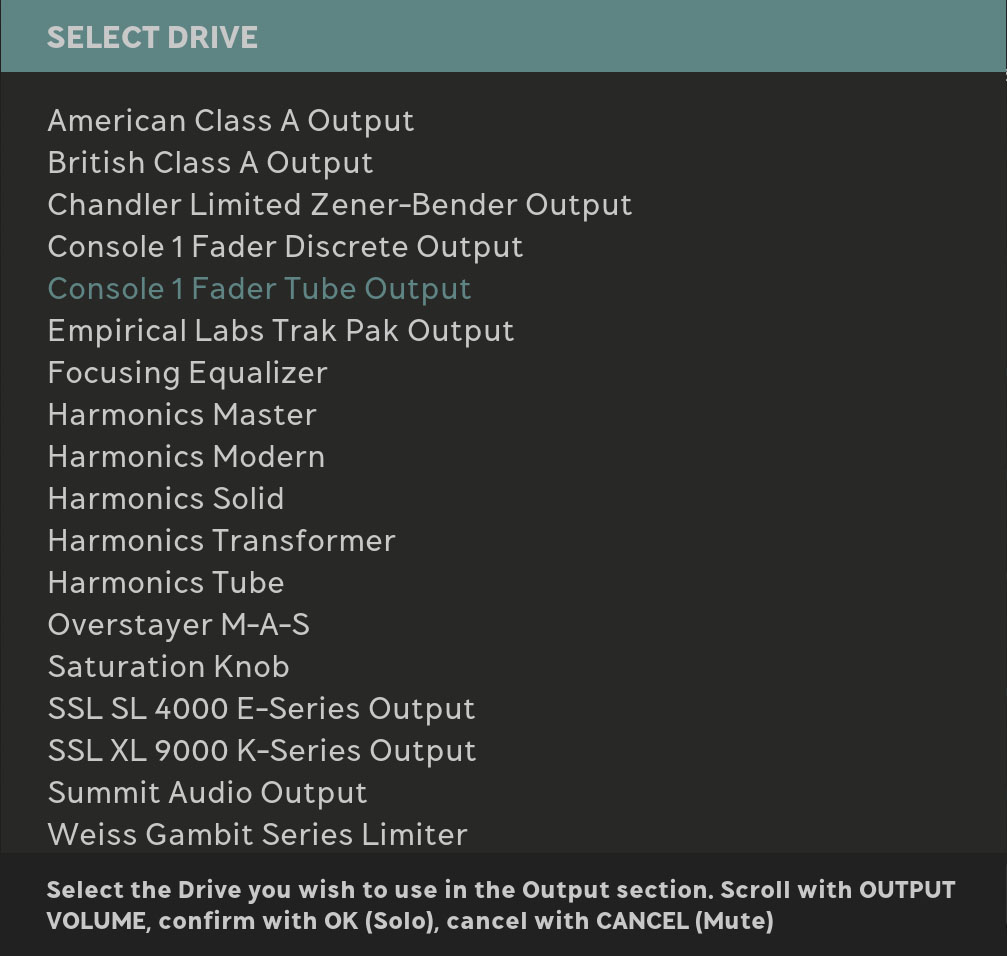
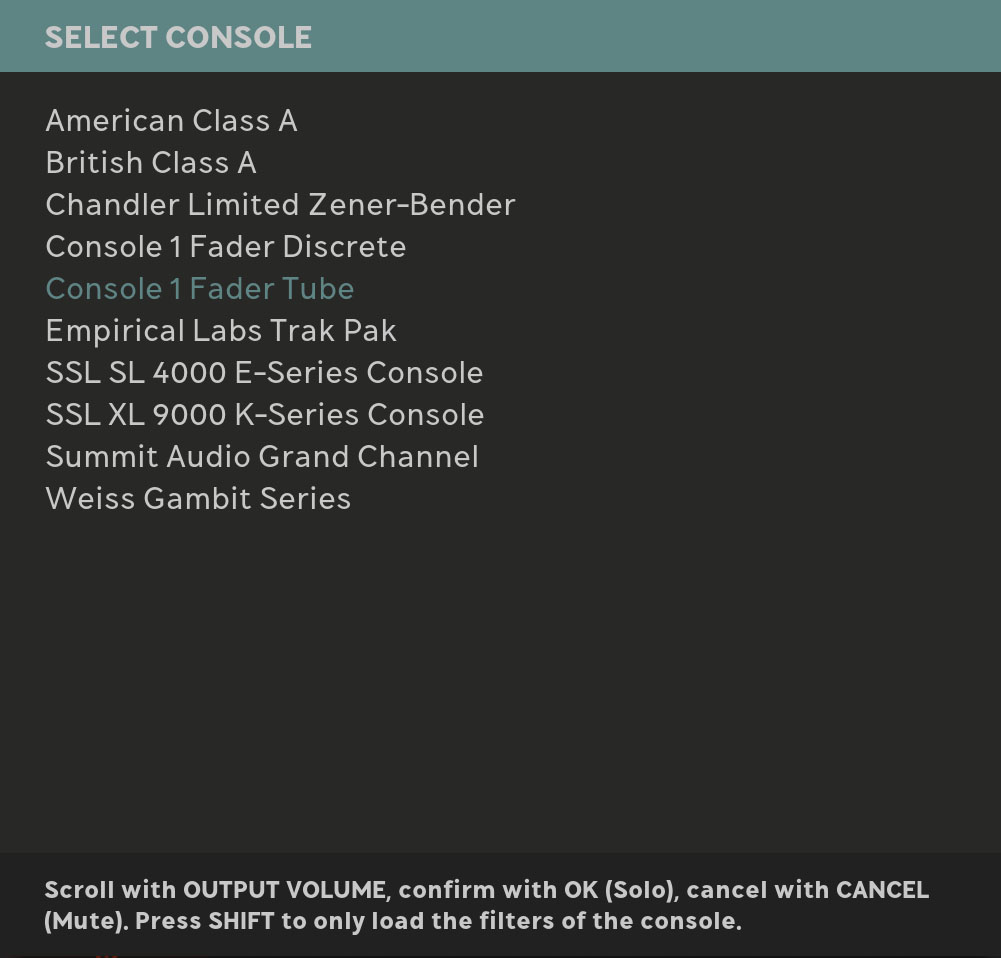
Load Strip
A channel strip is a Drive section with its own set of Low Cut and High Cut filters. Hold down Shift and press Load Strip to load alternate channel strips.
Console 1 Fader comes with two strips: Discrete and Tube, each with their own tonal drive characteristics (as described in the previous section).
Discrete has a very effective 12 dB/octave low cut filter and a 24 dB/octave high cut filter.
Tube has more natural sounding 6 dB/octave low and high cut filters.
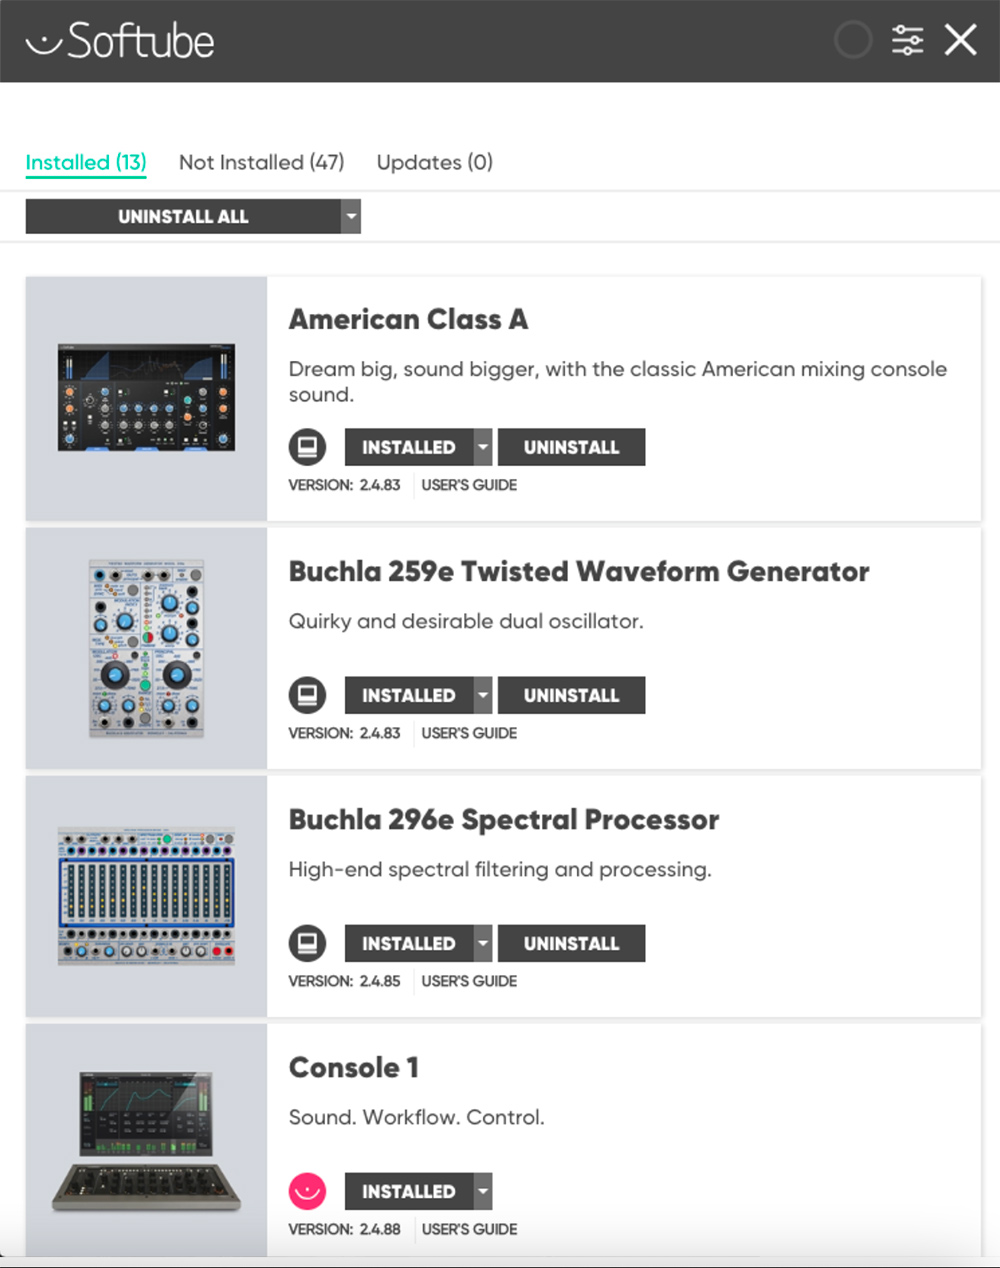
If you have installed additional Console 1 channel strips (like British Class A, American Class A, Summit Audio Grand Channel and others), they will also be seen when you press Load Strip.
If you hold Shift while pressing OK when loading a strip, only the input filters of that strip will be loaded!
Settings
You can fine tune Console 1 Fader to suit your needs perfectly. Pressing Settings gives you access to a menu of choices.
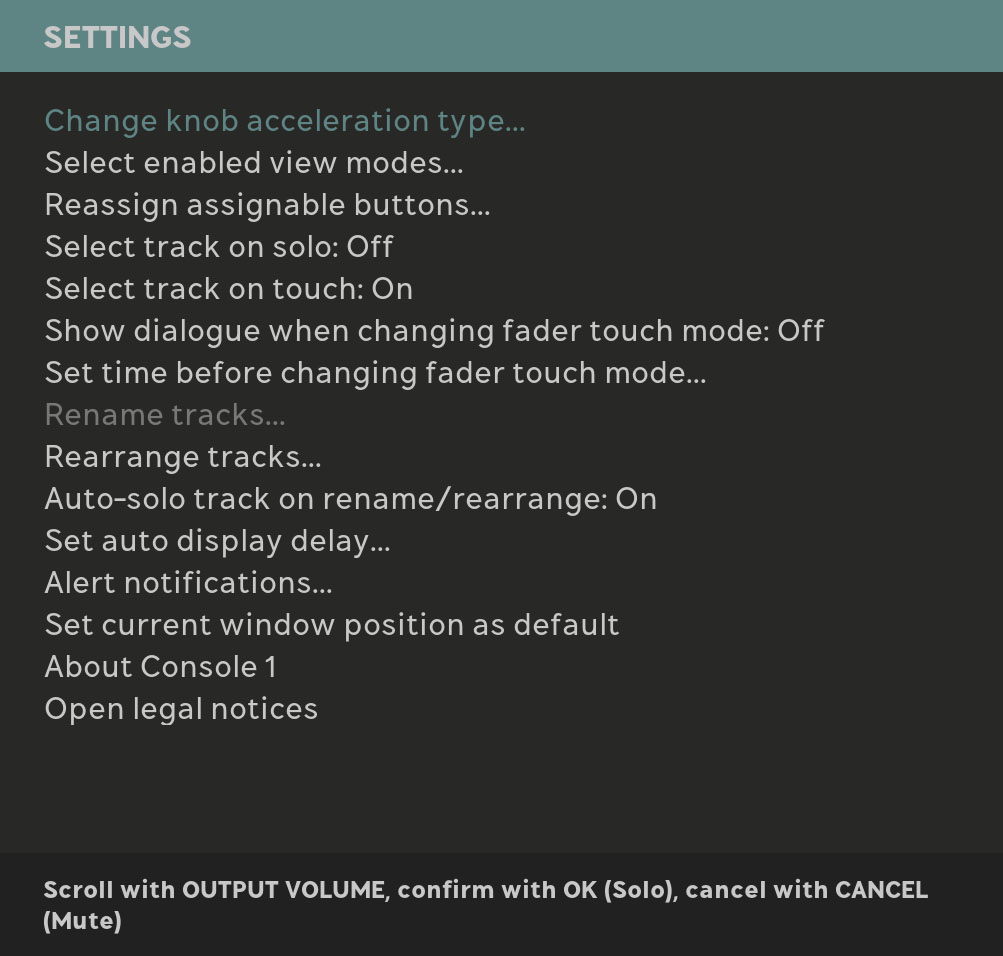
Rename Tracks: If your DAW doesn’t allow for automatic track naming, you can rename tracks here. This function can also be reached by clicking in the plugin window, where it says “click to set track name”.
Rearrange Tracks: If your DAW doesn’t allow for automatic track numbering, you can rearrange the order of your tracks here.
Auto solo track on rename/rearrange: Set this to ON if you want to solo the track that’s currently being renamed or moved. This is very useful if you insert Console 1 Fader on all tracks on an existing session and quickly want to name all tracks. Just hit play, start with track 1 and listen what’s on it, and proceed through all tracks the same way.
Change knob acceleration type: In this menu you can set how the knob on the Console 1 Fader hardware reacts to changes. In the linear modes, the knob always has the same speed, whereas in the accelerated modes a faster turn of the knob leads to faster changes.
Set auto display delay: Here you can adjust the time it takes for the OSD to disappear, when Auto Display mode is activated.
Select track on solo: Here you can decide, if you do or do not want to automatically select a track when you press Solo or Mute.
Select track on touch: It can often be convenient, to automatically select a track when you touch a fader. Select your desired setting here.
Select enabled view modes: You can restrict the number of available OSD Display Modes. If your workflow calls for fewer OSD views, please disable the ones you don’t need.
Rearrange Fader Units: If you use two or more Console 1 Fader units, it’s important to be able to number them in a logical order. To set the order, go to Settings -> Rearrange Faders and press the Track Selectors on the consoles in the order you want them to be rearranged. The track selectors will indicate which Console 1 Fader unit is which. Number 1 will have the first (leftmost) track lit, number 2 will have the first two tracks lit, and so on.
The order of the consoles is remembered in Console 1 Fader’s settings on your computer and will remain until you change it again. Please note, that the physical order of the USB connectors in no way interferes with the settings you make on this page.
Alert notifications: This menu lets you choose if you want to be alerted about compatibility changes between your DAW and Console 1 Fader. If you always work in the same DAW, you may find it more relaxing to turn these notifications off.
Reassign Assignable Buttons: The three media control buttons labeled Assignable can be allocated to do what you specify. They are labeled Go to start, Play/Pause, and Go to end, but you can choose any remote command you find useful.
Here’s how you do that. Press Settings, scroll down to Define new assignment and press Ok. Scroll to the desired button and press Ok. A window pops up and it asks you to enter a key command. Type that command and click on Ok. Done!
Please note, that the DAW must be in focus (last app used) when entering shortcuts.
Select Auto Detect DAW to let Console 1 fader automatically find the right commands for your DAW.
If you hit Settings + Shift, you will enter the glorious Las Vegas mode. It’s a special test-mode, where faders and LEDs are dancing around. This is a service function only. You exit Las Vegas mode by pressing Solo/OK or Mute/Cancel.
About Console 1: This menu shows the current version of the Console 1 Fader software and firmware and other bits of information.
Legal notices: Selecting this entry will open a text window with legal notices.
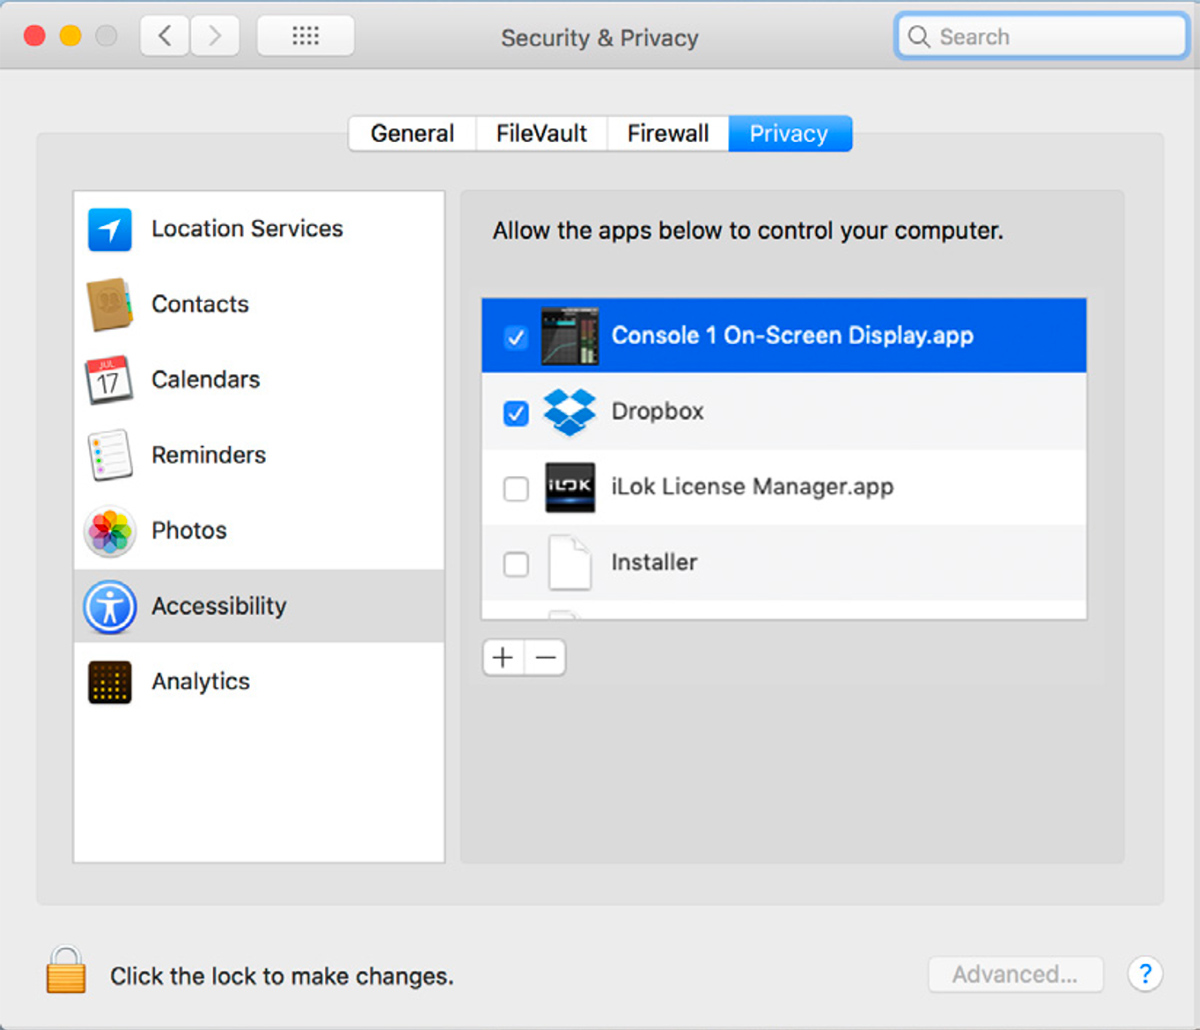
Special info for Mac OS users
If the OSD won’t allow you to assign the Assignable buttons to DAW functions, you may have to tweak your System Preferences. Click on Security & Privacy and choose Privacy. In the left column, go to Accessibility and tick the box next to the Console 1 On-Screen Display.app entry on the right side. You may have to press the small unlock icon first to accomplish this.
By ticking this box, you’re allowing Console 1 Fader to control your computer.
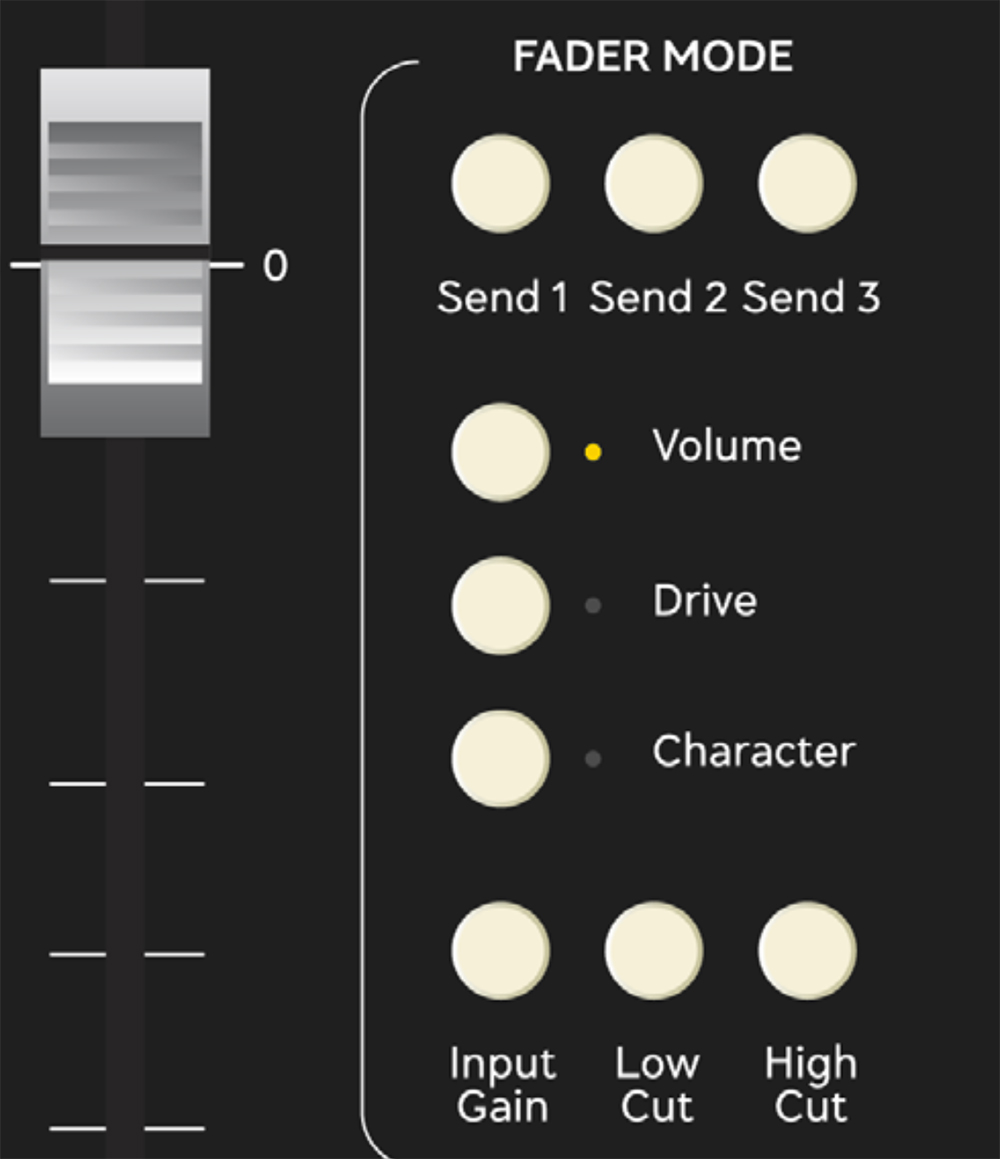
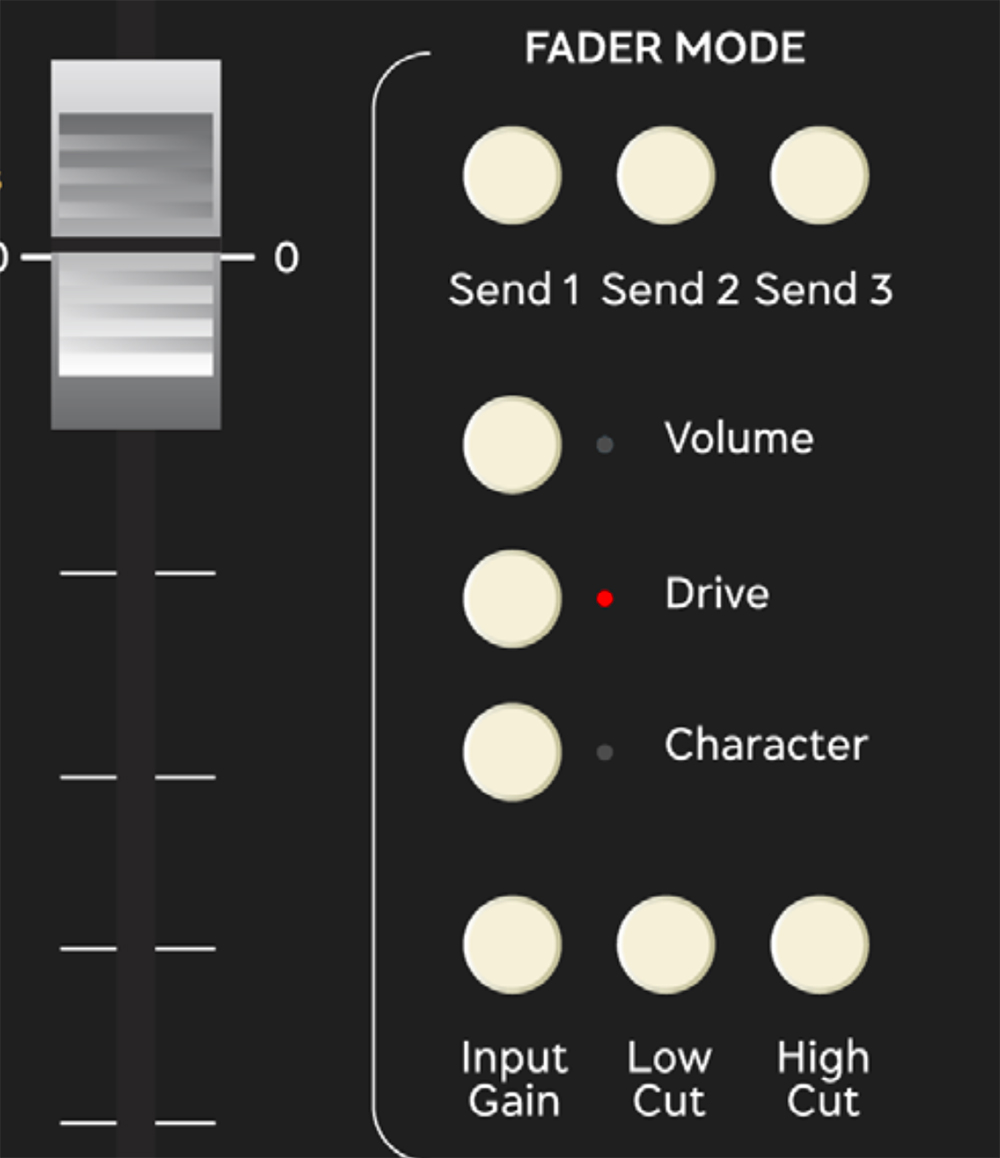
Fader Mode: Persistent versus Temporary
If you want a temporary fader mode to be persistent, hold Shift while entering that mode. Shift + High Cut, will make High Cut persistant until you change mode again.
As you’ve already figured out, the ten faders on Console 1 Fader can be used in many different ways. The 9 buttons below the text Fader Mode define what mode is being used at any given moment.
Persistent buttons: The Volume, Drive, and Character buttons are persistent, i.e. they keep their status after you’ve released them. One example: Press Character once, and the faders will show the amount of character until you press another button in this group.
Temporary buttons: The Send 1–3 plus Input Gain, High Cut, and Low Cut buttons are temporary. The faders show their respective status only while these buttons are being pressed. Shift-click on these to make them persistant.
Sends 1–3
When you’re using Console 1 Fader with DAW Control, not only are track volume, pan, mute, and solo synced, but you can also control the auxiliary sends.
The three first aux sends in your DAW can be remotely controlled from Console 1 Fader by holding down a Send button and adjusting the send level with the corresponding fader.
Volume
When the LED next to Volume is lit, the faders of Console 1 Fader are functioning as volume faders of a physical mixing desk. This is the default mode when you instantiate Console 1 Fader on a channel.
Pressing the Page buttons takes you to channels 11–20, 21–30, and so on.
Drive
Following the proud tradition of Softube’s tube emulation technology, Console 1 Fader comes with a dedicated Drive section. Now you can add unique harmonics, distortion, and non-linearities to any channel, or group of channels, just like running an analog mixing desk into overdrive.
With the Drive button pressed, you use the faders to set the amount of overdrive you wish to add to any channel.
Character
Character is used to shape the sound of the distortion.
If you turn up Character to a positive value, it will enhance the mid-range distortion, which can make the sound “pop out” of the mix. On vocals, it will add air and pleasant harmonics.
If you turn down Character below its mid position, it will preserve the mid-range content, and focus the distortion to the low frequencies and low mids. This setting is useful if you want to use distortion to “glue” a mix together.
Please note, that Character only alters the sound if Drive is turned up.
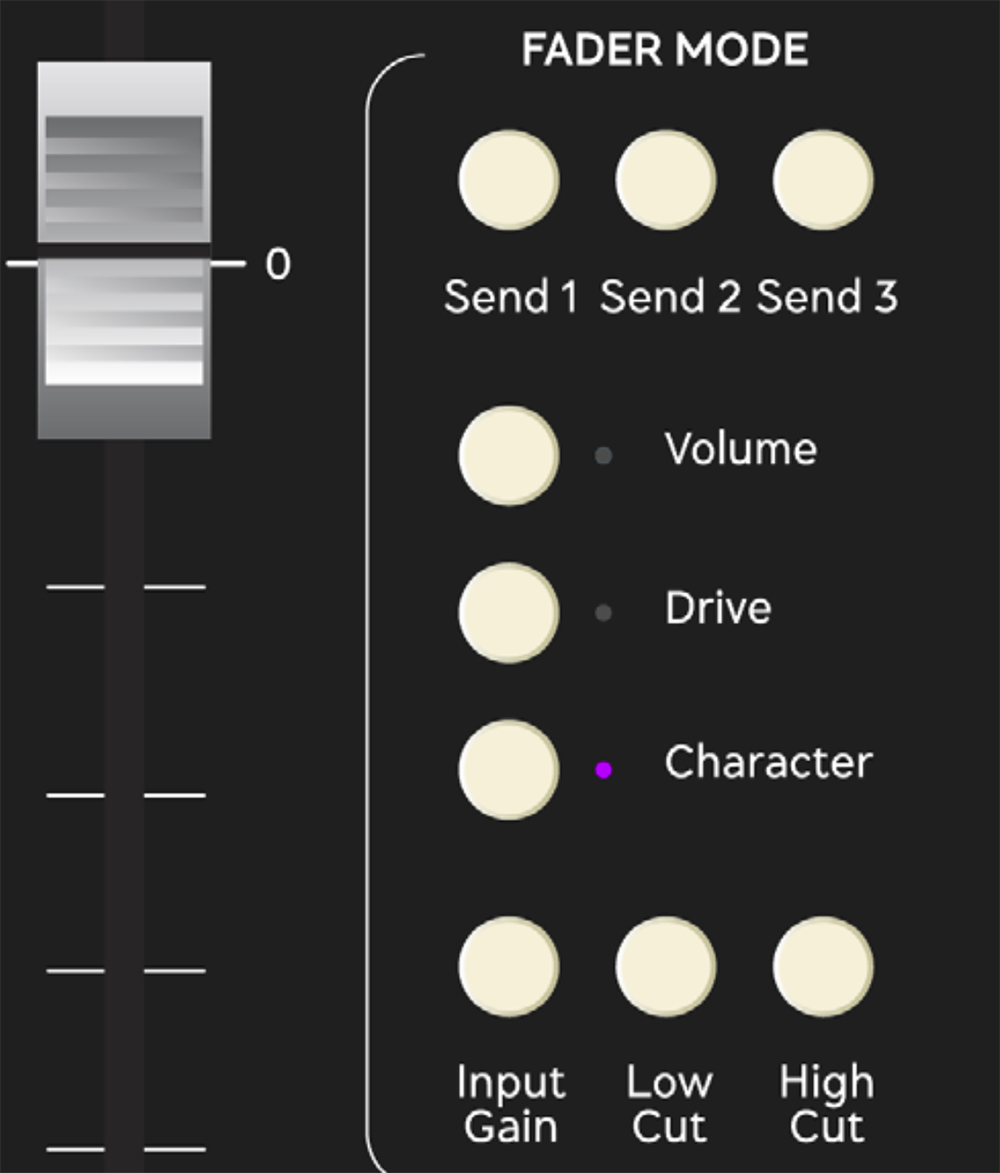
Input Gain
When you hold the Input Gain button down, the faders control input gain for each channel.
Adjusting the Input Gain can be useful, when tracks in your DAW have been recorded at very different levels. Boosting or cutting at the input stage will adjust those tracks to more practical levels.
There is also a correlation between Input Gain and Drive. The hotter the input signal, the more pronounced the drive will be.
Low Cut
The Low Cut knob is a lifesaver. It’s the perfect clean-up tool for any mix, as it removes unwanted low frequencies. Mixing engineers often use this filter on every track except for bass instruments, kick drum, and thunderstorm effects.
The Low Cut frequency can be adjusted from 0 Hz and upwards, and the range varies between different Drives and Strips. This filter is often referred to as HPF (High Pass Filter).
High Cut
Next is the High Cut filter. As the name implies, it removes audio below its cutoff frequency. You can use this filter to effectively remove hiss or unwanted, sharp frequencies from any audio material. It can reduce high frequencies from above 20 kHz and downwards (range depending on what Drive or Strip is selected).
The High Cut filter is often called LPF (Low Pass Filter).

Layer Mode is now Favorites Mode (and Compact Mode!)
The Layer Mode functionality has been removed and replaced with an improved “Favorites” functionality, which is a faster way to access your favorite tracks. The following paragraphs describe how Favorites work.
- Assign a track as a favorite by selecting the track and press “Assign track(s) to layer”. The track will get a little star next to its number in the meter bridge in the On-Screen Display.
- Enter “Favorites Mode” by pressing “Layer Mode”. Only tracks marked as a favorite will be seen.
Favorited tracks will be saved in your session.
Compact Mode provides another way to organize your session. If you don’t use Console 1 on all tracks, you notice that you get “gaps”. Enter Compact Mode to remove all those gaps. This is very handy if you have hundreds of tracks, but only using Console 1 on the most important tracks and busses.
- Press Shift + Layer Mode to enter Compact Mode.
- Console 1 will be in Compact Mode until you close the session or exit it manually.
Both Favorite and Compact Mode are indicated by a small text in the lower left corner.
Assignable controls 1–3
Console 1 Fader can be used to remotely control selected functions of your DAW, and these buttons act as keyboard shortcuts. The default shortcuts are labeled Rewind, Play/Pause, and Forward. We decided to assign previous and next marker to Rewind and Forward buttons when possible, but you are free to choose any function in your DAW as long as it has a keyboard shortcut attached to it. Please refer to your host's documentation for a complete list of keyboard shortcuts.
By pressing Settings and scrolling down to Reassignable Assignable Buttons, you are given a few options.
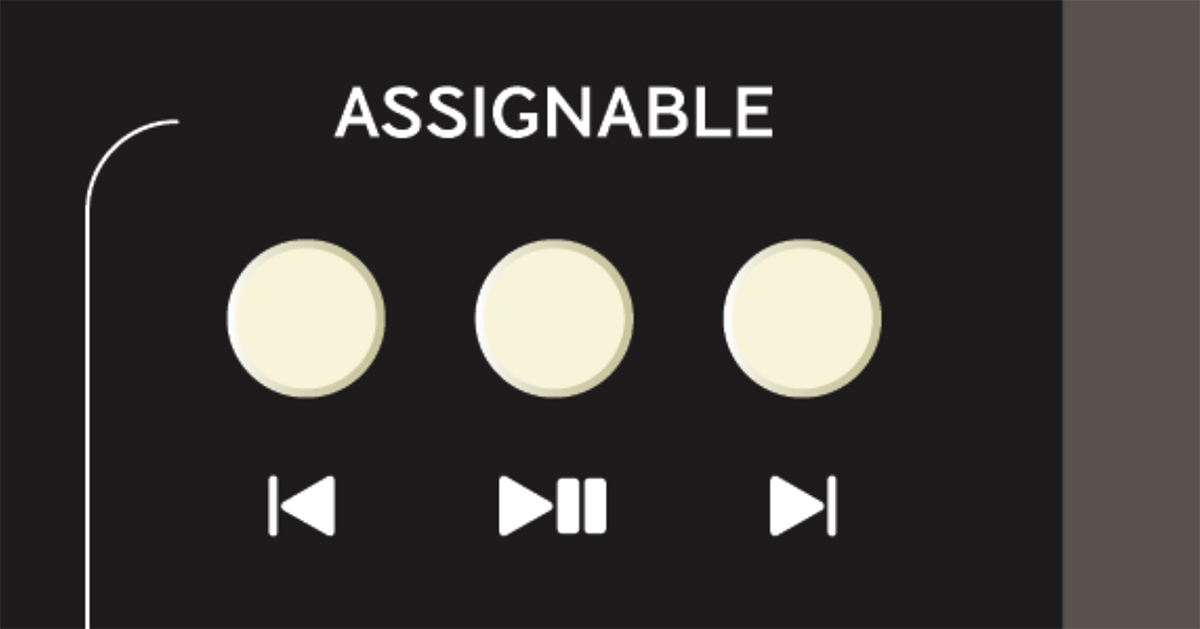
Auto Detect DAW: Console 1 Fader detects your DAW and its transport buttons settings.
Buttons 1–3: Here you can specify a keyboard shortcut that performs the desired function. This could be anything, be creative!
Please note, that when you assign shortcuts, your DAW must be in focus (last app used).
Special info for Mac OS users
If the OSD won’t allow you to assign these buttons to DAW functions, you may have to tweak your System Preferences. Click on Security & Privacy and choose Privacy. In the left column, go to Accessibility and tick the box next to the Console 1 On-Screen Display.app entry on the right side. You may have to press the small unlock icon first to accomplish this.
By ticking this box, you’re allowing Console 1 Fader to control your computer.
Solo/OK
Any channel, or group of channels, can be soloed. This is super useful when tweaking individual tracks and finetuning the mix.
When you have soloed a number of tracks, you may want to compare the sound of those tracks with the entire mix. Hold Shift and press Solo/OK to un-solo all tracks. The same operation takes you back to solo mode again.
The Solo/OK button also performs various tasks when Console 1 Fader displays a menu with selections, e.g. Load Drive, and Settings.
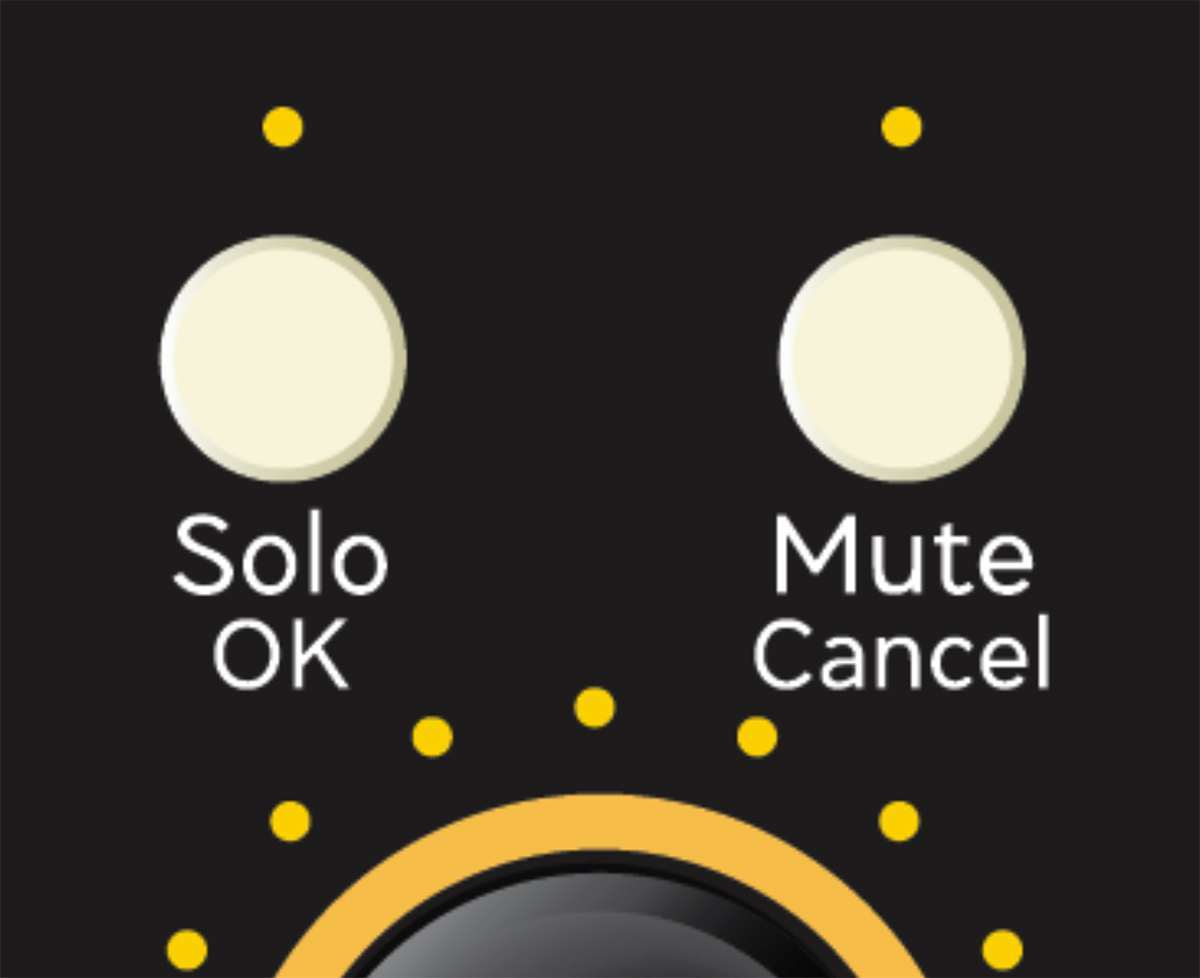
Mute/Cancel
Any channel, or group of channels, can be muted. This is an essential part of any audio production and mixing job.
When you have muted a number of tracks, you can compare that sound with the entire mix. Hold Shift and press Mute/ Cancel to un-mute all tracks. Hold Shift and press Mute/Cancel to go back to your previous mute mode.
Mute/Cancel also performs various tasks when Console 1 Fader displays a menu with selections, e.g. Load Drive, and Settings.
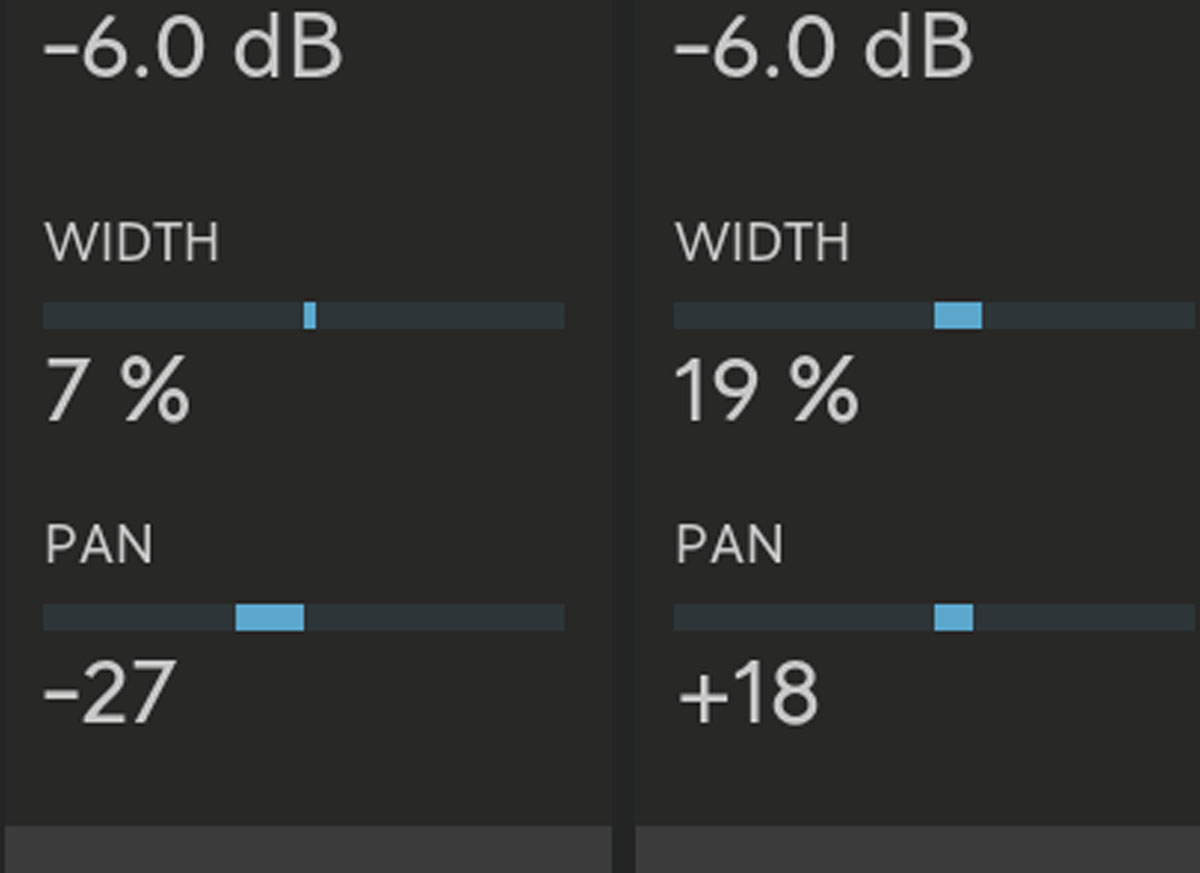
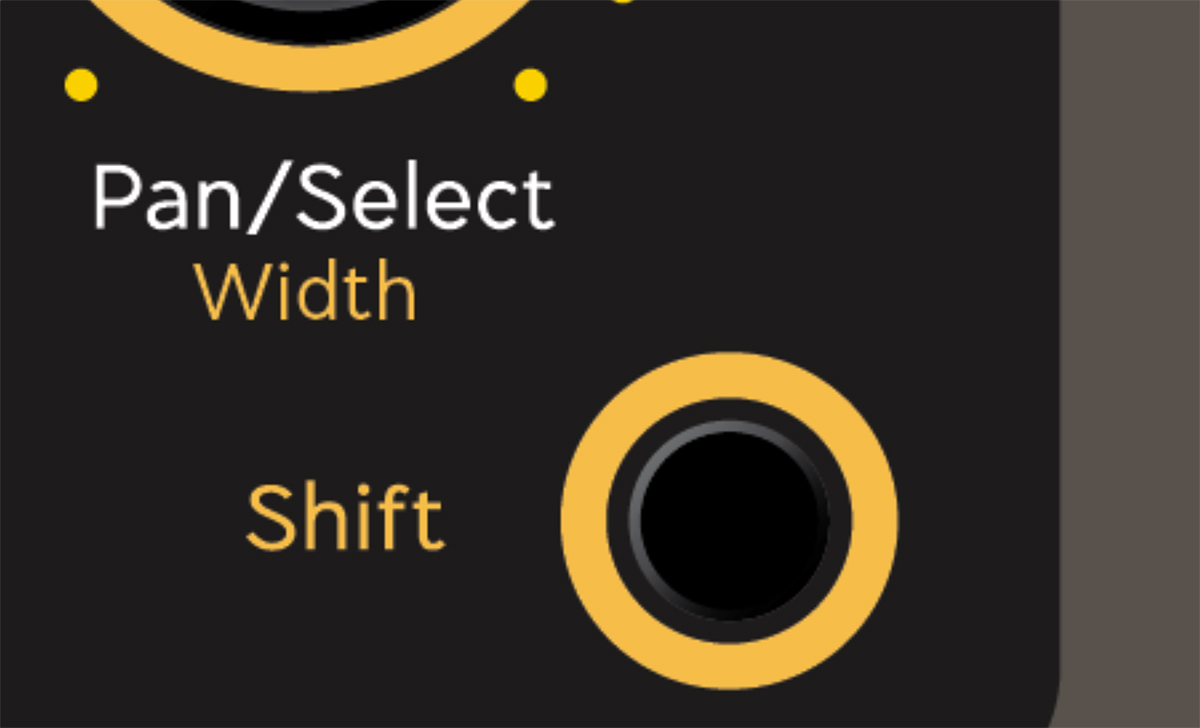
Pan/Select
This knob serves several purposes. In track mode, you control the pan (or balance, for stereo tracks) of the selected channel.
Whenever a menu is active, Pan/Select is used to scroll through the menu options. You confirm or abort with the OK or Cancel buttons.
Width
When you hold down Shift, the Pan/Select knob controls the Width of the stereo image. This function only works on an audio track with stereo information.
Width can be used to gradually narrow a stereo image down to mono. When turning the knob from its mid position towards the left, all frequencies below the frequency shown in the OSD are moved towards the center.
An example: With Width set to 150 Hertz, all audio below 150 Hz is in mono, the rest remains in stereo. With the knob fully to the left, the entire signal is in mono.
When used on a bass sound with a wide stereo image, narrowing everything below, say, 200 Hertz, down to mono, may give a more focused bass. Or you may want to narrow down a wide grand piano or a Leslie cabinet, to make the instrument sit better in the mix.
Width can also be used to widen a stereo sound. Turning the knob from its mid position towards the right, emphasizes the audio information on the left and right sides. This makes the stereo image wider.
Increasing Width can be useful with an instrument, say a piano or an acoustic guitar, recorded in stereo. You can use Width to clear up the center of a mix, making room for a vocalist or a solo instrument.
The technology used for widening the stereo image is based upon the Mid/side technique. More about M/S in the next section.
Technically, increasing the Width value is like increasing the gain of the side channels in an M/S setup. Only, here you can use any stereo audio file.
When Console 1 Fader is used on a mono track, or playing audio with mono content, the Width control does nothing from 7 o’clock to 12 and gradually reduces volume between 12 and 5.
Shift
Many controls in the Console 1 Fader panel have an optional function printed in yellow. These functions can be reached by pressing the Shift button.
The Shift button is also essential, when you want to quickly get back to the unprocessed sound. In a situation where you’ve applied some sound altering functions in Console 1 Fader (Low Cut, Drive, Width, etc), holding Shift while pressing Bypass lets you compare the tweaked sound with the unprocessed sound.
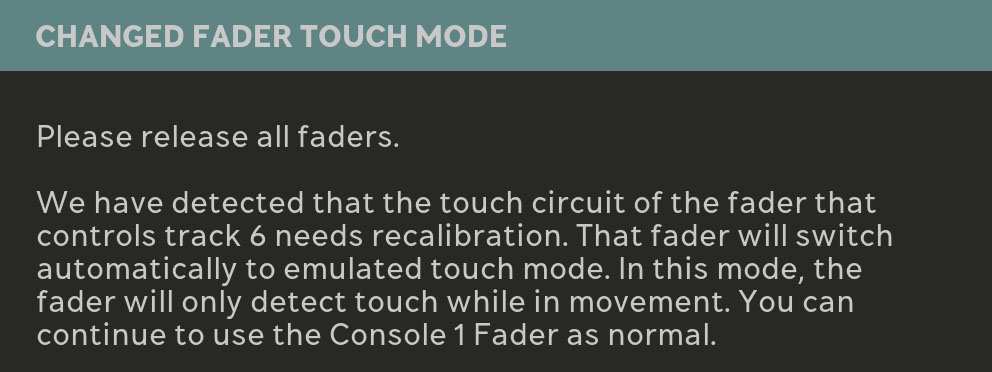
Emulated Fader Touch Mode
If Console 1 Fader detects that one of its faders isn’t registering touch properly, it will go into an “emulated touch” mode until the touch function is working again. This is indicated in the meter bridge by the fader symbol . This will allow you to continue to mix without having to power cycle the Console 1 Fader to force a recalibration of the touch circuit.
When a fader is in “emulated touch” mode it will send touch to the DAW whenever a fader is being moved, instead of whenever it gets touched. If you are writing touch automation and need proper touch you should unplug/ plug the USB cable of the unit to force a recalibration.
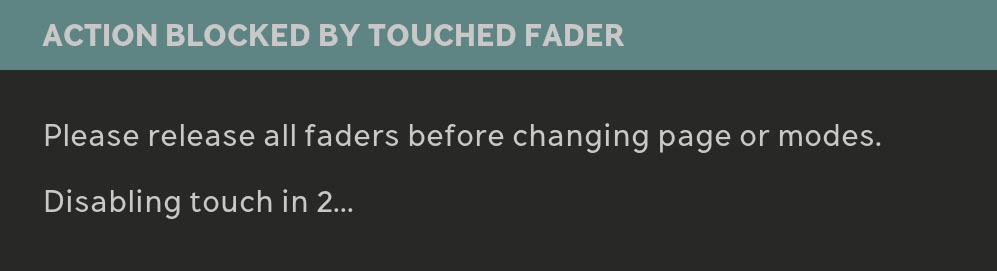
A fader is being touched while trying to change page, fader mode, etc. If you are touching the fader, please release it, otherwise we will enter “emulated touch” mode.
The fader will enter “emulated touch” mode until it recovers.

Emulated touch is indicated in the meter bridge by the fader icon.
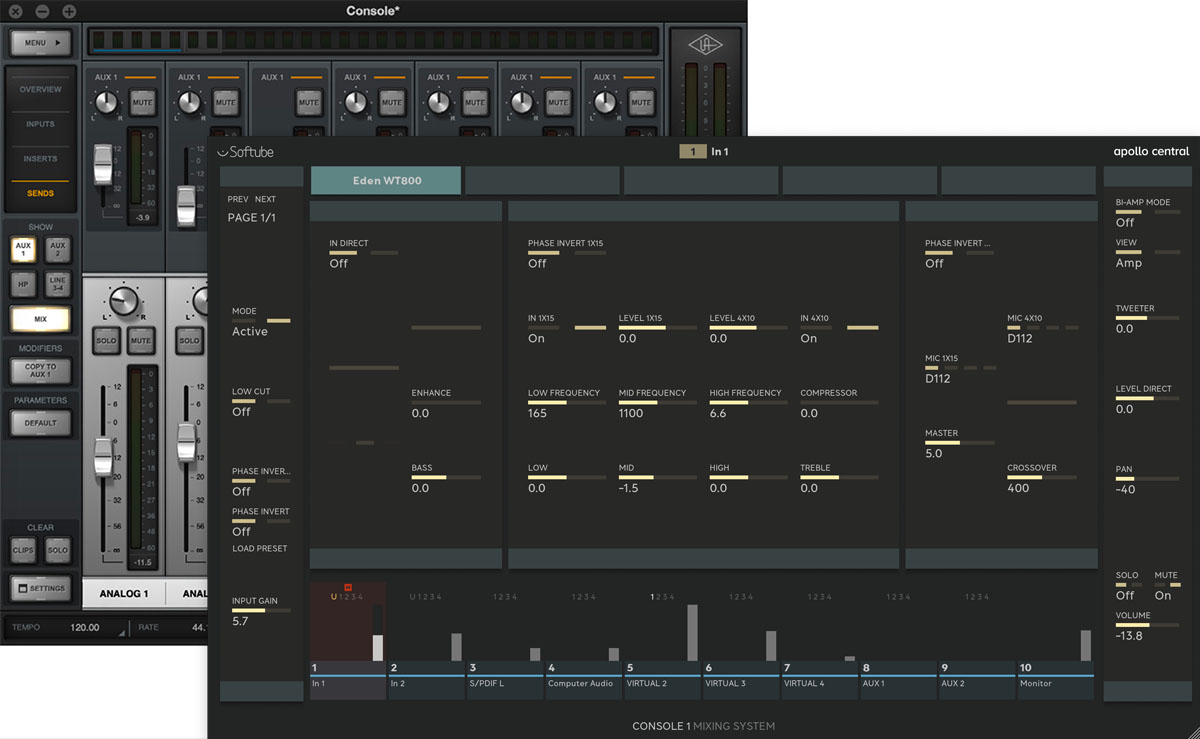
Using Console 1 Fader with Apollo Central
If you are an Apollo Central user, you can control your UAD channels and plugins in the Apollo Console from the Console 1 Fader hardware. To switch to the Apollo Central mode, open the OSD and press Shift + Display Mode. This mode is indicated by the "Apollo Central" logo in the top right corner. You exit Apollo Central mode by pressing Shift + Display Mode again.
Apollo Central mode is especially useful, when using a UAD Apollo unit for tracking. Console 1 Fader becomes your hardware control of the following functions in the UAD software console.
Fader, Pan, Solo, and Mute.
Phase Reversal, Low Cut, Aux Sends, and Input Gain.
You can also recall presets remotely from Console 1 Fader by pressing Load Strip on the OSD.
Upon entering and leaving Apollo Central mode, the faders will run a calibration routine by moving quickly up and down. This is expected behavior.
Detailed info about working with Apollo Central can be found in the Console 1 manual.
Using Console 1 Fader without the hardware
There are times, like when you’re on a tour, where you want to make a few quick adjustments to your mix, but your Console 1 Fader hardware is out of reach. If you don’t have Console 1 Fader nearby, you can still edit your mix.
The small interface, that pops up after you’ve instantiated Console 1 Fader on a track, can be used for some basic editing. Most functions can be accessed here, excluding Sends 1–3, Load Drive, and Settings.
Please note, that the Volume slider in the small GUI controls Console 1 Fader’s internal volume, not the fader volume of the DAW.
Cool ways to use Console 1 Fader
As a controller of everything (studio)
Why not go all in and let Console 1 Fader control every aspect of your project? Insert the plugin on all audio tracks, to master the channel mix. Insert it on all effects sends, to allow for dynamic changes that turns up the reverb only on selected phrases. Insert it on the master bus, to create that entirely smooth fade (Solo Safe may be needed here to allow for undisturbed workflow).
As a controller of important things (studio)
Maybe your project is rather simple. The rhythm section itself is in balance and the guitars play well together, but you want to try overall mix ideas. Marking the most important tracks as favorites can make life so much easier, when you want to make drastic, more radical changes.
As a helpful reorganizer (studio)
A DAW can house hundreds of tracks.With Favorites Mode you can use Console 1 Fader to collect tracks 8–13 and 43–45 on the same Console 1 Fader page, making it it possible to mix them more effectively, when they’re sitting next to each other.
As a backing track mixer (live)
Many live performers use backing tracks organized as stems (bass on one stereo track, drums on another, rhythm guitars on the third, and so on). You may want to be able to fine-tune the mix and/or mute tracks quickly and safely.
Using Console 1 Fader to easily access the stems is a safe and intuitive method, much more intuitive than using a mouse or a touchpad.
As a headphone mixer for a group (studio)
If you’re recording in a rehearsal room or a studio, the musicians may want to use individual headphone mixes. Placing Console 1 Fader in the recording area, gives the performers direct access to aux sends 1, 2, and 3.
This is an elegant way to let the engineer focus on other things, while the musicians can fine-tune their headphone mixes themselves.
Please note! This only works when Console 1 Fader is in DAW Control mode.
As a real-time controller for ambient music (live or studio)
As a musician, you could create a number of sonic landscapes (tonal, rhythmic, sound effects etc.) on several, long stereo tracks. As a performer, you could create music in real-time by playing those tracks and pushing faders and fiddling with the Low/High Cut and Pan controls.
A laptop and Console 1 Fader would be your ideal partners for this adventure. Just imagine!
As a remote control for the producer (studio)
Some producers take a very active part in the production process. You may be working on a project, and the person next to you (be it a co-musician, producer, or other collaborator) wants to suggest mixing changes from time to time.
It could be a great idea to give that person the Console 1 Fader to play with. That way, both of you would have access to the transport controls, volumes, mute and solo, etc. You would not have to fight about who owns the computer keyboard or mouse.
As a simple remote tool
As mentioned before, you can assign anything in your DAW that has a keyboard command to the 3 Assignable buttons in Console 1 Fader. Think about it!
When you’re recording MIDI parts, various degrees of quantizing could be assigned to those buttons.
Or, during a vocal session, you may want to assign those buttons to “go to locator 1”, “rec/pause”, and “select next track” respectively.
When mixing, maybe you find yourself constantly going back to specific points in a song. You could position locators at those points and assign the Console 1 Fader buttons to “go to Loc 1”,” go to Loc 2”, and “go to Loc 3”.
To speed up your workflow and make navigation in a project easier, you could assign the Assignable buttons to zoom in and zoom out. Or you could choose zoom modes 1, 2, and 3.
Or why not use two Assignable buttons to go to previous or next locator …
As a simpler mixer
During a mixing session, you may sooner or later find yourself facing some real issues – a few tracks that need special attention. Typically, those tracks are seldom adjacent to each other, but more likely spread out on tracks 3, 12, and 41.
Favorites Mode can be a real lifesaver, when you need to focus on a handful of tracks and manually balance them.
As a bass cleaner
Cool, fat synth basses can sound wonderful on their own, but you may find it difficult to mix such a sound. Many producers prefer using a single-oscillator bass sound, due to its simpler, phase coherent, and solid sound/waveform.
If you are using a fat, wide bass sound, and would like to keep it that way, you can still clean up the low end of your bass track with the Width control. Turning it anti-clockwise will narrow everything below a given frequency to mono.
Tidy up the lows, let the highs sparkle.
As a practical focusing tool
Here’s a typical situation: Lead vocals are on track 7 and the lead guitar on track 23. You are trying to automate their respective volumes in order to make them blend perfectly, but their faders are too far apart. You can’t reach them both at the same time.
Mark those two as favorite tracks and enter Favorite Mode. It’s much easier to ride those faders, now that they are sitting next to each other.
The On-Screen Display (OSD) won’t appear when I press Display On.
You may have to start the Console 1 On-Screen Display app manually.
The On-Screen Display has a big logo over it and won’t show the controls.
You may have to press a couple of Track Selector buttons to make the logo disappear.
Installation
Go to www.softube.com/login and log in, or create a Softube account if you don’t already have one.
When you’re logged in at softube.com, go to the My Account page and My Products. Click on Register License and enter the activation code found on the card included in the box (format: XXXX-XXXX-XXXXXXXX).
There are currently two ways to install and activate Softube plugins.
- Use Softube Central
The Softube Central app can be downloaded here: https://www.softube.com/my-account#/my-products (you must be logged in). In Softube Central, you sometimes need to go to the Settings page (press the fader symbol in the upper right corner) and press Restart (if backend status is disconnected). And sometimes Softube Central requires you to log out, close the app, wait for 30 seconds, then re-start it, log in, and wait a little while. Be patient! - Use direct installers and activate in iLok License Manager
You can find Softube’s direct installers for Mac and Windows here: https://www.softube.com/myaccount#/ my-products (you must be logged in). After installation, use iLok License Manager to activate the plugins (right-click or CMD+click on the plugin name).
You may notice that Console 1 Fader performs a little fader exercise when the Console 1 On Screen Display program is started. This is a calibration routine and nothing to worry about. Just make sure to keep pens and coins away from the fader area.
Firmware upgrades
Softube Central takes care of installation and updating of Softube software. We have made life simple for you, by incorporating firmware upgrades too in Softube Central. So as long as you update your Console 1 Fader software, it’s hardware will be upgraded too.
Support
Don’t get stuck! Softube’s super friendly (their own words) Support Team offers help and solutions.
Should the need arise, go to https://www.softube.com/ support. There you will also find an extensive FAQ.

Block diagram
Here’s a schematic that outlines the internal paths in Console 1 Fader.
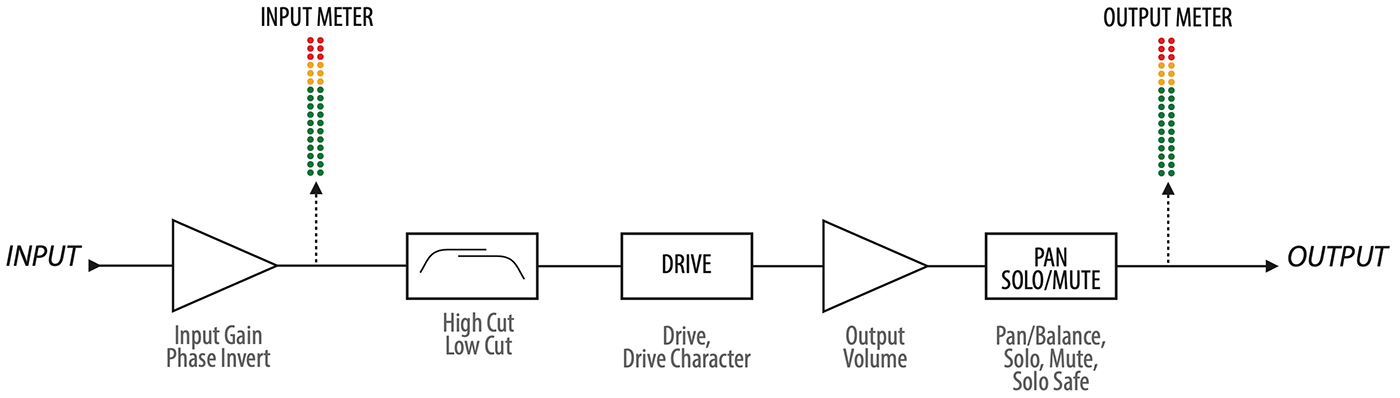
Click here to view the full-sized image in a new tab
Hardware specifications
Console 1 Fader has the following specifications.
Connectors: USB type B, power supply input
Power Supply: Replace with 8.0 Volt, 3 Ampere, center positive polarity
Dimensions: 426 x 187 x 42 mm (W x D x H)
Weight: 2.2 kg excl power supply
Included items: Activation Code, USB cable, power supply, quick start guide
Niklas Odelholm – initial concept, product owner, coding.
Kristofer Ulfves – test lead, user manual feedback.
Erik Sight – lead programmer.
Filip Thunström – programming.
Tord Jansson – GUI engine customization.
Arvid Rosén – hardware lead, firmware.
Anton Eriksson – calibration routine.
Maxus Widarsson – QA lead
Johan Bremin – deep testing, qualification.
Emanuel Enbäre – qualification.
Sven Bornemark – user manual and testing.